Тег html выпадающий список
Содержание:
- Стандартный select
- Создание пользовательского меню выбора
- Основные стили
- jquery.sb.js Selectbox Replacement
- The CSS class Selector
- jQuery
- CSS Advanced
- CSS Properties
- Быстрый старт
- CSS Reference
- CSS Properties
- HTML Справочник
- HTML Теги
- Еще примеры
- Часто задаваемые вопросы
- HTML Теги
- Пример получения значения в скрипте PHP
- CSS Properties
- Pseudo-classes
- JavaScript
- Examples
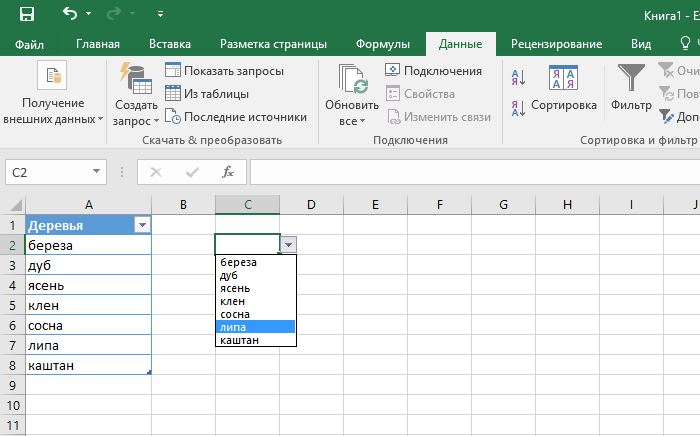
Стандартный select
Достоинства:
- работает на всех устройствах, в том числе на мобильных телефонах
- автоматически подстраивает ширину
- без проблем контролируется с помощью jQuery
- открывается всегда на видимую часть страницы (так называемое «умное позиционирование»)
- сам определяет оптимальную высоту для выпадающего списка
- позволяет группировать опции
- позволяет выделять сразу несколько пунктов (если, конечно, прописать необходимые атрибуты)
- реагирует на переход Tab’ом
- имеет подбор по первой букве
- поддерживает скролл колёсиком мышки
Недостатки:
- выглядят во всех браузерах по разному
- не имеет возможности быть нормально стилизованным
Создание пользовательского меню выбора
Шаг 1) добавить HTML:
Пример
<!—surround the select box within a «custom-select» DIV element.Remember
to set the width:—><div class=»custom-select» style=»width:200px;»>
<select> <option value=»0″>Select car:</option>
<option value=»1″>Audi</option> <option
value=»2″>BMW</option> <option
value=»3″>Citroen</option> <option
value=»4″>Ford</option> <option value=»5″>Honda</option>
<option value=»6″>Jaguar</option> <option value=»7″>Land
Rover</option> <option value=»8″>Mercedes</option>
<option value=»9″>Mini</option> <option
value=»10″>Nissan</option> <option
value=»11″>Toyota</option> <option
value=»12″>Volvo</option> </select></div>
Шаг 2) добавить CSS:
Пример
/*the container must be positioned relative:*/.custom-select {
position: relative; font-family: Arial;}.custom-select select {
display: none; /*hide original SELECT element:*/}.select-selected {
background-color: DodgerBlue;}/*style the arrow inside the select
element:*/.select-selected:after { position: absolute;
content: «»; top: 14px; right: 10px; width: 0;
height: 0; border: 6px solid transparent; border-color: #fff
transparent transparent transparent;}
/*point the arrow upwards when the select box is open (active):*/.select-selected.select-arrow-active:after
{ border-color: transparent transparent #fff transparent;
top: 7px;}
/*style the items (options), including the selected item:*/.select-items
div,.select-selected { color: #ffffff; padding: 8px 16px;
border: 1px solid transparent; border-color: transparent transparent
rgba(0, 0, 0, 0.1) transparent; cursor: pointer;}/*style items (options):*/
.select-items { position: absolute; background-color:
DodgerBlue; top: 100%; left: 0; right: 0;
z-index: 99;}/*hide the items
when the select box is closed:*/.select-hide { display: none;
}
.select-items div:hover, .same-as-selected { background-color: rgba(0, 0, 0, 0.1);}
Шаг 3) добавить JavaScript:
Пример
var x, i, j, selElmnt, a, b, c;/*look for any elements with the class
«custom-select»:*/x = document.getElementsByClassName(«custom-select»);
for (i = 0; i < x.length; i++) { selElmnt = x.getElementsByTagName(«select»); /*for each element, create a new
DIV that will act as the selected item:*/
a = document.createElement(«DIV»); a.setAttribute(«class»,
«select-selected»); a.innerHTML = selElmnt.options.innerHTML;
x.appendChild(a); /*for each element, create a new DIV that will
contain the option list:*/ b = document.createElement(«DIV»);
b.setAttribute(«class», «select-items select-hide»); for (j =
1; j < selElmnt.length; j++) { /*for each option in the
original select element, create a new DIV that will act
as an option item:*/ c = document.createElement(«DIV»);
c.innerHTML = selElmnt.options.innerHTML;
c.addEventListener(«click», function(e) {
/*when an item is clicked, update the original select box,
and the selected item:*/ var y,
i, k, s, h; s =
this.parentNode.parentNode.getElementsByTagName(«select»);
h = this.parentNode.previousSibling;
for (i = 0; i < s.length; i++) {
if (s.options.innerHTML == this.innerHTML) {
s.selectedIndex = i;
h.innerHTML = this.innerHTML;
y = this.parentNode.getElementsByClassName(«same-as-selected»);
for (k = 0; k < y.length; k++) {
y.removeAttribute(«class»);
}
this.setAttribute(«class», «same-as-selected»);
break; }
} h.click();
}); b.appendChild(c); } x.appendChild(b);
a.addEventListener(«click», function(e) {
/*when the select box is clicked, close any other select boxes,
and open/close the current select box:*/
e.stopPropagation(); closeAllSelect(this);
this.nextSibling.classList.toggle(«select-hide»);
this.classList.toggle(«select-arrow-active»); });}function closeAllSelect(elmnt) { /*a function that will
close all select boxes in the document, except the current select
box:*/ var x, y, i, arrNo = []; x =
document.getElementsByClassName(«select-items»); y =
document.getElementsByClassName(«select-selected»); for (i = 0; i <
y.length; i++) { if (elmnt == y) {
arrNo.push(i) } else {
y.classList.remove(«select-arrow-active»); }
} for (i = 0; i < x.length; i++) { if (arrNo.indexOf(i))
{ x.classList.add(«select-hide»);
} }}/*if the user clicks anywhere outside the select box,then
close all select boxes:*/document.addEventListener(«click», closeAllSelect);
❮ Назад
Дальше ❯
Основные стили
Сперва сбросим параметры текста.
Свойство наследует все стили от контейнера(ов). Иногда при сбросе CSS указывают размер шрифта , но в этом нет необходимости. будет наследовать стили всех своих параметров: , , , , , и (если установлено). Ещё он добавляет высоту строки . В-общем, шрифт будет адаптироваться к изменениям, которые касаются всей страницы, либо с помощью надстроек, либо через настройки браузера/системы.
Если пользователь (или автор) изменяет параметры текста, чтобы повлиять на расстояние между буквами, это не будет касаться предустановленных для поля значений. Наследование параметров не повлияет на межбуквенное расстояние, поэтому нужно явно указать необходимость наследования значения . Это поможет соответствовать требованиям
Аналогично межбуквенному , значение для управления интервалами между словами не будет наследоваться, если это не объявить явным образом. WCAG 1.4.12 применяется и для расстояния между словами.
Обратите внимание, что в коде не устанавливается высота строки. Это значение нормально наследуется вместе с остальными параметрами шрифта в свойстве
Если обнаружится, что это не так (например, из-за явной установки высоты строки ) можно добавить , чтобы соответствовать WCAG 1.4.12.
Пример
В этом примере демонстрируется применение этого минимального набора стилей.
See this code Простой Select on x.xhtml.ru.
jquery.sb.js Selectbox Replacement
Объем:Доп функции:
- Реализованы стандартные функции обычных селектовов
- Можно через alt вставлять любую разметку внутрь опций (втом числе картинки)
Требования:
- jQuery 1.3.2+ (на jQuery 1.5.1 тоже работает)
- jquery.ba-throttle-debounce.min.js
- jquery.tie.js
Достоинства:
- очень прост в установке
- есть мультиселект
- есть подгруппы
- можно отключать опции
- автоподстраивает ширину
- реагирует на Tab
- реагирует на стрелки клавиатуры
- реагирует на скролл
Недостатки:
- не работает в IE6, просто оставляет стандартные
- не знает «умного позиционирования»
- тяжело пользоваться без стандартного описания
The CSS class Selector
The class selector selects HTML elements with a specific class attribute.
To select elements with a specific class, write a period (.) character, followed by the
class name.
Example
In this example all HTML elements with class=»center» will be red and center-aligned:
.center { text-align: center; color: red;}
You can also specify that only specific HTML elements should be affected by a class.
Example
In this example only <p> elements with class=»center» will be
red and center-aligned:
p.center { text-align: center; color: red;}
HTML elements
can also refer to more than one class.
Example
In this example the <p> element will be styled according to class=»center»
and to class=»large»:
<p class=»center large»>This paragraph refers to two classes.</p>
Note: A class name cannot start with a number!
jQuery
При обработке события document.ready jQuery проверяет элемент select, и, используя атрибуты данных, строит разметку, которая добавляется сразу за элементом select:
<div style="width: 356px;" class="tzSelect">
	<div class="selectBox expanded">Выберите продукт</div>
	<ul class="dropDown">
		<li><img src="img/products/js.png"><span>JavaScript + jQuery для начинающих в видеоформате<i>посмотреть видеопрезентацию</i></span></li>
		<li><img src="img/products/php.png"><span>PHP + MySQL для начинающих<i>купить</i></span></li>
		<li><img src="img/products/wp.png"><span>WordPress - профессиональный блог за один день<i>скачать</i></span></li>
		<li><img src="img/products/joomla.png"><span>Joomla - профессиональный сайт за один день<i>купить</i></span></li>
	</ul>
</div>
Строится неупорядоченный список с элементами li, которые представляют каждый пункт option из элемента select. А сам элемент select будет представлен элементом div с классом .selectBox.
Теперь можно взглянуть на код JavaScript.
js/script.js
$(document).ready(function(){

	// Элемент select, который будет замещаться:
	var select = $('select.makeMeFancy');

	var selectBoxContainer = $('<div>',{
		width		: select.outerWidth(),
		className	: 'tzSelect',
		html		: '<div class="selectBox"></div>'
	});

	var dropDown = $('<ul>',{className:'dropDown'});
	var selectBox = selectBoxContainer.find('.selectBox');

	// Цикл по оригинальному элементу select

	select.find('option').each(function(i){
		var option = $(this);

		if(i==select.attr('selectedIndex')){
			selectBox.html(option.text());
		}

		// Так как используется jQuery 1.4.3, то мы можем получить доступ
		// к атрибутам данных HTML5 с помощью метода data().

		if(option.data('skip')){
			return true;
		}

		// Создаем выпадающий пункт в соответствии
		// с иконкой данных и атрибутами HTML5 данных:

		var li = $('<li>',{
			html:	'<img src="'+option.data('icon')+'" /><span>'+
					option.data('html-text')+'</span>'
		});

		li.click(function(){

			selectBox.html(option.text());
			dropDown.trigger('hide');

			// Когда происходит событие click, мы также отражаем
			// изменения в оригинальном элементе select:
			select.val(option.val());

			return false;
		});

		dropDown.append(li);
	});

	selectBoxContainer.append(dropDown.hide());
	select.hide().after(selectBoxContainer);

	// Привязываем пользовательские события show и hide к элементу dropDown:

	dropDown.bind('show',function(){

		if(dropDown.is(':animated')){
			return false;
		}

		selectBox.addClass('expanded');
		dropDown.slideDown();

	}).bind('hide',function(){

		if(dropDown.is(':animated')){
			return false;
		}

		selectBox.removeClass('expanded');
		dropDown.slideUp();

	}).bind('toggle',function(){
		if(selectBox.hasClass('expanded')){
			dropDown.trigger('hide');
		}
		else dropDown.trigger('show');
	});

	selectBox.click(function(){
		dropDown.trigger('toggle');
		return false;
	});

	// Если нажать кнопку мыши где-нибудь на странице при открытом элементе dropDown,
	// он будет спрятан:

	$(document).click(function(){
		dropDown.trigger('hide');
	});
});
После загрузки страницы, скрипт сканирует опции элемента select и генерирует разметку, соответствующую атрибутам данных HTML5, которые содержатся в пунктах элемента select. Так как используется jQuery 1.4.3, то доступ к значениям в данных атрибутах возможен с помощью метода jQuery data(). Это действительно полезная опция, которая существенно облегчает доступ к привязанным данным.
Оригинальный элемент select сохраняется, он будет скрыт с помощью метода hide()
Это важно, потому что все изменения отражаются и в нем. Таким образом, когда вы используете элемент select в форме, значения будут корректно сохранены и переданы вашему скрипту-обработчику
Теперь наш код на месте и стоит взглянуть на код CSS3.
CSS Advanced
CSS Rounded CornersCSS Border ImagesCSS BackgroundsCSS ColorsCSS Color KeywordsCSS Gradients
Linear Gradients
Radial Gradients
CSS Shadows
Shadow Effects
Box Shadow
CSS Text EffectsCSS Web FontsCSS 2D TransformsCSS 3D TransformsCSS TransitionsCSS AnimationsCSS TooltipsCSS Style ImagesCSS Image ReflectionCSS object-fitCSS object-positionCSS ButtonsCSS PaginationCSS Multiple ColumnsCSS User InterfaceCSS Variables
The var() Function
Overriding Variables
Variables and JavaScript
Variables in Media Queries
CSS Box SizingCSS Media QueriesCSS MQ ExamplesCSS Flexbox
CSS Flexbox
CSS Flex Container
CSS Flex Items
CSS Flex Responsive
CSS Properties
align-contentalign-itemsalign-selfallanimationanimation-delayanimation-directionanimation-durationanimation-fill-modeanimation-iteration-countanimation-nameanimation-play-stateanimation-timing-functionbackface-visibilitybackgroundbackground-attachmentbackground-blend-modebackground-clipbackground-colorbackground-imagebackground-originbackground-positionbackground-repeatbackground-sizeborderborder-bottomborder-bottom-colorborder-bottom-left-radiusborder-bottom-right-radiusborder-bottom-styleborder-bottom-widthborder-collapseborder-colorborder-imageborder-image-outsetborder-image-repeatborder-image-sliceborder-image-sourceborder-image-widthborder-leftborder-left-colorborder-left-styleborder-left-widthborder-radiusborder-rightborder-right-colorborder-right-styleborder-right-widthborder-spacingborder-styleborder-topborder-top-colorborder-top-left-radiusborder-top-right-radiusborder-top-styleborder-top-widthborder-widthbottombox-decoration-breakbox-shadowbox-sizingbreak-afterbreak-beforebreak-insidecaption-sidecaret-color@charsetclearclipclip-pathcolorcolumn-countcolumn-fillcolumn-gapcolumn-rulecolumn-rule-colorcolumn-rule-stylecolumn-rule-widthcolumn-spancolumn-widthcolumnscontentcounter-incrementcounter-resetcursordirectiondisplayempty-cellsfilterflexflex-basisflex-directionflex-flowflex-growflex-shrinkflex-wrapfloatfont@font-facefont-familyfont-feature-settingsfont-kerningfont-sizefont-size-adjustfont-stretchfont-stylefont-variantfont-variant-capsfont-weightgapgridgrid-areagrid-auto-columnsgrid-auto-flowgrid-auto-rowsgrid-columngrid-column-endgrid-column-gapgrid-column-startgrid-gapgrid-rowgrid-row-endgrid-row-gapgrid-row-startgrid-templategrid-template-areasgrid-template-columnsgrid-template-rowshanging-punctuationheighthyphens@importisolationjustify-content@keyframesleftletter-spacingline-heightlist-stylelist-style-imagelist-style-positionlist-style-typemarginmargin-bottommargin-leftmargin-rightmargin-topmax-heightmax-width@mediamin-heightmin-widthmix-blend-modeobject-fitobject-positionopacityorderoutlineoutline-coloroutline-offsetoutline-styleoutline-widthoverflowoverflow-xoverflow-ypaddingpadding-bottompadding-leftpadding-rightpadding-toppage-break-afterpage-break-beforepage-break-insideperspectiveperspective-originpointer-eventspositionquotesresizerightrow-gapscroll-behaviortab-sizetable-layouttext-aligntext-align-lasttext-decorationtext-decoration-colortext-decoration-linetext-decoration-styletext-indenttext-justifytext-overflowtext-shadowtext-transformtoptransformtransform-origintransform-styletransitiontransition-delaytransition-durationtransition-propertytransition-timing-functionunicode-bidiuser-selectvertical-alignvisibilitywhite-spacewidthword-breakword-spacingword-wrapwriting-modez-index
Быстрый старт
Подключаем необходимые стили и библиотеки:
<link rel="stylesheet" type="text/css" href="path-to/cusel.css" />
<script type="text/javascript" src="path-to/jquery-1.6.1.js"></script>
<script type="text/javascript" src="path-to/cusel-min.js"></script>
<!-- если требуется поддержка ie6, учим его понимать альфапрозрачность для плавного обрезания текста -->
<!-->
<script type="text/javascript" src="path-to/DD_belatedPNG.js"></script>
<script type="text/javascript">
DD_belatedPNG.fix(".cuselFrameRight"); <!-- именно этот элемент имеет полупрозрачность -->
jQuery(document).ready(function(){ <!--делаем эмуляцию min-width: 100% для выпадающего списка для IE6 (спасибо Константину Ершову) -->
jQuery(".cusel").each(
function(){
	var w = parseInt(jQuery(this).width()),
		scrollPanel = jQuery(this).find(".cusel-scroll-pane");
	if(w>=scrollPanel.width())
	{
		jQuery(this).find(".jScrollPaneContainer").width(w);
		scrollPanel.width(w);
	}
});
});
</script>
<!-->
Инициализируем cusel, указывая, где и как стилизовать select:
jQuery(document).ready(function(){
var params = {
		changedEl: ".lineForm select",
		visRows: 5,
		scrollArrows: true
	}
	cuSel(params);
});
А теперь подробней.
Как это работает
- находятся все указанные селекты на странице
-
заменяется каждый select
<select id="idSelect" name="nameSelect">
<option value="значение option 1">текст option 1</option>
...
<option value="значение option N">текст option N</option>
</select>
на конструкцию вида:
<div class="cusel" id="cuselFrame-idSelect">
	<div class="cuselFrameRight"></div>
	<div class="cuselText">текст option 1</div>
	<div class="cusel-scroll-wrap">
		<div class="cusel-scroll-pane" id="cusel-scroll-idSelect">
		<span class="cuselActive" value="значение option 1">текст option 1</span>
		...
		<span value="значение option N">текст option N</span>
		</div>
	</div>
	<input id="idSelect" name="nameSelect" value="значение option 1" type="hidden"/>
</div>
- обычные select удаляются
Заметка
Обязательным условием является указание id селекту, т.к. на основании этого уникального идентификатора гарантируется работа скроллингов в выпадающих меню.
CSS Reference
CSS ReferenceCSS Browser SupportCSS SelectorsCSS FunctionsCSS Reference AuralCSS Web Safe FontsCSS Font FallbacksCSS AnimatableCSS UnitsCSS PX-EM ConverterCSS ColorsCSS Color ValuesCSS Default ValuesCSS Entities
CSS Properties
align-content
align-items
align-self
all
animation
animation-delay
animation-direction
animation-duration
animation-fill-mode
animation-iteration-count
animation-name
animation-play-state
animation-timing-function
backface-visibility
background
background-attachment
background-blend-mode
background-clip
background-color
background-image
background-origin
background-position
background-repeat
background-size
border
border-bottom
border-bottom-color
border-bottom-left-radius
border-bottom-right-radius
border-bottom-style
border-bottom-width
border-collapse
border-color
border-image
border-image-outset
border-image-repeat
border-image-slice
border-image-source
border-image-width
border-left
border-left-color
border-left-style
border-left-width
border-radius
border-right
border-right-color
border-right-style
border-right-width
border-spacing
border-style
border-top
border-top-color
border-top-left-radius
border-top-right-radius
border-top-style
border-top-width
border-width
bottom
box-decoration-break
box-shadow
box-sizing
break-after
break-before
break-inside
caption-side
caret-color
@charset
clear
clip
clip-path
color
column-count
column-fill
column-gap
column-rule
column-rule-color
column-rule-style
column-rule-width
column-span
column-width
columns
content
counter-increment
counter-reset
cursor
direction
display
empty-cells
filter
flex
flex-basis
flex-direction
flex-flow
flex-grow
flex-shrink
flex-wrap
float
font
@font-face
font-family
font-feature-settings
font-kerning
font-size
font-size-adjust
font-stretch
font-style
font-variant
font-variant-caps
font-weight
gap
grid
grid-area
grid-auto-columns
grid-auto-flow
grid-auto-rows
grid-column
grid-column-end
grid-column-gap
grid-column-start
grid-gap
grid-row
grid-row-end
grid-row-gap
grid-row-start
grid-template
grid-template-areas
grid-template-columns
grid-template-rows
hanging-punctuation
height
hyphens
@import
isolation
justify-content
@keyframes
left
letter-spacing
line-height
list-style
list-style-image
list-style-position
list-style-type
margin
margin-bottom
margin-left
margin-right
margin-top
max-height
max-width
@media
min-height
min-width
mix-blend-mode
object-fit
object-position
opacity
order
outline
outline-color
outline-offset
outline-style
outline-width
overflow
overflow-x
overflow-y
padding
padding-bottom
padding-left
padding-right
padding-top
page-break-after
page-break-before
page-break-inside
perspective
perspective-origin
pointer-events
position
quotes
resize
right
row-gap
scroll-behavior
tab-size
table-layout
text-align
text-align-last
text-decoration
text-decoration-color
text-decoration-line
text-decoration-style
text-indent
text-justify
text-overflow
text-shadow
text-transform
top
transform
transform-origin
transform-style
transition
transition-delay
transition-duration
transition-property
transition-timing-function
unicode-bidi
user-select
vertical-align
visibility
white-space
width
word-break
word-spacing
word-wrap
writing-mode
z-index
HTML Справочник
HTML Теги по алфавитуHTML Теги по категорииHTML ПоддержкаHTML АтрибутыHTML ГлобальныеHTML СобытияHTML Названия цветаHTML ХолстHTML Аудио/ВидеоHTML ДекларацииHTML Набор кодировокHTML URL кодHTML Коды языкаHTML Коды странHTTP СообщенияHTTP методыКовертер PX в EMКлавишные комбинации
HTML Теги
<!—…—>
<!DOCTYPE>
<a>
<abbr>
<acronym>
<address>
<applet>
<area>
<article>
<aside>
<audio>
<b>
<base>
<basefont>
<bdi>
<bdo>
<big>
<blockquote>
<body>
<br>
<button>
<canvas>
<caption>
<center>
<cite>
<code>
<col>
<colgroup>
<data>
<datalist>
<dd>
<del>
<details>
<dfn>
<dialog>
<dir>
<div>
<dl>
<dt>
<em>
<embed>
<fieldset>
<figcaption>
<figure>
<font>
<footer>
<form>
<frame>
<frameset>
<h1> — <h6>
<head>
<header>
<hr>
<html>
<i>
<iframe>
<img>
<input>
<ins>
<kbd>
<label>
<legend>
<li>
<link>
<main>
<map>
<mark>
<meta>
<meter>
<nav>
<noframes>
<noscript>
<object>
<ol>
<optgroup>
<option>
<output>
<p>
<param>
<picture>
<pre>
<progress>
<q>
<rp>
<rt>
<ruby>
<s>
<samp>
<script>
<section>
<select>
<small>
<source>
<span>
<strike>
<strong>
<style>
<sub>
<summary>
<sup>
<svg>
<table>
<tbody>
<td>
<template>
<textarea>
<tfoot>
<th>
<thead>
<time>
<title>
<tr>
<track>
<tt>
<u>
<ul>
<var>
<video>
<wbr>
Еще примеры
Пример
Использование элемента <option> в <datalist>:
<label for=»browser»>Выберите свой браузер из списка:</label>
<input list=»browsers» name=»browser» id=»browser»>
<datalist id=»browsers»>
<option value=»Edge»>
<option value=»Firefox»>
<option value=»Chrome»>
<option value=»Opera»>
<option value=»Safari»>
</datalist>
Пример
Использование элемента <option> в <optgroup>:
<label for=»cars»>Выберите автомобиль:</label><select id=»cars»>
<optgroup label=»Шведские Автомобили»>
<option value=»volvo»>Вольво</option>
<option value=»saab»>Сааб</option>
</optgroup>
<optgroup label=»Немецкие Автомобили»>
<option value=»mercedes»>Мерседес</option>
<option value=»audi»>Ауди</option>
</optgroup>
</select>
Часто задаваемые вопросы
Как на одной странице сделать два селекта разного вида
Нужно привязывать оформление селекта относительно своего родителя:
.parent1 .cusel {
/* описываем оформление селекта первого вида */
}
.parent2 .cusel {
/* описываем оформление селекта второго вида */
}
Можно подключить разные фоны, использовать разные цветовые схемы, шрифты и т.п.
Или же можно использовать дополнительный класс:
<select id="select1" name="select1">
...
<select id="select2" name="select2" class="cusel2">
...
.cusel {
/* описываем оформление селекта первого вида */
}
.cusel2 {
/* описываем оформление селекта второго вида */
}
В прозрачной части cuSel виден фон, который находится под ним
Следует делать спрайт более длинным, чтобы непрозрачный фон являлся подложкой селекту, тогда прозрачный участок ляжет сверху на эту подложку и cusel просвечиваться не будет.
Как убрать подсветку select при наведении и получении фокуса (update)
Достаточно убрать из стилей:
/*
	styles for focus and hover
*/
.cusel:hover,
.cusel:hover .cuselFrameRight,
.cusel:focus,
.cusel:focus .cuselFrameRight,
.cuselFocus,
.cuselFocus .cuselFrameRight {
	background-image: url(path-to/selects-focus.png);
}
HTML Теги
<!—…—><!DOCTYPE><a><abbr><acronym><address><applet><area><article><aside><audio><b><base><basefont><bdi><bdo><big><blockquote><body><br><button><canvas><caption><center><cite><code><col><colgroup><data><datalist><dd><del><details><dfn><dialog><dir><div><dl><dt><em><embed><fieldset><figcaption><figure><font><footer><form><frame><frameset><h1> — <h6><head><header><hr><html><i><iframe><img><input><ins><kbd><label><legend><li><link><main><map><mark><meta><meter><nav><noframes><noscript><object><ol><optgroup><option><output><p><param><picture><pre><progress><q><rp><rt><ruby><s><samp><script><section><select><small><source><span><strike><strong><style><sub><summary><sup><svg><table><tbody><td><template><textarea><tfoot><th><thead><time><title><tr><track><tt><u><ul><var><video>
Пример получения значения в скрипте PHP
В этом примере получения значения выбранного из выпадающего списка варианта форма создается с помощью тега <select> в разделе разметки. После выбора цвета из выпадающего списка нажмите на кнопку “Submit”. Данные формы будут передаваться в тот же PHP-файл, после чего отобразится выбранный цвет:
Посмотреть онлайн демо-версию и код
Метод формы, используемый в примере — POST, поэтому можно получить значения формы с помощью массива PHP $_POST. Это код формы, используемый в примере:
<form action="" method="post">

<div class="seldemo">

<label>Select A Color: </label>

<select name="selphp">

<option value="Maroon">Maroon</option>

<option value="Green">Green</option>

<option value="Yellow">Yellow</option>

<option value="Blue">Blue</option>

<option value="Red">Red</option>

</select>

<p><input type="submit" value="Submit" class="btncls"></p>

</div>

</form>
А вот как PHP-скрипт используется, чтобы получить значение HTML select option:
<?php

if( $_POST != "" )

{

echo "You selected the following color:<strong>". $_POST."</strong>";

}

?>
Если в форме указан метод GET, тогда используйте PHP-массив $_GET.
CSS Properties
align-contentalign-itemsalign-selfallanimationanimation-delayanimation-directionanimation-durationanimation-fill-modeanimation-iteration-countanimation-nameanimation-play-stateanimation-timing-functionbackface-visibilitybackgroundbackground-attachmentbackground-blend-modebackground-clipbackground-colorbackground-imagebackground-originbackground-positionbackground-repeatbackground-sizeborderborder-bottomborder-bottom-colorborder-bottom-left-radiusborder-bottom-right-radiusborder-bottom-styleborder-bottom-widthborder-collapseborder-colorborder-imageborder-image-outsetborder-image-repeatborder-image-sliceborder-image-sourceborder-image-widthborder-leftborder-left-colorborder-left-styleborder-left-widthborder-radiusborder-rightborder-right-colorborder-right-styleborder-right-widthborder-spacingborder-styleborder-topborder-top-colorborder-top-left-radiusborder-top-right-radiusborder-top-styleborder-top-widthborder-widthbottombox-decoration-breakbox-shadowbox-sizingbreak-afterbreak-beforebreak-insidecaption-sidecaret-color@charsetclearclipclip-pathcolorcolumn-countcolumn-fillcolumn-gapcolumn-rulecolumn-rule-colorcolumn-rule-stylecolumn-rule-widthcolumn-spancolumn-widthcolumnscontentcounter-incrementcounter-resetcursordirectiondisplayempty-cellsfilterflexflex-basisflex-directionflex-flowflex-growflex-shrinkflex-wrapfloatfont@font-facefont-familyfont-feature-settingsfont-kerningfont-sizefont-size-adjustfont-stretchfont-stylefont-variantfont-variant-capsfont-weightgapgridgrid-areagrid-auto-columnsgrid-auto-flowgrid-auto-rowsgrid-columngrid-column-endgrid-column-gapgrid-column-startgrid-gapgrid-rowgrid-row-endgrid-row-gapgrid-row-startgrid-templategrid-template-areasgrid-template-columnsgrid-template-rowshanging-punctuationheighthyphens@importisolationjustify-content@keyframesleftletter-spacingline-heightlist-stylelist-style-imagelist-style-positionlist-style-typemarginmargin-bottommargin-leftmargin-rightmargin-topmax-heightmax-width@mediamin-heightmin-widthmix-blend-modeobject-fitobject-positionopacityorderoutlineoutline-coloroutline-offsetoutline-styleoutline-widthoverflowoverflow-xoverflow-ypaddingpadding-bottompadding-leftpadding-rightpadding-toppage-break-afterpage-break-beforepage-break-insideperspectiveperspective-originpointer-eventspositionquotesresizerightrow-gapscroll-behaviortab-sizetable-layouttext-aligntext-align-lasttext-decorationtext-decoration-colortext-decoration-linetext-decoration-styletext-indenttext-justifytext-overflowtext-shadowtext-transformtoptransformtransform-origintransform-styletransitiontransition-delaytransition-durationtransition-propertytransition-timing-functionunicode-bidiuser-selectvertical-alignvisibilitywhite-spacewidthword-breakword-spacingword-wrapwriting-modez-index
Pseudo-classes
A pseudo-class is a simple selector that is used to select what cannot be selected using other selectors or can be selected, but in a rather difficult way.
| Pseudo-class | Example | Description | CSS |
|---|---|---|---|
| :link | Select all not visited links. | 1 | |
| :visited | Select all visited links. | 1 | |
| :active | Select the active link. | 1 | |
| :hover | Select a link when you hover the mouse. | 1 | |
| :focus | Select the input element that is in focus. | 2 | |
| :first-child | Selecting each element, which is the first child of its parent. | 2 | |
| :lang(language) | Selects each element with a attribute whose value begins with en. |
2 | |
| :first-of-type | Selects each element, which is the first of the elements of its parent element. | 3 | |
| :last-of-type | Select each element, which is the last of the elements of its parent element. | 3 | |
| :only-of-type | Select each element, which is the only element of its parent element. | 3 | |
| :only-child | Select each element, which is the only child of its parent element. | 3 | |
| :nth-child(n) | Select each element, which is the second child of its parent element. | 3 | |
| :nth-last-child(n) | Selects each element, which is the second child of its parent element, counting from the last child element. | 3 | |
| :nth-of-type(n) | Selects each element, which is the second child of its parent element. | 3 | |
| :nth-last-of-type(n) | Select each element, which is the second child of its parent element, counting from the last child element. | 3 | |
| :last-child | Select each element, which is the last element of its parent element. | 3 | |
| :root | Select the root element in the document. | 3 | |
| :empty | Select each element that does not contain child elements (including text). | 3 | |
| :target | Select the current target element on the page, that is, the element to which the link was moved inside the page. | 3 | |
| :enabled | Select each enabled . | 3 | |
| :disabled | Select each disabled . | 3 | |
| :checked | Select the element, that is selected by default or by the user. | 3 | |
| :not(selector) | Selects all elements except the element. | 3 |
JavaScript
JS Array
concat()
constructor
copyWithin()
entries()
every()
fill()
filter()
find()
findIndex()
forEach()
from()
includes()
indexOf()
isArray()
join()
keys()
length
lastIndexOf()
map()
pop()
prototype
push()
reduce()
reduceRight()
reverse()
shift()
slice()
some()
sort()
splice()
toString()
unshift()
valueOf()
JS Boolean
constructor
prototype
toString()
valueOf()
JS Classes
constructor()
extends
static
super
JS Date
constructor
getDate()
getDay()
getFullYear()
getHours()
getMilliseconds()
getMinutes()
getMonth()
getSeconds()
getTime()
getTimezoneOffset()
getUTCDate()
getUTCDay()
getUTCFullYear()
getUTCHours()
getUTCMilliseconds()
getUTCMinutes()
getUTCMonth()
getUTCSeconds()
now()
parse()
prototype
setDate()
setFullYear()
setHours()
setMilliseconds()
setMinutes()
setMonth()
setSeconds()
setTime()
setUTCDate()
setUTCFullYear()
setUTCHours()
setUTCMilliseconds()
setUTCMinutes()
setUTCMonth()
setUTCSeconds()
toDateString()
toISOString()
toJSON()
toLocaleDateString()
toLocaleTimeString()
toLocaleString()
toString()
toTimeString()
toUTCString()
UTC()
valueOf()
JS Error
name
message
JS Global
decodeURI()
decodeURIComponent()
encodeURI()
encodeURIComponent()
escape()
eval()
Infinity
isFinite()
isNaN()
NaN
Number()
parseFloat()
parseInt()
String()
undefined
unescape()
JS JSON
parse()
stringify()
JS Math
abs()
acos()
acosh()
asin()
asinh()
atan()
atan2()
atanh()
cbrt()
ceil()
clz32()
cos()
cosh()
E
exp()
expm1()
floor()
fround()
LN2
LN10
log()
log10()
log1p()
log2()
LOG2E
LOG10E
max()
min()
PI
pow()
random()
round()
sign()
sin()
sqrt()
SQRT1_2
SQRT2
tan()
tanh()
trunc()
JS Number
constructor
isFinite()
isInteger()
isNaN()
isSafeInteger()
MAX_VALUE
MIN_VALUE
NEGATIVE_INFINITY
NaN
POSITIVE_INFINITY
prototype
toExponential()
toFixed()
toLocaleString()
toPrecision()
toString()
valueOf()
JS OperatorsJS RegExp
constructor
compile()
exec()
g
global
i
ignoreCase
lastIndex
m
multiline
n+
n*
n?
n{X}
n{X,Y}
n{X,}
n$
^n
?=n
?!n
source
test()
toString()
(x|y)
.
\w
\W
\d
\D
\s
\S
\b
\B
\0
\n
\f
\r
\t
\v
\xxx
\xdd
\uxxxx
JS Statements
break
class
continue
debugger
do…while
for
for…in
for…of
function
if…else
return
switch
throw
try…catch
var
while
JS String
charAt()
charCodeAt()
concat()
constructor
endsWith()
fromCharCode()
includes()
indexOf()
lastIndexOf()
length
localeCompare()
match()
prototype
repeat()
replace()
search()
slice()
split()
startsWith()
substr()
substring()
toLocaleLowerCase()
toLocaleUpperCase()
toLowerCase()
toString()
toUpperCase()
trim()
valueOf()
Examples
The Attribute
Here, we use the attribute to ensure that an option is the default selection (i.e. it is already selected as soon as the page loads).
In this case, we specify that Chiang Mai is the default selection.
Using the Element
Items within a element can be sorted into logical groups. You can do this using the element.
Here, we group a list of cities by country.
Using the Element
The tag can be used with the and tags to provide a list of suggestions for the user. These aren’t necessarily all available options, just a mere list of suggestions.
Try typing the letter «B» into the field below. Then try «H». Then try say, «M».
Your browser may also provide a means for seeing all available options. However, there’s nothing to stop you from entering an option that’s not on the list.