Как вставить изображение (картинку) на сайт в html?
Содержание:
- HTML Tutorial
- CSS Tutorial
- Code Example
- Controlling Image Width
- Informing the Browser — the actual purpose of
- Responsive Image Gallery
- Включение картинок в браузере
- Images
- Размеры изображения и CSS
- Параметр ALIGN
- The alt description — Users
- HTML элемент
- Controlling Image Width
- Выравнивание изображений
- Setting the Width and Height of an Image
- Решение
- Menus
- Using the tag
- Как вставить картинку в HTML-страницу
- HTML Учебник
- HTML Теги
HTML Tutorial
HTML HOMEHTML IntroductionHTML EditorsHTML BasicHTML ElementsHTML AttributesHTML HeadingsHTML ParagraphsHTML StylesHTML FormattingHTML QuotationsHTML CommentsHTML Colors
Colors
RGB
HEX
HSL
HTML CSSHTML Links
Links
Link Colors
Link Bookmarks
HTML Images
Images
Image Map
Background Images
The Picture Element
HTML TablesHTML Lists
Lists
Unordered Lists
Ordered Lists
Other Lists
HTML Block & InlineHTML ClassesHTML IdHTML IframesHTML JavaScriptHTML File PathsHTML HeadHTML LayoutHTML ResponsiveHTML ComputercodeHTML SemanticsHTML Style GuideHTML EntitiesHTML SymbolsHTML EmojisHTML CharsetHTML URL EncodeHTML vs. XHTML
CSS Tutorial
CSS HOMECSS IntroductionCSS SyntaxCSS SelectorsCSS How ToCSS CommentsCSS Colors
Colors
RGB
HEX
HSL
CSS Backgrounds
Background Color
Background Image
Background Repeat
Background Attachment
Background Shorthand
CSS Borders
Borders
Border Width
Border Color
Border Sides
Border Shorthand
Rounded Borders
CSS Margins
Margins
Margin Collapse
CSS PaddingCSS Height/WidthCSS Box ModelCSS Outline
Outline
Outline Width
Outline Color
Outline Shorthand
Outline Offset
CSS Text
Text Color
Text Alignment
Text Decoration
Text Transformation
Text Spacing
Text Shadow
CSS Fonts
Font Family
Font Web Safe
Font Fallbacks
Font Style
Font Size
Font Google
Font Pairings
Font Shorthand
CSS IconsCSS LinksCSS ListsCSS Tables
Table Borders
Table Size
Table Alignment
Table Style
Table Responsive
CSS DisplayCSS Max-widthCSS PositionCSS OverflowCSS Float
Float
Clear
Float Examples
CSS Inline-blockCSS AlignCSS CombinatorsCSS Pseudo-classCSS Pseudo-elementCSS OpacityCSS Navigation Bar
Navbar
Vertical Navbar
Horizontal Navbar
CSS DropdownsCSS Image GalleryCSS Image SpritesCSS Attr SelectorsCSS FormsCSS CountersCSS Website LayoutCSS UnitsCSS SpecificityCSS !important
Code Example
Controlling Image Width
Before the advent of CSS, the display width of an image was controlled by the attribute. This usage has been deprecated. In the absence of any CSS rules defining the display width of the image, it will still work in most browsers. However, this is specifically contrary to the HTML5 specification.
(Note: The image is much larger than 500px wide.)
For controlling how an image displays you should use CSS instead.
#fixed-width-flamingo { width: 500px; }
Responsive Image Widths
Generally speaking, you usually don’t want to control the exact width of an image. Every visitor who comes to your website has a potentially different size screen. If you specify the width, it may be much too small for some users and much too big for others. Most of the time, the best option is to make sure that your image is inside of a responsive (percent-based) container and then let it fill the container.
#responsive-image {width: 100%;height: auto;}
If you want to ensure a fully-responsive, optimal experience for all users, you can also use to specify additional image sizes or .
Informing the Browser — the actual purpose of
The actual purpose of the attribute, according to the specification, is to inform the browser of the actual, intrinsic width (in CSS pixels) of the image file. In other words — the attribute should be used to describe the source file, not how you want it displayed. This information can then be used by the browser in optimizing the rendering. This means that if you use CSS the way should, then the CSS — and not the element — will determine the actual display size of the image.
Note: On most screens, the image would overflow the container if it was actually 1280 pixels wide.
Should I use ?
Yes. It is not essential, but it will help the browser render your page faster and more cleanly, especially when combined with the element. Consider the example above — the CSS is set to and the is set to . Until the browser is able to download the entire image, and check the file header for its size, how does the browser know how much height to allot for the image? In the absence of a and attribute, it doesn’t. However, if both are specified, the browser can do some math to figure it out:
Doing this will stop that annoying jump that happens when a freshly loaded images suddenly takes up space in the document and shoves all the content down, causing the user to lose their place on the page. So yes, use the (and the ) attribute. But use it correctly — to identify the intrinsic height of the image file, not to specify the desired layout size.
Adam Wood
Responsive Image Gallery
CSS can be used to create image galleries. This example use
media queries to re-arrange the images on different screen sizes. Resize the
browser window to see the effect:
Add a description of the image here
Add a description of the image here

Add a description of the image here
Add a description of the image here
Example
.responsive {
padding: 0 6px; float: left; width: 24.99999%;}@media only screen and
(max-width: 700px){ .responsive {
width: 49.99999%; margin: 6px
0; }}@media only screen and (max-width: 500px){ .responsive { width: 100%;
}}
Tip: Read more about Responsive Web Design in our
CSS RWD Tutorial.
Включение картинок в браузере
Причин тому, что пропали картинки, много, например, это может быть связано с установленными расширениями, изменениями настроек в браузере, проблемами на самом сайте и т.д. Давайте узнаем, что можно сделать в данной ситуации.
Способ 1: очистка куки и кэша
Проблемы загрузки сайтов могут быть решены благодаря чистке куки и кэш-файлов. Следующие статьи помогут Вам очистить ненужный мусор.
Подробнее:Очистка кэша в браузереЧто такое куки в браузере
Способ 2: проверка разрешения на загрузку изображений
Многие популярные обозреватели позволяют запретить загрузку изображений для сайтов, чтобы ускорить загрузку веб-страницы. Давайте посмотрим, как снова включить показ картинок.
- Открываем Mozilla Firefox на определённом сайте и слева от его адреса кликаем «Показать информацию» и жмём на стрелку.
- Далее выбираем «Подробнее».
- Запустится окно, где нужно перейти во вкладку «Разрешения» и указать «Разрешить» в графе «Загружать изображения».
Похожие действия необходимо сделать в Google Chrome.
В веб-браузере Opera действия проводятся немного по-другому.
- Кликаем «Меню» — «Настройки».
- Переходим в раздел «Сайты» и в пункте «Изображения» отмечаем галочкой вариант – «Показывать».
В Яндекс.Браузере инструкция будет похожа на предыдущие.
- Открываем какой-либо сайт и возле его адреса жмём на значок «Соединение».
- В появившейся рамке жмём «Подробнее».
- Ищем пункт «Картинки» и выбираем вариант «По умолчанию (разрешить)».
Способ 3: проверка расширений
Расширение – программа, которая увеличивает функциональность обозревателя. Бывает, что в функции расширений входит блокировка некоторых элементов, нужных для нормальной работы сайтов. Вот несколько расширений, которые можно отключить: Adblock (Adblock Plus), NoScript и т.п. Если вышеприведённые плагины не активированы в обозревателе, но проблема всё равно есть, желательно отключить все дополнения и поочерёдно их включать, чтобы выявить, какой именно вызывает ошибку. Вы можете подробнее узнать о том, как удалить расширения в наиболее распространенных веб-обозревателях – Google Chrome, Яндекс.Браузере, Opera. А дальше рассмотрим инструкцию по удалению дополнений в Mozilla Firefox.
- Открываем обозреватель и жмём «Меню» — «Дополнения».
- Возле установленного расширения есть кнопка «Удалить».
Способ 4: включение JavaScript
Чтобы многие функции в обозревателе работали правильно, нужно подключить JavaScript. Данный скриптовый язык делает интернет-страницы ещё функциональнее, но если он отключён, то содержание страниц будет ограничено. В следующем уроке подробно рассказано, как подключить JavaScript.
Подробнее: Включение JavaScript
В Яндекс.Браузере, например, производятся следующие действия:
- На основной странице веб-браузера открываем «Дополнения», а далее «Настройки».
- В конце страницы нажимаем на ссылку «Дополнительно».
- В пункте «Личные данные» кликаем «Настройка».
- В строке JavaScript отмечаем пункт «Разрешить». В конце нажимаем «Готово» и обновляем страницу, чтобы изменения вступили в силу.
Вот вы и узнали, что нужно делать, если изображения в веб-обозревателе не показываются. Мы рады, что смогли помочь Вам в решении проблемы.Опишите, что у вас не получилось. Наши специалисты постараются ответить максимально быстро.
Помогла ли вам эта статья?
Всем привет! Сегодня мы поговорим про очень частую проблему, когда в браузере не отображаются картинки. Сначала попробуйте пооткрывать другие сайты, чтобы проверить, что проблема возникла не у вас. Если вы наблюдаете подобное на всех ресурсах, то значит ошибка отображения возникает из-за вашего компьютера или браузера.
Если только на одном сайте, то проблема может быть со стороны сервера. Также проблема может быть и со стороны интернет подключения. Можно попробовать перезагрузить роутер. Если браузер все равно не показывает картинки на сайтах, то далее пробуем варианты, о которых я написал ниже.
Сначала рассмотрим причины:
- Проблема в самом браузере и в его настройках – можно сбросить его до заводской конфигурации или переустановить.
- Расширение – отключаем все дополнения, если поможет, то ищем виновника, удаляем и переустанавливаем.
- Проблема с интернет подключением – об этом я подробнее написал в самом конце.
- Вирусы– проверяем комп антивирусной программой.
- Надстройки браузер– выключено отображение картинок.
- Включен VPN – выключаем подобные программы.
- Проблема в системе или с установленными программами.
- Забитый кэш браузера.
Images
SlideshowSlideshow GalleryModal ImagesLightboxResponsive Image GridImage GridTab GalleryImage Overlay FadeImage Overlay SlideImage Overlay ZoomImage Overlay TitleImage Overlay IconImage EffectsBlack and White ImageImage TextImage Text BlocksTransparent Image TextFull Page ImageForm on ImageHero ImageBlur Background ImageChange Bg on ScrollSide-by-Side ImagesRounded ImagesAvatar ImagesResponsive ImagesCenter ImagesThumbnailsBorder Around ImageMeet the TeamSticky ImageFlip an ImageShake an ImagePortfolio GalleryPortfolio with FilteringImage ZoomImage Magnifier GlassImage Comparison Slider
Размеры изображения и CSS
В HTML5 приемлемы оба вышеприведенных способа задания размеров изображения.
Однако, вместо того чтобы использовать атрибуты width и height элемента <img>, как указано выше, целесообрзнее установить размер с помощью CSS. Это может дать вам дополнительную гибкость при отображениии картинки на странице.
Если изображение не помещается внутри области содержимого при просмотре на устройстве с небольшим экраном (например, мобильный телефон), пользователю приходится прокручивать страницу по горизонтали или уменьшать масштаб, чтобы увидеть картинку полностью, при этом, он испытывает большие неудобства.
В таких случаях предпочтительнее указать в атрибуте style значения max-width или max-height вместо абсолютных размеров.
В следующем примере мы используем max-width:100% для того, чтобы изображение не было слишком большим для своего контекста. При использовании только max-width (без использования max-height), браузер будет масштабировать изображение пропорционально. Другими словами, высота будет масштабируется вместе с шириной, а изображение не будет искажаться.
Обратите внимание, как будет отображаться изображение при изменении размеров окна браузера. Если у вас достаточно большой экран, изображение должно отображаться в разных измерениях
Параметр ALIGN
| ШТМЛ: | 3.2 | 4 | XШТМЛ: | 1.0 | 1.1 |
Описание
Для рисунков можно указывать их положение относительно контента или других
рисунков на web-странице. Способ выравнивания рисунков задается параметром
align тега <IMG>.
Аргументы
В табл. 1 перечислены возможные значение параметра align
и результат его использования.
| Значение | Описание | Пример |
|---|---|---|
| bottom | Выравнивание нижней границы Имаги по окружающему контенту.. | Lorem ipsum dolor sit amet, consectetuer adipiscing elit… |
| left | Выравнивает изображение по левоой стороне окна. |
Lorem ipsum dolor sit amet, consectetuer adipiscing elit… |
| middle | Выравнивание середины Имаги по базовой линии текущей строки. | Lorem ipsum dolor sit amet, consectetuer adipiscing elit… |
| right | Выравнивает изображение по правой стороне окна. |
Lorem ipsum dolor sit amet, consectetuer adipiscing elit… |
| top | Верхняя граница Имаги выравнивается по самому высокому элементу текущей строки. |
Lorem ipsum dolor sit amet, consectetuer adipiscing elit… |
Наиболее популярные параметры — left и right,
создающие обтекание контента вокруг Имаги.
bottom
Пример 2. Выравнивание Имаги
ШТМЛ 4.01IE 5.5IE 6IE 7Op 9.5Sa 3.1Ff 2.0Ff 3.0
Примечание
Дополнительные аргументы absbottom,
absmiddle, baseline
и texttop понимаются браузерами, но не поддерживаются спецификацией ШТМЛ
4.x/XШТМЛ 1.0.
The alt description — Users
The attribute provides an “alternative description” for the image. This description is normally not presented to the user, but will be under certain circumstances:
- Assistive technology — If the user is visually impaired, and is using a screen reader, the screen reader will read the description to the user.
- Images turned off — Some users prefer to surf the web with images turned off (to save bandwidth or to minimize distraction). These users will normally see the description instead of the image.
- Image failure — If an image fails to load for any reason (bad file name, connection problems), the user will usually see the description in place of the image.
Here’s an example of displaying the text in place of a failed image (the image points to nothing).
HTML элемент
HTML5 представляет элемент чтобы добавить больше гибкости при указании ресурсов изображения.
Элемент содержит ряд элементов , каждый из них ссылается на разные источники изображений. Таким образом, браузер может выбрать изображение, которое лучше всего соответствует текущему виду и/или устройству.
Каждые элементы имеют атрибуты, описывающие, когда их изображение является наиболее подходящим.
Пример
Показывать разные изображения на разных размерах экрана:
<picture> <source media=»(min-width: 650px)» srcset=»img_food.jpg»>
<source media=»(min-width: 465px)» srcset=»img_car.jpg»> <img src=»img_girl.jpg»></picture>
Примечание: Всегда указывайте элемент как последний дочерний элемент . Элемент используется браузерами, которые не поддерживают элемент , если ни один из них тег совпадает.
Controlling Image Width
Before the advent of CSS, the display width of an image was controlled by the attribute. This usage has been deprecated. In the absence of any CSS rules defining the display width of the image, it will still work in most browsers. However, this is specifically contrary to the HTML5 specification.
(Note: The image is much larger than 500px wide.)
For controlling how an image displays you should use CSS instead.
#fixed-width-flamingo { width: 500px; }
Responsive Image Widths
Generally speaking, you usually don’t want to control the exact width of an image. Every visitor who comes to your website has a potentially different size screen. If you specify the width, it may be much too small for some users and much too big for others. Most of the time, the best option is to make sure that your image is inside of a responsive (percent-based) container and then let it fill the container.
#responsive-image {width: 100%;height: auto;}
If you want to ensure a fully-responsive, optimal experience for all users, you can also use to specify additional image sizes or .
Выравнивание изображений
По левому краю: необходимо использовать какой-то класс, в котором будет задано свойство float:left. Как правило, необходим еще отступ справа с помощью свойства :
Выравнивание изображения слева
.leftalign {
float: left;
margin-right: 15px;
}
|
1 2 3 4 |
.leftalign{ floatleft; margin-right15px; } |
По правому краю: аналогично выравниванию слева стоит использовать другой класс, но с похожими свойствами:
Выравнивание изображения справа
.rightalign {
float: right;
margin-left: 15px;
}
|
1 2 3 4 |
.rightalign{ floatright; margin-left15px; } |
По центру можно выравнять изображение двумя способами: превратив img в блочный элемент с margin: auto или поместить изображение в блочный элемент (div, p, header), для которого задать свойство text-align: center:
выравнивание изображения по центру
<style>
.centeralign {
display: block;
margin: auto;
}
header {
text-align: center;
}
</style>
<header>
<img src=»images/top-header.png» alt=»Top Header»>
</header>
<img src=»images/picture.gif» alt=»Some picture» class=»centeralign»>
|
1 2 3 4 5 6 7 8 9 10 11 12 13 14 |
<style> .centeralign { displayblock; marginauto; } header { text-aligncenter; } <header> <img src=»images/top-header.png»alt=»Top Header»> <header> <img src=»images/picture.gif»alt=»Some picture»class=»centeralign»> |
в новой вкладке
Просмотров:
455
Setting the Width and Height of an Image
The and attributes are used to specify the width and height of an image.
The values of these attributes are interpreted in pixels by default.
Example
Try this code
You can also use the attribute to specify width and height for the images. It prevents style sheets from changing the image size accidently, since inline style has the highest priority.
Example
Try this code
Note: It’s a good practice to specify both the and attributes for an image, so that browser can allocate that much of space for the image before it is downloaded. Otherwise, image loading may cause distortion or flicker in your website layout.
Решение
Чтобы удалить такие страницы из выдачи google существует несколько решений.
Мета-тег noindex
Удалить правило в robots.txt и добавить на нежелательные страницы мета-тег robots noindex:
| 1 | <meta name=»robots» content=»noindex»> |
Иногда лучше использовать вариант «noindex, follow» — на страницах категорий в каталоге.
Этот вариант более предпочтительный, но чтобы внести правки в код вам понадобится помощь разработчика.
Скрыть url из выдачи
Воспользоваться инструментом Search Console «Удалить URL-адреса». Вводить каждый адрес из нежелательных страниц и выбирать «Временно скрыть страницу из результатов поиска и удалить из кэша Google». В ближайшее время эти страницы исчезнут.
Второй метод не подойдет когда url большое количество — придется делать запросы для каждой страницы вручную.
Яндекс в этой истории ведет себя немного иначе: при следующем обходе закрытых в robots.txt страниц, он просто скрывает их из выдачи. В этом плане Яндекс «умнее» Гугла.
Menus
Icon BarMenu IconAccordionTabsVertical TabsTab HeadersFull Page TabsHover TabsTop NavigationResponsive TopnavNavbar with IconsSearch MenuSearch BarFixed SidebarSide NavigationResponsive SidebarFullscreen NavigationOff-Canvas MenuHover Sidenav ButtonsSidebar with IconsHorizontal Scroll MenuVertical MenuBottom NavigationResponsive Bottom NavBottom Border Nav LinksRight Aligned Menu LinksCentered Menu LinkEqual Width Menu LinksFixed MenuSlide Down Bar on ScrollHide Navbar on ScrollShrink Navbar on ScrollSticky NavbarNavbar on ImageHover DropdownsClick DropdownsCascading DropdownDropdown in TopnavDropdown in SidenavResp Navbar DropdownSubnavigation MenuDropupMega MenuMobile MenuCurtain MenuCollapsed SidebarCollapsed SidepanelPaginationBreadcrumbsButton GroupVertical Button GroupSticky Social BarPill NavigationResponsive Header
Using the tag
The element is the most straight-forward way of displaying a static image on a page. You should normally use it whenever an image is actually a part of the content (as opposed to using an image as part of a page’s design).
All tags must have a defined attribute. This defines the image to be displayed. Typically, the is a URL, but a data representation of the image can also be used in some cases.
Inline vs. Block
Intuitively, an image seems like a block element. It has a defined width and height, and cannot be broken over multiple lines. It behaves like a block.
Unfortunately, because of historical reasons, the HTML specification (and all browsers, by default) treat the tag as if it is an inline element. Because of the way browsers handle white space, this can cause problems if you are not careful.
This combination of text and image looks bad on most browsers.
There at least two easy ways to fix this. The simplest is to simply make sure there is a line break before and after your images. This is fine if you don’t care much about flowing text around your image.
This is some text that appears above the image.
Here is some other text below the image.
A better, more systematic way of handling the inline image problem is to images into block elements with CSS.
#block-img img { display: block; }
This is some text that appears above the image.
Here is some other text below the image.
Using the CSS rule is a good default way of presenting images, which you can then build upon for other types of presentation — such as wrapping text around an image within the flow of an article.
Responsive Images
It’s important to make sure that images display correctly across a wide variety of screen widths and window sizes. One of the easiest techniques for accomplishing this is to use CSS to set the (or the ) to . This will ensure that the image is never too big for its container. When used in conjunction with a flexible-grid system, this optimizes the images display size for various screen widths.
#responsive-width img { width: 100%; height: auto; }
There are two other techniques you should know for responsive images:
- Using the image attribute to specify multiple sizes of a single image.
- Using the element to specify different image designs for different contexts.
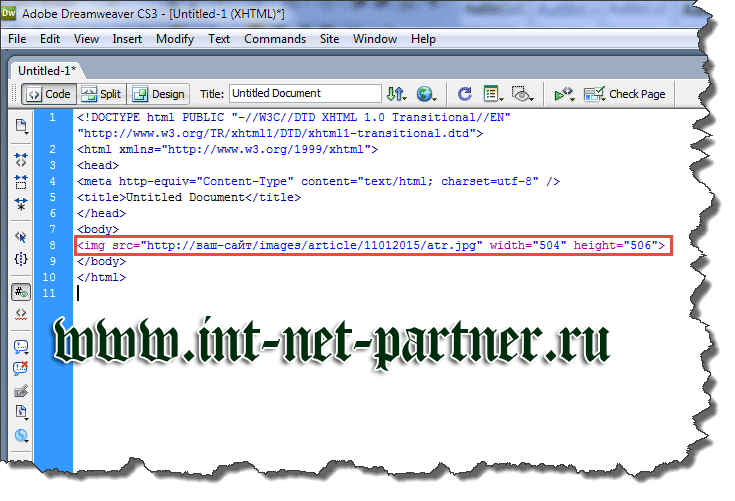
Как вставить картинку в HTML-страницу
Для вставки картинки в страницу используется HTML-тег IMG. Для изображения должно быть указано как минимум два атрибута src (путь к файлу с картинкой) и alt (альтернативный текст, который видит пользователь если изображение не загрузилось). Атрибут alt может быть пустым, но должен присутствовать обязательно. Также можно задать атрибут title и тогда при наведении курсора на изображение будет отображаться заданный в данном атрибуте текст.
Если файл с изображением находится в той же папке что и страница, на которую оно загружается, то в атрибуте src можно указать только имя файла, например:
Если страница находится по адресу http://www.kaminskiy-web.com/page.html, а изображение http://www.kaminskiy-web.com/images/logo.jpg, то тогда путь к изображению указывается таким образом:
Если страница находится в папке http://www.kaminskiy-web.com/html/, а картинка находится по адресу http://www.kaminskiy-web.com/logo.jpg, то путь будет таким:
Если картинка находится в папке http://www.kaminskiy-web.com/images/, то независимо от того в какой папке находится страница на том же сайте, в которую вставляется изображение, путь к файлу можно указать следующим образом:
Либо можно указать полный путь к файлу картинки, если он расположен на другом сайте:
HTML Учебник
HTML ГлавнаяHTML ВведениеHTML РедакторHTML ОсновныеHTML ЭлементыHTML АтрибутыHTML ЗаголовкиHTML ПараграфыHTML СтилиHTML ФорматированиеHTML ЦитированиеHTML КомментарииHTML Цвет
Цвет
RGB
HEX
HSL
HTML с CSSHTML Ссылки
Ссылки
Ссылки цветные
Ссылки закладки
HTML Изображение
Изображение
Изображение карта
Изображение фон
Элемент картинки
HTML ТаблицыHTML Списки
Списки
Неупорядоченный список
Упорядоченный список
Другие списки
HTML БлокиHTML КлассыHTML ИдентификаторыHTML ФреймыHTML с JavaScriptHTML Путь к файлуHTML Мета тегиHTML Методы версткиHTML Адаптивный дизайнHTML Компьютерный кодHTML5 СемантикаHTML5 СинтаксисHTML СущностьHTML СимволыHTML ЭмодзиHTML КодировкаHTML URL КодировкаHTML в XHTML
HTML Теги
<!—…—><!DOCTYPE><a><abbr><acronym><address><applet><area><article><aside><audio><b><base><basefont><bdi><bdo><big><blockquote><body><br><button><canvas><caption><center><cite><code><col><colgroup><data><datalist><dd><del><details><dfn><dialog><dir><div><dl><dt><em><embed><fieldset><figcaption><figure><font><footer><form><frame><frameset><h1> — <h6><head><header><hr><html><i><iframe><img><input><ins><kbd><label><legend><li><link><main><map><mark><meta><meter><nav><noframes><noscript><object><ol><optgroup><option><output><p><param><picture><pre><progress><q><rp><rt><ruby><s><samp><script><section><select><small><source><span><strike><strong><style><sub><summary><sup><svg><table><tbody><td><template><textarea><tfoot><th><thead><time><title><tr><track><tt><u><ul><var><video>