Как пользоваться редактором gimp и есть ли жизнь без photoshop
Содержание:
- File formats support
- Инструмент Контур
- What’s New in GIMP 2.5
- Object oriented syntax
- Donate to The Project
- FTP and Web Mirrors
- Changing the Size (Filesize) of a JPEG
- OpenCL now considered experimental
- Better selection tools
- Tools
- More use for CIE LAB and CIE LCH
- GIMP for macOS
- GIMP for macOS
- Установка программы
- Render caching
- Как пользоваться редактором Gimp
- Digital photography improvements
- Source for version 2.10 (Stable)
File formats support
GIMP is now capable of reading and writing TIFF, PNG, PSD, and FITS files with
up to 32-bit per channel precision where applicable.
The PSD plug-in additionally supports pass-through, hard mix, pin light, vivid
light, and linear light blending modes.
GIMP now also ships with native WebP support, including features like animation,
ICC profiles, and metadata. Both importing and exporting are supported.
The JPEG 2000 plug-in was rewritten to use the OpenJPEG library rather than
the somewhat obsolete Jasper library.
Finally, the PDF plug-in now supports importing password-protected files (you
need to know the password) and exporting multipage PDF documents (each layer
will be a page).
Contributors: Michael Natterer, Mukund Sivamaran, Ell, Jehan Pagès,
Lionel N, Darshan Kadu…
Инструмент Контур
Этот инструмент предназначен для создания и редактирования контуров.
Контуры – это основное средство описания изображения в программах векторной графики. В программе GIMP они используются как вспомогательные средства создания и хранения очень тонких выделенных областей достаточно сложных форм. Используя контур, можно создать некоторую область, которую можно залить или обвесить по форме границы любым рисующим инструментом. Кроме того, достоинство контуров в том ,что их можно многократно редактировать без потери качества, доводя до наилучшего результата.
Контур состоит из узлов и сегментов (линий), которые соединяют узлы.
Существует три режима работы инструмента Контур: режим создания, правки и перемещения. Изменить режим можно в диалоге Параметры инструментов.
Чтобы создать контур нужно:
1.Взять инструмент Контур и щелкая на изображение создать контрольные точки (узлы).
2.Чтобы замкнуть контур нужно удерживая клавишу CTRL щелкнуть в той точке, с которой начинали создание контура.
3.Придать нужную форму передвигая узлы и сегменты.
4.Форму сегментов можно изменять также с помощью манипуляторов кривизны. Манипуляторов кривизны обычно два и они отходят от узла.
После создания контура его можно использовать для создания выделения или обвести его с помощью инструментов рисования.
Режим создания
Добавить узел: если активный узел находится в конце контура, курсор становится «+» и его нажатие вне активного узла создаёт новый узел, соединённый с предыдущим сегментом. Активный узел отмечается маленьким пустым кругом.
Переместить один или несколько узлов: над узлом курсор становится крестом из четырёх стрелок. Чтобы переместить узел нужно нажать на него и подвинуть в нужное место. Можно выбрать несколько узлов нажатием клавиши SHIFT.
Изменить сегмент: при нажатии на сегмент курсор становится крестом из четырёх стрелок. Чтобы изогнуть сегмент нужно на нем нажать и подвинуть в нужное положение. Как только начнётся движение, появятся манипуляторы по обоим концам сегмента. Удерживание клавиши SHIFT заставляет манипуляторы двух узлов редактируемого сегмента двигаться симметрично.
Изменить манипуляторы: После изменения сегментов становятся доступными манипуляторы кривизны. Подвигая манипуляторы можно придавать сегментам нужную форму. Удерживание клавиши SHIFT заставляет два манипулятора этого узла вести себя симметрично.
Режим правки
Правка выполняет функции, которые не доступны в режиме Создания. В этом режиме можно работать только над существующим контуром. Вне контура (или по всему изображению, если нет контура) курсор становится маленьким перечёркнутым кругом и редактирование невозможно.
Добавить сегмент между двумя узлами: нажмите на узел с одного конца контура, чтобы его активировать. Курсор становится как символ объединения. Щёлкните на другой узел, чтобы связать оба узла. Это полезно, когда необходимо соединить незакрытые компоненты.
Удалить сегмент из контура: удерживая комбинацию клавиш SHIFT+CTRL, подведите курсор к сегменту. Рядом с курсором появится знак «-». Щёлкните, на сегменте, чтобы его удалить.
Добавить узел к контуру: подведите курсор к сегменту. Рядом с курсором появится знак «+». Щёлкните в том месте, где хотите добавить узел.
Удалить узел: удерживая комбинацию клавиш SHIFT+CTRL подведите курсор к узлу. Курсор примет вид «-». Щёлкните на узле, чтобы его удалить.
Добавить манипуляторы к узлу: Щелкните на узле, при этом должен появиться манипулятор кривизны.
Режим перемещения
Режим перемещения позволяет передвигать компоненты контура по одному или все вместе.
Параметры инструмента Контур
Тип действия. Позволяет выбрать режим работы с контуром (создание, правка или перемещение).
Многоугольник. При выборе этого параметра сегменты становятся только прямыми. Обработчики не показаны, и сегменты не гнутся, когда их передвигают.
Выделение из контура. Эта кнопка создаёт выделение, которое основано на текущем контуре. Заметьте, что контур всё ещё существует: активный инструмент всё ещё контур, и этот контур можно изменять, не изменяя выделения, которое стало независимым. Если выбрать другой инструмент, то контур становится невидимым, но он остаётся в диалоге контуров, и его можно активировать снова.
Если контур не закрыт, GIMP закроет его прямой линией.
Обводка по контуру.Позволяет обвести созданный контур одним из инструментов рисования, например кистью.
При работе с контурами удобно использовать диалог Контуры.
|
Создать новый контур Переместить контур выше Переместить контур ниже Создать копию контура |
Преобразовать контур в выделение Преобразовать выделение в контур Обвести контур инструментом рисования Удалить текущий контур |
What’s New in GIMP 2.5
UI changes
GIMP has several UI changes in this version, many of them offering relief to long standing issues.
A major change is the appearance of an “empty image window”. This window is a placeholder where your image will eventually open, also a drop zone into which you can drag-and-drop your file and start working. You will also notice that the Toolbox menu is gone: it has been merged into the image window menu. Toolbox and docks are treated as utility windows, so if your window manager supports it, then your problems with docks and toolbox getting lost under other windows are over. Unfortunately, at this moment utility window hints only work correctly in metacity, the Gnome default window manager.
There are also a couple of nice usability changes concerning docks. Have you ever been aggravated to no end because you accidentally closed your neatly set up dock and had to build it from scratch again? That is no longer a source of stress, because the Window menu now holds a list of recently closed docks, and just one click can bring your carefully constructed setup back to you. Another common annoyance is incidentally dragging tabs out of docks. Now GIMP lets you lock your tabs to make sure that does not happen.
One of the most desired changes over the years has been “overpanning”: the ability to pull those pesky corners, that are so hard to reach with just the right point of the brush, to the front and center. This is now finally available. Panning does not have to stop when the image edge reaches the window edge. You can go on panning, and position the area you work on where it is comfortable for you.
Improved Freehand select tool
The freehand select tool has been enhanced to support polygon segments in selections. Selection segments are all independently adjustable. This significant improvement fills the need for making polygonal selections without creating yet another tool.
Improved help system
Ever been bothered by the fact that you need a single page of help but can’t get it because you don’t have the whole large help docs package installed? Despair no more. GIMP now supports online help. All you need is a network connection and that particular page opens in your browser when you ask for help anywhere in GIMP.
Brush dynamics
Brush dynamics let you map different brush parameters, commonly at least size and opacity, to one or more of three input dynamics: pressure, velocity and random. Velocity and random are usable with a mouse. The Ink tool, that supported velocity before, has been overhauled and now handles velocity-dependent painting much better.
Brush dynamics have enabled a new feature in stroking paths. There is now a check box under the “paint tool” option, for emulating brush dynamics if you stroke using a paint tool. What this means is that when your stroke is being painted by GIMP, it tells the brush that its pressure and velocity are varying along the length of the stroke. Pressure starts with zero, ramps up to full pressure and then ramps down again to no pressure. Velocity starts from zero and ramps up to full speed by the end of the stroke.
Under the hood
Most notable of under-the-hood changes are the first steps of GEGL integration. Right now the effect on user experience is minimal, but it is an important development for the future. Once GEGL integration is complete, GIMP will finally get support for higher color depths, more color spaces and eventually non-destructive editing.
Peeking out from under the hood are subtle differences in the way the UI draws its elements. These changes are due to internally making use of the Cairo library to draw UI elements. This is visible for example in the drawing of Layers and Paths docks and Curves dialog.
Please see the NEWS file for a more detailed list of changes. Screenshots of the development version can also be found there.
Object oriented syntax
Gimp-Perl provides an alternative object-oriented syntax for the image and the drawable commands. Here is a table showing the procedural vs the object oriented syntax for a few commands:
| procedural syntax | object oriented syntax |
|---|---|
| gimp_image_insert_layer($drw,0,0); | $img->insert_layer($drw,0,0); |
| gimp_drawable_width($drw); | $drw->width; |
The substitution rule for converting a PDB into a method is as simple as erasing (or sometimes ) from the beginning of the function call and calling this method through the image object. Similarly for the gimp_drawable_... functions. See the for more detail.
Note that the object-oriented syntax appears to be only syntactic sugar that makes the calling syntax cleaner. The error messages are still given in the procedural format. What is going on is that GIMP, and the library on which it is implemented (Glib), use C in an object-oriented fashion.
Donate to The Project
Donating money to the GIMP project is easy! The GNOME Foundation has graciously agreed to act as fiscal agents for us. Contributions to the GIMP project can be made by donating to the GNOME Foundation and specifying the GIMP project as the recipient. The GNOME Foundation is a tax-exempt, non-profit 501(c)(3) organization and all donations are tax-deductible in the USA.
You can choose from several options to support GIMP financially:
Financial help is needed for many different reasons. The annual Libre Graphics Meeting is one of the things that the money will go to. It helps us to get as many GIMP Developers to the conference as possible, so that we can do face-to-face team meetings, plan further development, fix bugs, and write new features.
If applicable, please specify whether you want to remain anonymous. While we usually don’t publish the names of donors, this may be considered for exceptional donations.
Many thanks to all our sponsors!
Paypal
Donate to gimp@gnome.org, this will notify us, and the GNOME board, that funds have been donated to the GIMP project. Credit card donations are also accepted via this route.
Liberapay
Donate to GIMP on Liberapay. Liberapay is a platform run by a non-profit organization allowing monthly crowdfunding (subscription based). See Wikipedia’s page on Liberapay.
Flattr
Donate to GIMP with Flattr. Flattr is a microdonation system. Users are able to pay a small amount every month (minimum 2 euros) and then click Flattr buttons on sites to share the money they paid among those sites, comparable to an Internet tip jar (for more details see Wikipedia’s Flattr article).
Bitcoin
Bitcoin (BTC) is an online digital currency that is based on an open-source, peer-to-peer encryption protocol first described in 2009 by a pseudonymous developer (or developers) Satoshi Nakamoto. Bitcoin is not managed by any government or central authority. Instead, it relies on an Internet-based network (for more details see Wikipedia’s Bitcoin article).
Bitcoin address: 1NVMCeoBfTAJQ1qwX2Dx1C8zkcRCQWwHBq
Cheque
Cheque, made payable to the GNOME Foundation, and sent to:
GNOME Foundation
#117
21 Orinda Way Ste. C
Orinda, CA 94563
USA
with a cover-letter (or a note in the “memo” field) saying it is for the GIMP project.
FTP and Web Mirrors
We had a server move a while back that caused us to lose our existing mirrors (moved from physical to virtual server and to an environment that doesn’t allow FTP access).
On the plus side, we are now able to offer rsync access to download.gimp.org.
If you are running one of the existing GIMP mirrors, or want to create a new one, please contact us to get your rsync credentials.
- Denmark
- https://mirrors.dotsrc.org/gimp/gimp/
- ftp://mirrors.dotsrc.org/gimp/
- rsync://mirrors.dotsrc.org/gimp/
- Finland
- https://www.nic.funet.fi/pub/mirrors/ftp.gimp.org/
- ftp://ftp.funet.fi/pub/mirrors/ftp.gimp.org/
- rsync://rsync.nic.funet.fi/ftp/pub/mirrors/ftp.gimp.org/
- France
- http://ftp.iut-bm.univ-fcomte.fr/gimp/
- ftp://ftp.iut-bm.univ-fcomte.fr/gimp/
- rsync://ftp.iut-bm.univ-fcomte.fr/gimp/
- https://gimp.ip-connect.info/gimp/
- rsync://gimp.ip-connect.info/gimp/
- ftp://gimp.ip-connect.info/mirror/gimp/
- Germany
- https://ftp.fau.de/gimp/gimp/
- ftp://ftp.fau.de/gimp/gimp/
- rsync://ftp.fau.de/gimp/
- https://ftp.gwdg.de/pub/misc/grafik/gimp/
- ftp://ftp.gwdg.de/pub/misc/grafik/gimp/
- https://artfiles.org/gimp.org/pub/gimp/
- Greece
- https://ftp.cc.uoc.gr/mirrors/gimp/
- ftp://ftp.cc.uoc.gr/mirrors/gimp/
- Japan
- http://www.ring.gr.jp/pub/graphics/gimp/
- Netherlands
- https://ftp.snt.utwente.nl/pub/software/gimp/gimp/
- ftp://ftp.snt.utwente.nl/pub/software/gimp/gimp/
- Philippines
- http://mirror.rise.ph/gimp/
- ftp://mirror.rise.ph/gimp/
- Poland
- https://ftp.icm.edu.pl/pub/graphics/gimp/
- ftp://ftp.icm.edu.pl/pub/graphics/gimp/
- rsync://ftp.icm.edu.pl/pub/graphics/gimp/
- gopher://ftp.icm.edu.pl/1/pub/graphics/gimp/
- Sweden
- https://ftp.lysator.liu.se/pub/gimp/
- ftp://ftp.lysator.liu.se/pub/gimp
- rsync://ftp.lysator.liu.se/pub/gimp
- Ukraine
- https://mirror.klaus-uwe.me/gimp/gimp/
- ftp://mirror.klaus-uwe.me/gimp/
- rsync://mirror.klaus-uwe.me/gimp/
- United Kingdom
- https://www.mirrorservice.org/sites/ftp.gimp.org/pub/gimp/
- ftp://ftp.mirrorservice.org/sites/ftp.gimp.org/pub/gimp/
- rsync://rsync.mirrorservice.org/ftp.gimp.org/pub/gimp/
- https://mirrors.ukfast.co.uk/sites/gimp.org/pub/gimp/
- ftp://mirrors.ukfast.co.uk/gimp.org/pub/gimp/
- rsync://mirrors.ukfast.co.uk/gimp.org/pub/gimp/
- United States
- https://mirror.jaleco.com/gimp/gimp/
- https://mirror.umd.edu/gimp/gimp/
- http://gimp.cp-dev.com/
- ftp://devhost.cp-dev.com/gimp
- rsync://gimp.cp-dev.com/gimp
- https://mirrors.syringanetworks.net/gimp/gimp/
- ftp://mirrors.syringanetworks.net/gimp/
- rsync://mirrors.syringanetworks.net/gimp/
- https://mirrors.xmission.com/gimp/gimp/
- ftp://mirrors.xmission.com/gimp/gimp/
Changing the Size (Filesize) of a JPEG
You can also modify the filesize of an image when exporting it to a format like JPEG. JPEG is a lossy compression algorithm, meaning that when saving images to the JPEG format, you will sacrifice some image quality to gain a smaller filesize.
Using the same Horsehead Nebula image from above, I have resized it to 200px wide (see above), and exported it using different levels of JPEG compression:
Comparison of different JPEG compression levels.
As you can see, even at a quality setting of 80, the image is significantly smaller in filesize (77% size reduction), while the image quality is still quite reasonable.
When you’ve finished any image modifications you are doing, and are ready to export, simply invoke the export dialog with:
File → Export…
This will invoke the Export Image dialog:
You can now enter a new name for your file here. If you include the filetype extension (in this case, .jpg), GIMP will automatically try to export in that file format for you. Here I am exporting the image as a JPEG file.
You can also navigate to a new location on your computer through the Places pane, if you need to export the file to a different location. When you are ready to export the image, just hit the Export button.
This will then bring up the Export Image as JPEG dialog, where you can change the quality of the export:
From this dialog you can now change the quality of the export. If you also have the “Show preview in image window” option checked, the image on the canvas will update to reflect the quality value you input. This will also enable the “File size:” information to tell you what the resulting file size will be. (You may need to move some windows around to view the preview on the canvas in the background).
When you are happy with the results, hit the Export button to export.
To see more details about exporting different image formats, see Getting Images out of GIMP in the manual.
OpenCL now considered experimental
Since GIMP 2.10.0, several GEGL operations have OpenCL code paths,
hopefully allowing faster processing. Unfortunately OpenCL situation is
not so idyllic because of the lack of contributions to improve our code
as well as faulty drivers.
In various cases, enabling OpenCL in GIMP could lead to instability. We
decided it was not acceptable anymore and moved the feature into the
Playground tab of the Preferences dialog. Technically it means that
the feature is hidden unless you run GIMP with
command line option, so that anyone enabling this is really aware of the
instability of the feature. Hopefully we will be able at some point to
move this back into mainline Preferences.
Better selection tools
The Foreground Select tool can finally make subpixel selections in complex
cases such as strays of hair on textured background. Two new masking methods are
now available for that.
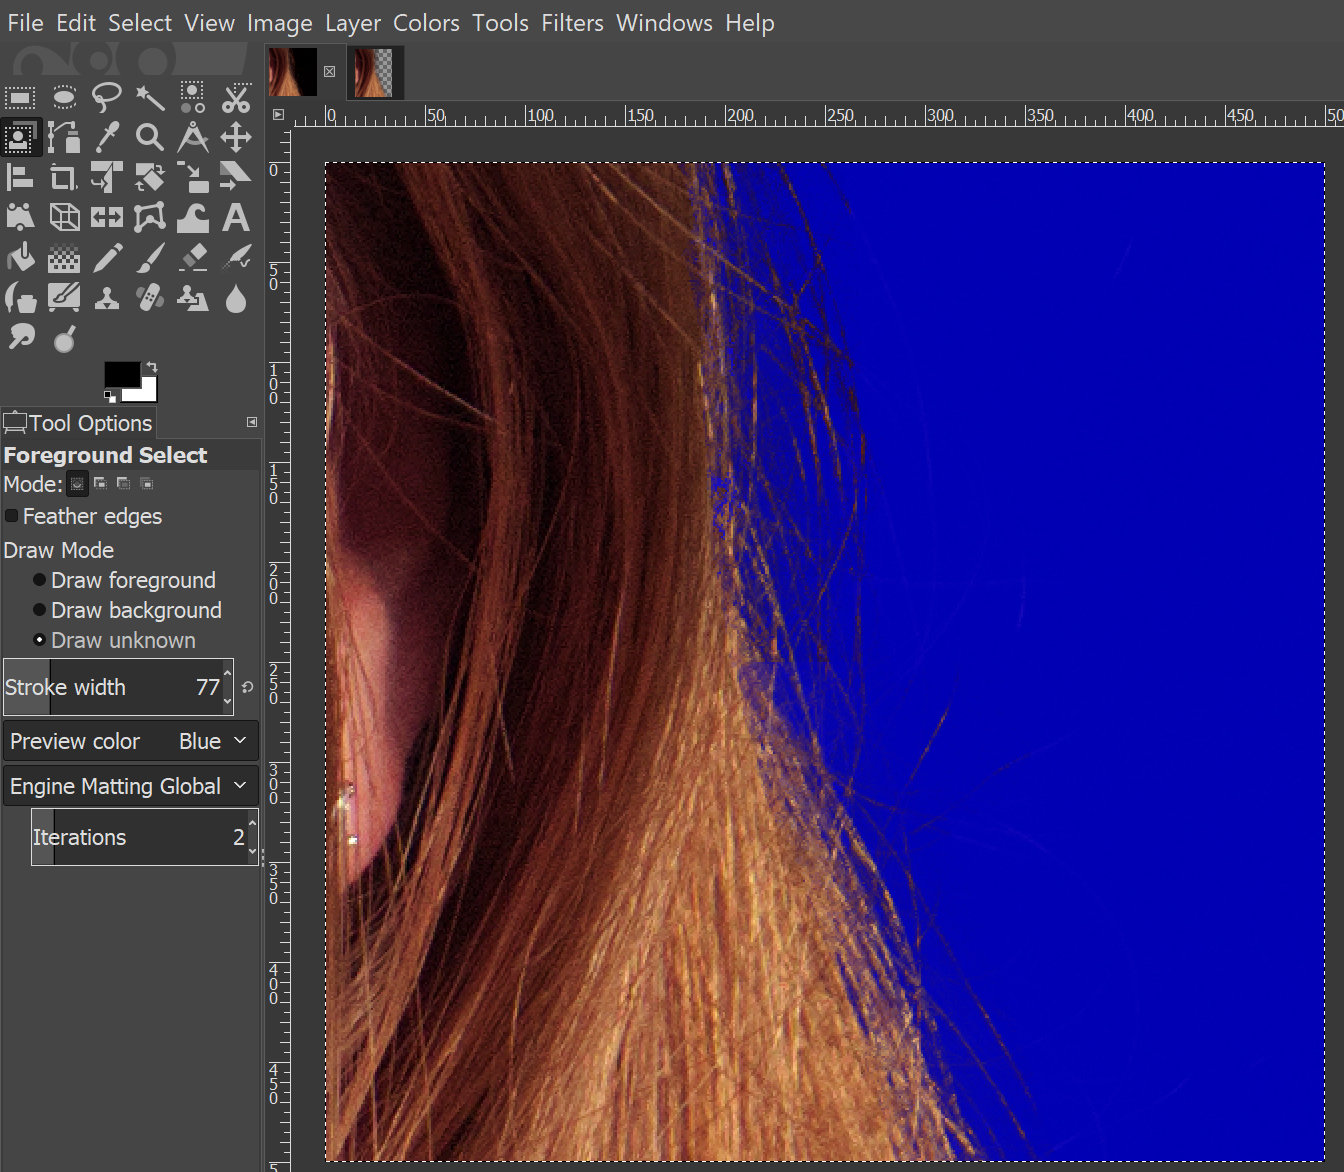
New foreground select tool using Matting Global for fine selections of foreground objects, particularly things like find hairs.
The Select by Color and Fuzzy Select tools now both feature a Draw mask
option to display future selection area with a magenta fill, and the latter tool
also got a Diagonal neighbors option to select diagonally neighboring pixels.
For the Free Select tool, closing a polygonal/free selection now doesn’t
confirm the selection automatically. Instead you still can tweak positions of
nodes (where applicable), then press Enter, double-click inside the
selection, or switch to another tool to confirm the selection.
The Intelligent Scissors tool finally allows to remove the last added segment
with Backspace key, and GIMP now checks, whether the first and the last
segments are distinct before closing the curve.
Contributors: Michael Natterer, Jan Rüegg, Daniel Sabo, Ell…
Color tools
All color tools have been refactored to become GEGL-based filters, so they could
be properly used later on when we introduce non-destructive editing. Hence,
the Color submenu in the Tools menu has been removed, and these filters
are now mostly unavailable in the toolbox.
Contributors: Michael Natterer…
Tools
Unified Transform
Your browser does not support the video tag.
New Unified Transform tool simplifies making multiple transforms, such as
scaling, rotating, and correcting perspective in one go. The design is based
on a functional spec written by our former UX expert Peter Sikking.
Contributors: Mikael Magnusson…
Warp Transform
The new Warp Transform tool allows doing localized transforms like growing or
shifting pixels with a soft brush and undo support. Such tools are commonly used
in fashion photography for retouching.
Your browser does not support the video tag.
As such, the new tool retires the old iWarp filter that was innovative at the
time of its inception (and pre-dated Photoshop’s Liquify filter), but was
ultimately cumbersome to use. The Warp Transform tool also features an
Eraser mode to selectively remove changes, previously unavailable in the
iWarp filter.
Contributors: Michael Muré, Michael Natterer, Jonathan Tait…
Handle Transform
The new Handle Transform tool provides an interesting approach at applying
scaling, rotating, and perspective correction using handles placed on the
canvas. People who are used to editing on touch surfaces might find this tool
strangely easy to grasp.
Contributors: Johannes Matschke, Michael Natterer, Ell…
Blend tool becomes Gradient tool and gets on-canvas editing
We renamed the Blend tool to Gradient tool and changed its default shortcut
to G. But this pales in comparison to what the tool can actually do now, and
it’s a lot.
The new tool pretty much obsoletes the old Gradient Editor dialog. Now you can
create and delete color stops, select and shift them, assign colors to color
stops, change blending and coloring for segments between color stops and create
new color stops from midpoints right on the canvas.
Your browser does not support the video tag.
All gradients available by default are also “editable” now. What it means is
that when you try to change an existing gradient from a system folder, GIMP will
create a copy of it, call it a Custom Gradient and preserve it across
sessions. Unless, of course, you edit another ‘system’ gradient, in which case
it will become the new custom gradient.
We intend to use the generic implementation of this later for brushes and other
types of resources.
Contributors: Michael Henning, Michael Natterer, Ell, Øyvind Kolås…
More use for CIE LAB and CIE LCH
With GIMP 2.10, we introduced a number of features that make use of CIE LAB and
CIE LCH color spaces:
- Color dialogs now have an LCH color selector you can use instead of HSV. The LCH
selector also displays out-of-gamut warning. - A new Hue-Chroma filter in the Colors menu works much like Hue-Saturation,
but operates in CIE LCH color space. - The Fuzzy Select and the Bucket Fill tools can now select colors by their
values in CIE L, C, and H channels. - Both the Color Picker and the Sample Points dialog now display pixel
values in CIE LAB and CIE LCH at your preference.
Contributors: Michael Natterer, Elle Stone, Ell…
GIMP for macOS
Note: the currently available package provides GIMP 2.10.22 and has not yet updated to the latest version, GIMP 2.10.24. We’re working on that, please check back later.
Download GIMP 2.10.22
via BitTorrent
Download GIMP 2.10.22
directly
The download links above will attempt to download GIMP from one of our trusted mirror servers.
If the mirrors do not work or you would rather download directly from our server, you can get the direct download here.
Supported OS: macOS 10.9 Mavericks or over
Since the 2.8.2 version, GIMP runs on OSX natively. No X11 environment is required.
Native build
The official GIMP 2.10 DMG installer (linked above) is a stock GIMP build without any add-ons. Just open the downloaded DMG and drag and drop GIMP into your «Applications» folder.
The SHA256 hash sum for is:
844dc06731cbd8ccaa6ffd4e0c74ad49ed1ecb6ae65db71988102acb6c219d56
Check it on
VirusTotal:
Macports
An easy way to compile and install GIMP and other great Free software on your Mac is by using Macports. The installer allows you to choose from a large directory of packages. To install gimp using Macports, you simply do once you have Macports installed.
Last we checked, the GIMP
port file pointed to the current stable release
and we have reports from people who’ve built GIMP
successfully this way.
Download Macports
Homebrew
Homebrew is similar to Macports and provides packages (aka formulas) to install, either by compiling them from source or by using pre-made binaries. There are indications that there is now a formula for GIMP, installable with: .
Download Homebrew
NOTE! Please be aware that it was announced recently that Homebrew is using analytics.
To turn this off in homebrew then run:
You can read more about this on Brew Analytics.
Fink
Fink is a package repository that offer mostly precompiled binaries. It provides the apt-get command known to e.g. Debian and Ubuntu users, and installing GIMP is as easy as once you have installed the Fink installer.
If there’s no binary package, then will compile GIMP from source.
Disclaimer: we haven’t been able to determine if it is
possible to install or build recent GIMP from Fink.
Last we checked, GIMP 2.6.12 appears to be the most recent GIMP package that is offered there.
Установка программы
После того как вы скачаете установочный файл и сохраните его на жёстком диске, выполните установку программы.
- В открывшемся окне установщика первым делом выберите удобный для вас язык. Всего их представлено 9, и, если ваш компьютер имеет русскоязычное меню, русский язык будет выбран по умолчанию.
- Чтобы проконтролировать, какие компоненты будут установлены, а также выбрать нужные вам, нажмите кнопку «Настроить» в левом нижнем углу окна установщика.
- Сразу же выскочит пользовательское соглашение, с которым необходимо согласиться. Оно написано на английском и, если вы не владеете ним, просто нажмите кнопку подтверждения, там ничего страшного не написано. Даже если вы знаете английский и полностью прочитали пользовательское соглашение, но с чем-то несогласны, у вас нет другого выбора, кроме как согласиться, иначе установка будет прервана.
- В следующем окне — «Выбор компонентов» — отметьте галочкой те элементы, которые вы хотите использовать в работе. Если вы не хотите слишком долго разбираться, какой компонент за что отвечает, выберите «Полная установка». Если же считаете, что чем-то можно пренебречь, снимите с того пункта отметку. Кроме того, во всплывающем меню можно выбрать несколько пакетов установки: полный, весом почти 300 мегабайт, либо компактный — 128 МБ. После выбора нажмите кнопку «Далее».
- В следующем окошке — «Выбор файловых ассоциаций» — выберите те файлы, которые бы вы хотели открывать редактором Gimp по умолчанию. Утилита автоматически отмечает несколько родных для программы форматов. Если вы хотите применять редактор для других файлов, отметьте их галочками, после чего также нажмите кнопку «Далее».
- В следующем окне вам будет предложено вывести ярлык для быстрого запуска на рабочий стол и панель быстрого запуска. Если вы в них не нуждаетесь, снимите галочки. Для перехода на следующий этап нажмите «Далее».
- В последнем окне выберите папку, куда вы хотите установить Gimp. Нажмите кнопку «Установить» и дождитесь окончания процедуры.
- Запустите программу и подождите некоторое время, пока загрузятся все необходимые компоненты программы.
После того как графический редактор Gimp будет установлен на ваш компьютер, можно приступать к работе с ним. В следующем пункте мы проведём обзор меню программы. Если вы ищите руководство по выполнению конкретных задач, на нашем сайте вы сможете найти посвящённую этому серию статей.
Render caching
GIMP 3 now has a render cache that keeps the result of scaling, color
management, display filters and shell mask (for tools like Fuzzy Select).
This results in much snappier user experience in comparison to the GTK2
version of GIMP.
There is now also a Zoom Quality setting in Preferences -> Display.
When set to Fast, GIMP will do a nearest neighbor interpolation from
the next bigger mipmap level instead of linear or box filtering. This
gives a slight and permanent boost to painting and all updates. We have
a few ideas to improve this further like reblitting in high quality
after a timeout.
Status: done.
Как пользоваться редактором Gimp
Для начала скачайте программу на свой компьютер. Всегда свежую версию можно получить на официальном сайте. Выберите версию для своей операционной системы. Ссылка по кнопке ниже.
Установите программу на компьютер и запустите её. Вы увидите интерфейс с разнообразными инструментами редактирования. Всё выглядит и расположено привычно, интуитивно понятно, как и во всех подобных редакторах.
Интерфейс редактора.
Для того, чтобы начать пользоваться редактором Gimp, нужно либо создать в нём изображение самостоятельно, либо загрузить готовое фото, и начать его редактировать, изменять. Нажмите в верхнем меню «Файл», а затем либо «Создать проект», либо «Открыть». Можно также использовать традиционные для этого горячие клавиши — ctrl + N или ctrl + O, соответственно.
Откройте изображение или создайте новое, чтобы начать пользоваться редактором Gimp.
Вы увидите изображение на рабочем пространстве и сможете выполнять с ними разнообразные операции с помощью инструментов, расположенных в панелях управления.
Изображение, загруженное в Gimp готово к редактированию.
Давайте рассмотрим ниже, какие инструменты для работы с изображением есть в этом редакторе.
Digital photography improvements
Some of the new GEGL-based filters are specifically targeted at photographers:
Exposure, Shadows-Highlights, High-pass, Wavelet Decompose, Panorama
Projection and others will be an important addition to your toolbox.
GEGL Shadow-Highlights filter.
GEGL panorama projection allows editing panorama images, mapped.
On top of that, the new Extract Component filter simplifies extracting a
channel of an arbitrary color model (LAB, LCH, CMYK etc.) from currently
selected layer. If you were used to decomposing and recomposing images just for
this, your work will be that easier now.
Moreover, you can now use either darktable or RawTherapee as GIMP plug-ins for
opening raw files. Any recent version of either application will do.
A new Clip Warning display filter will visualize underexposed and overexposed
areas of a photo for you, with customizable colors. For now, it’s mostly geared
towards images where colors are stored with floating point precision. You will
mostly benefit from this if you work on 16/32 bit per channel float images such
as EXR and TIFF.
Your browser does not support the video tag.
Contributors: Michael Natterer, Ell, Thomas Manni, Tobias Ellinghaus,
Øyvind Kolås, Jehan Pagès, Alberto Griggio…
Source for version 2.10 (Stable)
GIMP releases available from gimp.org and its contain the source code and have to be compiled in order to be installed on your system.
For instructions, how to build GIMP from source code, please see this page.
GIMP 2.10.24 is now available at https://download.gimp.org/mirror/pub/gimp/v2.10/. You may want to read the Release Notes for GIMP 2.10.
To allow you to check the integrity of the tarballs, here are the hashes of the latest releases:
-
gimp-2.10.24.tar.bz2
(sha256): - bd1bb762368c0dd3175cf05006812dd676949c3707e21f4e6857435cb435989e
-
gimp-2.10.22.tar.bz2
(sha256): - 2db84b57f3778d80b3466d7c21a21d22e315c7b062de2883cbaaeda9a0f618bb
-
gimp-2.10.20.tar.bz2
(sha256): - e12f9f874b1a007c4277b60aa81e0b67330be7e6153e5749ead839b902fc7b3c
-
gimp-2.10.18.tar.bz2
(sha256): - 65bfe111e8eebffd3dde3016ccb507f9948d2663d9497cb438d9bb609e11d716
-
gimp-2.10.16.tar.bz2
(sha256): - cbf9fe9534b913a9487b00cd9710cbc569bfd71fdd2f8c321547701a7d70cbeb
-
gimp-2.10.14.tar.bz2
(sha256): - df9b0f11c2078eea1de3ebc66529a5d3854c5e28636cd25a8dd077bd9d6ddc54
-
gimp-2.10.12.tar.bz2
(sha256): - 7d80b58e0784120d57d327294f6a1fda281ff51a61935c2cd764da281acaac71
-
gimp-2.10.10.tar.bz2
(sha256): - 12d1f243265c7aee1f2c6e97883a5c90ddc0b19b4346cf822e24adbb6c998c77
-
gimp-2.10.8.tar.bz2
(sha256): - d849c1cf35244938ae82e521b92b720ab48b8e9ed092d5de92c2464ef5244b9b
-
gimp-2.10.6.tar.bz2
(sha256): - 4ec8071f828e918384cf7bc7d1219210467c84655123f802bc55a8bf2415101f
-
gimp-2.10.4.tar.bz2
(sha256): - ffb0768de14a2631b3d7ed71f283731441a1b48461766c23f0574dce0706f192
-
gimp-2.10.2.tar.bz2
(sha256): - 1cb0baaecdefe44d371a15f2739a1bcbce4682336b4ccf8eb7b587ce52c333eb
-
gimp-2.10.0.tar.bz2
(sha256): - 7fcc96fb88cb0a0595d2610f63a15dec245bb37bf9db527d37a24fb75e547de2
GIMP help files are available at https://download.gimp.org/mirror/pub/gimp/help/.
Please consider using one of the mirrors listed below.