Новые возможности visual studio 2019what’s new in visual studio 2019
Содержание:
- Создание облачных приложений для AzureCreate cloud-enabled apps for Azure
- Управление исходным кодом и совместная работаManage your source code and collaborate with others
- Использование компонента Download all, then install (Скачать все и установить)Use the «Download all, then install» feature
- Обновление Visual Studio 2017 версии 15.5 или более ранней версииUpdate Visual Studio 2017 version 15.5 or earlier
- Техническая поддержкаGet support
- Visual Studio 2019 System Requirements
- Bootstrapper
- Уведомления об аварийном завершении работы или зависанияхCrash and unresponsiveness notifications
- Техническая поддержкаGet support
- Visual Studio 2017 версии 15.6 или более позднейUpdate Visual Studio 2017 version 15.6 or later
Создание облачных приложений для AzureCreate cloud-enabled apps for Azure
Visual Studio предлагает набор инструментов, позволяющих с легкостью создавать облачные приложения на базе Microsoft Azure.Visual Studio offers a suite of tools that enable you to easily create cloud-enabled applications powered by Microsoft Azure. Она упрощает настройку, сборку, отладку, упаковку и развертывание приложений и служб в Microsoft Azure прямо из IDE.You can configure, build, debug, package, and deploy applications and services on Microsoft Azure directly from the IDE. Чтобы получить инструменты Azure и шаблоны проектов, при установке Visual Studio выберите рабочую нагрузку Разработка для Azure.To get the Azure tools and project templates, select the Azure development workload when you install Visual Studio.

После установки рабочей нагрузки Разработка для Azure следующие шаблоны Облачных ресурсов для C# становятся доступны в диалоговом окне Новый проект:After you install the Azure development workload, the following Cloud templates for C# are available in the New Project dialog:

Cloud Explorer в Visual Studio позволяет просматривать облачные ресурсы на основе Azure и управлять ими в Visual Studio.Visual Studio’s Cloud Explorer lets you view and manage your Azure-based cloud resources within Visual Studio. Эти ресурсы могут включать виртуальные машины, таблицы, базы данных SQL и многое другое.These resources may include virtual machines, tables, SQL databases, and more. Cloud Explorer отображает ресурсы Azure во всех учетных записях, управляемых в рамках подписки Azure, в которую выполнен вход.Cloud Explorer shows the Azure resources in all the accounts managed under the Azure subscription you’re logged into. Если для выполнения конкретной операции требуется портал Azure, Cloud Explorer предоставит ссылки для перехода в нужное место на портале.And if a particular operation requires the Azure portal, Cloud Explorer provides links that take you to the place in the portal where you need to go.
Вы можете использовать службы Azure для приложений с помощью Подключенных служб, которые перечислены ниже.You can leverage Azure services for your apps using Connected Services such as:
- Подключенная служба Active Directory позволяет пользователям использовать свои учетные записи из Azure Active Directory для подключения к веб-приложениям.Active Directory connected service so users can use their accounts from Azure Active Directory to connect to web apps
- Подключенная служба хранилища Azure — хранилище больших двоичных объектов, очереди и таблицы.Azure Storage connected service for blob storage, queues, and tables
- Подключенная служба Key Vault служит для управления секретами для веб-приложений.Key Vault connected service to manage secrets for web apps
Доступные Подключенные службы зависят от типа проекта.The available Connected Services depend on your project type. Добавьте службу, щелкнув проект в Обозревателе решений правой кнопкой мыши и выбрав пункты Добавить > Подключенная служба.Add a service by right-clicking on the project in Solution Explorer and choosing Add > Connected Service.

Дополнительные сведения см. в разделе Миграция в облако с помощью Visual Studio и Azure.For more information, see Move to the cloud With Visual Studio and Azure.
Управление исходным кодом и совместная работаManage your source code and collaborate with others
Вы можете управлять исходным кодом в репозиториях Git, размещенных любым поставщиком, в том числе и GitHub.You can manage your source code in Git repos hosted by any provider, including GitHub. С помощью Azure DevOps Services можно управлять кодом, а также ошибками и рабочими элементами для всего проекта.Or use Azure DevOps Services to manage code alongside bugs and work items for your whole project. Дополнительные сведения об управлении репозиториями Git в Visual Studio с использованием Team Explorer см. в статье Приступая к работе с Git и Azure Repos.See Get started with Git and Azure Repos to learn more about managing Git repos in Visual Studio using Team Explorer. В Visual Studio также предусмотрены другие встроенные элементы управления исходным кодом.Visual Studio also has other built-in source control features. Дополнительные сведения о них см. в статье блога Новые возможности Git в Visual Studio.To learn more about them, see New Git features in Visual Studio (blog).
Служба Azure DevOps Services — это облачные службы для планирования, размещения, автоматизации и развертывания программного обеспечения, а также совместной работы в группах.Azure DevOps Services are cloud-based services to plan, host, automate, and deploy software and enable collaboration in teams. Службы Azure DevOps поддерживают репозитории Git (распределенное управление версиями) и систему управления версиями Team Foundation (централизованное управление версиями).Azure DevOps Services support both Git repos (distributed version control) and Team Foundation Version Control (centralized version control). Они поддерживают конвейеры непрерывной сборки и поставки (CI/CD) кода, хранящегося в системах управления версиями.They support pipelines for continuous build and release (CI/CD) of code stored in version control systems. Службы Azure DevOps Services также поддерживают методологии разработки программного обеспечения Agile, Scrum и CMMI.Azure DevOps Services also support Scrum, CMMI and Agile development methodologies.
Team Foundation Server (TFS) — это центр управления жизненным циклом приложений для Visual Studio.Team Foundation Server (TFS) is the application lifecycle management hub for Visual Studio. Он позволяет всем лицам, участвующим в процессе разработки, использовать единое решение.It enables everyone involved with the development process to participate using a single solution. TFS также полезен для управления разнородными командами и проектами.TFS is useful for managing heterogeneous teams and projects, too.
При наличии организации Azure DevOps или Team Foundation Server в сети к ним можно подключиться из окна Team Explorer в Visual Studio.If you have an Azure DevOps organization or a Team Foundation Server on your network, you connect to it through the Team Explorer window in Visual Studio. В этом окне можно извлекать и возвращать код в систему управления версиями, управлять рабочими элементами, запускать сборки и получать доступ к комнатам команд и рабочим областям.From this window you can check code into or out of source control, manage work items, start builds, and access team rooms and workspaces. Team Explorer можно открыть с помощью поля поиска или из главного меню Вид > Team Explorer или Команда > Управление подключениями.You can open Team Explorer from the search box, or on the main menu from View > Team Explorer or from Team > Manage Connections.
На изображении ниже показано окно Team Explorer для решения, размещенного в Azure DevOps Services.The following image shows the Team Explorer window for a solution that is hosted in Azure DevOps Services.
Вы также можете автоматизировать процедуру сборки, чтобы обеспечить сборку кода, который разработчики в вашей рабочей группе вернули в систему управления версиями.You can also automate your build process to build the code that the devs on your team have checked into version control. Например, можно создавать один или более проектов каждую ночь или всякий раз при возврате кода.For example, you can build one or more projects nightly or every time that code is checked in. Дополнительные сведения см. в описании Azure Pipelines.For more information, see Azure Pipelines.
Использование компонента Download all, then install (Скачать все и установить)Use the «Download all, then install» feature
: скачав веб-установщик, выберите в Visual Studio Installer вариант Скачать все и установить.: After you download the web installer, select the new Download all, then install option from the Visual Studio Installer. После этого продолжите установку.Then, continue with your installation.
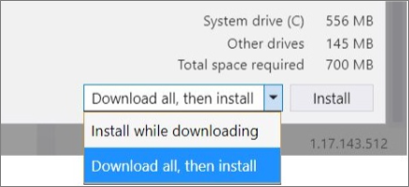
загрузив веб-установщик, выберите в установщике Visual Studio Installer новый компонент Download all, then install (Скачать все и установить).After you download the web installer, select the new Download all, then install option from the Visual Studio Installer. После этого продолжите установку.Then, continue with your installation.
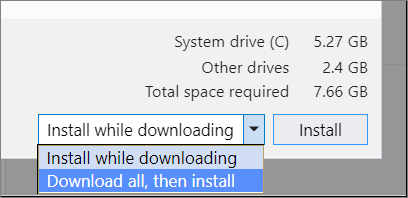
Параметр Download all, then install (Скачать все и установить) позволяет скачать Visual Studio в виде отдельного установщика для компьютера, на который он скачивается.We designed the «Download all, then install» feature so that you can download Visual Studio as a single installation for the same computer on which you downloaded it. Это позволяет безопасно отключится от Интернета перед установкой Visual Studio.That way, you can safely disconnect from the web before you install Visual Studio.
Важно!
Не используйте этот параметр, чтобы создать автономный кэш для передачи на другой компьютер.Do not use the «Download all, then install» feature to create an offline cache that you intend to transfer to another computer. Он не предназначен для этого.It’s not designed to work that way. Если вы хотите создать автономный кэш на локальном компьютере, который затем можно использовать для установки Visual Studio, см. раздел ниже.If you want to create an offline cache on the local computer that you can then use to install Visual Studio, see the section below. На странице Создание сетевой установки Visual Studio также содержатся сведения о том, как создать кэш в сети.Alternatively, the Create a network installation of Visual Studio page provides information about how to create a cache on the network.
Обновление Visual Studio 2017 версии 15.5 или более ранней версииUpdate Visual Studio 2017 version 15.5 or earlier
Если вы используете более раннюю версию, следуйте инструкциям ниже, чтобы применить обновление к Visual Studio 2017 версий 15.0–15.5.If you’re using an earlier version, here’s how to apply an update from Visual Studio 2017 version 15.0 through version 15.5.
Обновление с помощью центра уведомленийUpdate by using the Notifications hub
-
При наличии обновлений в Visual Studio отображается соответствующий флаг уведомления.When there are updates, there’s a corresponding notification flag in Visual Studio.
Выберите флажок уведомления, чтобы открыть центр уведомлений.Choose the notification flag to open the Notifications hub.
Совет
Обновление для выпуска Visual Studio 2017 является накопительным, поэтому всегда выбирайте для установки то, у которого новейший номер версии.An update for an edition of Visual Studio 2017 is cumulative, so always choose to install the one with the most recent version number.
-
Выберите уведомление Доступно обновление Visual Studio, чтобы открыть диалоговое окно Расширения и обновления.Choose «Visual Studio Update» is available, which opens the Extensions and Updates dialog box.
-
В диалоговом окне Расширения и обновления нажмите кнопку Обновить.In the Extensions and Updates dialog box, choose the Update button.
Подробнее об уведомлениях Visual StudioMore about Visual Studio notifications
В Visual Studio выводятся уведомления о доступности обновления для самой среды Visual Studio или для любых ее компонентов, а также об определенных событиях в среде Visual Studio.Visual Studio notifies you when an update is available for Visual Studio itself or for any components, and also when certain events occur in the Visual Studio environment.
- Желтый цвет флажка уведомления означает, что для установки доступно обновление Visual Studio.When the notification flag is yellow, there’s a Visual Studio product update available for you to install.
- Красный цвет флажка уведомления предупреждает о проблеме с лицензией.When the notification flag is red, there’s a problem with your license.
- Черный цвет флажка уведомления означает, что имеются дополнительные или информационные сообщения для просмотра.When the notification flag is black, there are optional or informational messages to review.
Выберите флажок уведомления, чтобы открыть центр уведомлений, а затем выберите уведомления, в отношении которых необходимо предпринять меры.Choose the notifications flag to open the Notifications hub and then choose the notifications that you want to act on. Уведомление можно также проигнорировать или закрыть.Or, choose to ignore or dismiss a notification.
Вы можете настроить пропуск уведомления, чтобы оно больше не отображалось в Visual Studio.If you choose to ignore a notification, Visual Studio stops showing it. Чтобы сбросить список игнорируемых уведомлений, нажмите кнопку Параметры в центре уведомлений.If you want to reset the list of ignored notifications, choose the Settings button in the Notifications hub.
Техническая поддержкаGet support
Иногда возникают проблемы.Sometimes, things can go wrong. Если установить Visual Studio не удается, воспользуйтесь пошаговыми указаниями в статье Устранение неполадок при установке и обновлении Visual Studio.If your Visual Studio installation fails, see Troubleshoot Visual Studio installation and upgrade issues for step-by-step guidance.
Также доступен , предназначенный для оказания помощи при проблемах с установкой (только на английском языке).We also offer an (English only) support option for installation-related issues.
Ниже приведены несколько дополнительных вариантов:Here are a few more support options:
- Вы можете сообщить о проблемах с продуктом, используя средство Сообщить о проблеме. Оно доступно как в Visual Studio Installer, так и в IDE Visual Studio.Report product issues to us via the Report a Problem tool that appears both in the Visual Studio Installer and in the Visual Studio IDE.
- Вы можете предлагать новые функции, просматривать описания проблем и искать решения в сообществе разработчиков Visual Studio.Suggest a feature, track product issues, and find answers in the Visual Studio Developer Community.
- Вы также можете связаться с нами и другими разработчиками Visual Studio, используя свою учетную запись GitHub в обсуждении Visual Studio в сообществе Gitter.Use your GitHub account to talk to us and other Visual Studio developers in the Visual Studio conversation in the Gitter community.
Visual Studio 2019 System Requirements
The following products support the minimum system requirements below:
- Visual Studio Enterprise 2019
- Visual Studio Professional 2019
- Visual Studio Community 2019
- Visual Studio Team Foundation Server Office Integration 2019
|
Supported Operating Systems |
Visual Studio 2019 will install and run on the following operating systems (64 bit recommended; ARM is not supported):
|
|
Hardware |
|
|
Supported Languages |
Visual Studio is available in English, Chinese (Simplified), Chinese (Traditional), Czech, French, German, Italian, Japanese, Korean, Polish, Portuguese (Brazil), Russian, Spanish, and Turkish. You can select the language of Visual Studio during installation. The Visual Studio Installer is available in the same fourteen languages, and will match the language of Windows, if available. Note: Visual Studio Team Foundation Server Office Integration 2019 is available in the ten languages supported by Visual Studio Team Foundation Server 2019. |
|
Additional Requirements |
|
Bootstrapper
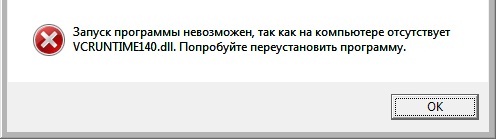
Visual Studio комплектуется гибким средством развертывания приложений под названием Bootstrapper. Бутстаппер интегрирует инсталляцию приложения и компонентов, необходимых для работы данного приложения. Среди таких компонентов находятся .NET Framework, библиотеки DirectX, J# Runtime, Microsoft Data Access Components, менеджер баз данных SQL Server и множество других. При отсутствии некоторых необходимых компонентов, многие приложения выдают сообщение об ошибке с информацией об отсутствии файла DLL. Автоматизированные средства Ботстаппера находят, загружают и устанавливают на компьютер компоненты, которые еще не установлены в системе. Visual Studio Bootstrapper автоматически установит ПО, произведет перезагрузки и полностью подготовит операционную систему для запуска приложения.
Уведомления об аварийном завершении работы или зависанияхCrash and unresponsiveness notifications
Visual Studio уведомляет вас о тех расширениях, которые могли вызвать аварийное завершение предыдущего сеанса.Visual Studio notifies you if it suspects that an extension was involved in a crash during a previous session. Когда Visual Studio аварийно завершает работу, сохраняется стек исключений.When Visual Studio crashes, it stores the exception stack. При следующем запуске Visual Studio стек проверяется, начиная с листового узла, в направлении базы.The next time Visual Studio launches, it examines the stack, starting with the leaf and working towards the base. Если Visual Studio определяет, что кадр принадлежит модулю, который является частью установленного и включенного расширения, система выводит уведомление.If Visual Studio determines that a frame belongs to a module that is part of an installed and enabled extension, it shows a notification.
Visual Studio оповещает еще и о тех расширениях, которые могут приводить к недоступности интерфейса.Visual Studio also notifies you if it suspects an extension is causing the UI to be unresponsive.
Получив такое оповещение, вы можете проигнорировать его или выполнить одно из следующих действий.When these notifications are shown, you can ignore the notification or take one of the following actions:
-
Выберите Больше не показывать это сообщение.Choose Never show this message again.
- Если уведомление относилось к аварийному завершению в предыдущем сеансе, в Visual Studio больше не будет отображаться уведомление при аварийном завершении работы этого расширения.If the notification concerns a crash in a previous session, Visual Studio no longer shows a notification when a crash associated with this extension occurs. Этот выбор не влияет на уведомления Visual Studio о зависаниях, связанных с этим расширением, а также об аварийных завершениях и зависаниях, связанных с другими расширениями.Visual Studio will still show notifications when unresponsiveness can be associated with this extension, or for crashes or unresponsiveness that can be associated with other extensions.
- Если же уведомление относилось к зависанию, в интегрированной среде разработки (IDE) больше не будут появляться уведомления о том, что это расширение связано с зависаниями.If the notification concerns unresponsiveness, the integrated development environment (IDE) no longer shows a notification when this extension is associated with unresponsiveness. В Visual Studio по-прежнему будут отображаться уведомления об аварийном завершении работы этого расширения, а также об аварийном завершении работы и зависаниях других расширений.Visual Studio will still show crash-related notifications for this extension and crash- and unresponsiveness-related notifications for other extensions.
-
Выберите Дополнительные сведения, чтобы перейти к этой странице.Choose Learn more to navigate to this page.
-
Нажмите кнопку X в конце уведомления, чтобы закрыть уведомление.Choose the X button at the end of the notification to dismiss the notification. В этом случае уведомление снова отобразится в следующий раз, когда экземпляры этого расширения будут связаны с аварийным завершением или зависанием пользовательского интерфейса.A new notification will appear for future instances of the extension being associated with a crash or UI unresponsiveness.
Примечание
Уведомление о зависании или аварийном завершении пользовательского интерфейса означает только то, что один из модулей конкретного расширения находился в стеке в тот момент, когда произошло аварийное завершение.A UI unresponsiveness or crash notification means only that one of the extension’s modules was on the stack when the UI was unresponsive or when the crash occurred. Это не обязательно означает, что расширение стало причиной сбоя.It does not necessarily mean that the extension itself was the culprit. Возможно, расширение вызвало внутренний код Visual Studio, который привел к аварийному завершению или зависанию пользовательского интерфейса.It’s possible that the extension called code that’s part of Visual Studio, which in turn resulted in unresponsive UI or a crash
Но эти уведомления могут быть полезны, если расширение, приводящее к аварийному завершению или зависанию пользовательского интерфейса, не очень важно для вас.However, the notification may still be useful if the extension which led to the UI unresponsiveness or crash is not important to you. Отключив такое расширение, вы сможете избежать аналогичных проблем в будущем без ущерба для производительности.In this case, disabling the extension avoids the UI unresponsiveness or the crash in the future, without impacting your productivity
Техническая поддержкаGet support
Иногда возникают проблемы.Sometimes, things can go wrong. Если установить Visual Studio не удается, воспользуйтесь пошаговыми указаниями в статье Устранение неполадок при установке и обновлении Visual Studio.If your Visual Studio installation fails, see Troubleshoot Visual Studio installation and upgrade issues for step-by-step guidance.
Также доступен , предназначенный для оказания помощи при проблемах с установкой (только на английском языке).We also offer an (English only) support option for installation-related issues.
Ниже приведены несколько дополнительных вариантов:Here are a few more support options:
- Вы можете сообщить о проблемах с продуктом, используя средство Сообщить о проблеме. Оно доступно как в Visual Studio Installer, так и в IDE Visual Studio.Report product issues to us via the Report a Problem tool that appears both in the Visual Studio Installer and in the Visual Studio IDE.
- Вы можете предлагать новые функции, просматривать описания проблем и искать решения в сообществе разработчиков Visual Studio.Suggest a feature, track product issues, and find answers in the Visual Studio Developer Community.
- Вы также можете связаться с нами и другими разработчиками Visual Studio, используя свою учетную запись GitHub в обсуждении Visual Studio в сообществе Gitter.Use your GitHub account to talk to us and other Visual Studio developers in the Visual Studio conversation in the Gitter community.
Visual Studio 2017 версии 15.6 или более позднейUpdate Visual Studio 2017 version 15.6 or later
Мы ускорили процесс установки и обновления, чтобы его можно выполнять непосредственно в интегрированной среде разработки.We’ve streamlined the installation and update experience to make it easier to use directly from within the IDE. Вот как можно обновить версию 15.6 и более поздние версии до последней версии Visual Studio.Here’s how to update from version 15.6 and later to newer versions of Visual Studio.
Использование Центра уведомленийUsing the Notifications hub
При наличии обновлений в Visual Studio отображается соответствующий флаг уведомления.When there’s an update, there’s a corresponding notification flag in Visual Studio.
-
Сохраните результаты своих действий.Save your work.
-
Выберите флаг уведомления, чтобы открыть центр уведомлений, а затем выберите уведомление, которое вы хотите установить.Choose the notification flag to open the Notifications hub, and then choose the update that you want to install.
Совет
Обновление для выпуска Visual Studio 2017 является накопительным, поэтому всегда выбирайте для установки то, у которого новейший номер версии.An update for an edition of Visual Studio 2017 is cumulative, so always choose to install the one with the most recent version number.
-
Когда откроется диалоговое окно Обновление, выберите Обновить сейчас.When the Update dialog box opens, choose Update Now.
Если откроется диалоговое окно управления доступом пользователя, выберите Да.If a User Access Control dialog box opens, choose Yes. Затем на некоторое время может открыться диалоговое окно с сообщением «Пожалуйста, подождите». Затем откроется Visual Studio Installer, чтобы начать обновление.Next, a «Please wait» dialog might open for a moment, and then the Visual Studio Installer opens to start the update.
Обновление продолжается.Your update continues. Когда обновление завершится, Visual Studio перезапустится.Then, when it’s complete, Visual Studio restarts.
Примечание
Если вы запускаете Visual Studio с правами администратора, вручную перезапустите его после обновления.When you run Visual Studio in administrator mode, you must manually restart Visual Studio after the update.
Использование интегрированной среды разработкиUsing the IDE
Можно проверить наличие обновлений и установить из в строке меню Visual Studio.You can check for an update and then install the update from the menu bar in Visual Studio.
-
Сохраните результаты своих действий.Save your work.
-
Выберите Справка > Проверка обновлений.Choose Help > Check for Updates.
-
Когда откроется диалоговое окно Обновление, выберите Обновить сейчас.When the Update dialog box opens, choose Update Now.
Как описано в предыдущем разделе, Visual Studio перезагружается после успешного завершения обновления.The update proceeds as described in the previous section, and then Visual Studio restarts after the update completes successfully.
Примечание
Если вы запускаете Visual Studio с правами администратора, вручную перезапустите его после обновления.When you run Visual Studio in administrator mode, you must manually restart Visual Studio after the update.
Использование Visual Studio InstallerUsing the Visual Studio Installer
Как и в предыдущих версиях Visual Studio, для установки обновлений можно использовать Visual Studio Installer.As in earlier versions of Visual Studio, you can use the Visual Studio Installer to install an update.
-
Сохраните результаты своих действий.Save your work.
-
Запустите установщик.Open the installer. Прежде чем продолжить, может потребоваться обновить Visual Studio Installer.The Visual Studio Installer might require updating before you continue.
Примечание
На компьютере под управлением Windows 10 установщик можно найти в списке по букве V (Установщик Visual Studio) или по букве M (Установщик Microsoft Visual Studio).On a computer running Windows 10, you can find the installer under the letter V as the Visual Studio Installer, or under the letter M as the Microsoft Visual Studio Installer.
-
На странице Продукт установщика найдите установленный ранее выпуск Visual Studio.On the Product page in the installer, look for the edition of Visual Studio that you installed previously.
-
Если обновление доступно, вы увидите кнопку Обновить.If an update is available, you see an Update button. (Поиск доступных обновлений может занять несколько секунд.)(It might take a few seconds for the installer to determine whether an update is available.)
Чтобы установить обновления, нажмите кнопку Обновить.Choose the Update button to install the updates.