Из excel в jpg
Содержание:
- office Convert Document To Image Free
- Сохранение картинки из MS Excel в файл без использования внешних компонент
- Сохранение картинки, фото и т. д.
- 3 Best JPG to Excel Converter—Online Free
- Как извлечь картинки из Excel файла? Это элементарно!
- Convert .xls to .jpg (.xlsx to .jpg) with Snipping Tool
- Save Excel data as image (.jpg, .png or .gif)
- Export Excel to JPG with Camera tool
- Best JPG to Excel OCR Converter for Windows PC
- Извлечение картинок
- Как сохранить файлы Excel в формате JPEG
- LibreOffice Calc
- Convert Excel to JPG by using Print Screen feature
- Excel to JPG converters online
- Сохранить изображения с листа Excel в файлы
- Best JPG to Excel OCR Converter for Mac
- Universal Document Converter
- Free Excel XLS to Image Jpg Bmp Converter
- Автоматическая конвертация файлов Excel в формат JPEG в офисе
office Convert Document To Image Free
office Convert Document To Image Free is another free Excel to JPG converter software for Windows. It is a simple and straightforward software through which you can convert Excel files (XLSX, XLS, etc.) to JPG, BMP, GIF, RLE, PNG, etc. images. The good thing about this software is that you can convert any Excel file (CSV, XLS, XLSX, etc.) to JPG format.
To convert Excel to JPG, first, load Excel files to this software using Add files or Add Folder option. After that, go to its Save Folder section and set the output file location. Now, move to Image Section and select JPG as the output format. At last, press the Convert Button to start the Excel to JPG conversion process. The output file that you get can directly be opened in an image viewer software.
Note: In this free version of this software, you get a small watermark at the bottom of the images. Also, you face limitations like disabled Batch File Conversion feature, Image Resolution Changer, File Merger, etc.
Сохранение картинки из MS Excel в файл без использования внешних компонент
Простого пути не нашел, пришлось идти окольными путями.
Конечно же, сначала в интернет. обнаружил, что люди сталкиваются с теми же проблемами, что и я.
Немного об объектной модели Excel.
1. Приложение: Application. Приложение мы создаем так:
Application = Новый COMОбъект ( “Excel.Application” );
2. Приложение имеет колекцию книг: Application.Workbooks.
Файл эксель открывается как книга Workbook, т.е. элемент коллекции Workbooks, например,
Workbook = Application . Workbooks . Item ( 0 );
или когда хотим открыть файл-excel
Workbook = Application . Workbooks . Open ( ПутьКФайлу );
3. Коллекция листов и диаграмм Workbook.Sheets,
можно и по отдельности обойти коллекцию листов Workbook.Worksheets и коллекцию диаграмм Workbooks.Charts, а можно одним махом через коллекцию Sheets.
Каждый элемент этой коллекции (лист или диаграмма) имеют свойство Shapes с коллекцией объектов Shape, дословно “фигура”.
4. Коллекция фигур Sheet.Shapes содержит коллекцию различных графических объектов листа или диаграммы.
В числе этих графических объектов можно найти и картинку.
5. Картинка. Каждый элемент Shape коллекции Shapes имеет свойство Shape.Type, которое принимает значения перечисления MsoShapeType. Одно из значений этого перечислений MsoShapeType.msoPicture = 13 . То, что нужно.
Таким образом мы можем найти все объекты картинок в любом файле MS Excel, и это не сложно.
6. Картинку в файл. А вот, что делать каждым объектом Shape, чтобы его выгрузить в файл – это уже вопрос.
Методов у фигуры Shape много. Единственный, хоть как-то касающийся вопроса, это метод CopyPicture, при вызове этого метода картинка копируется в буфер обмена. От чего легче не становится.
Встает другой вопрос, как достать из буфера картинку, или переложить в другой объект Excel, где есть нужные методы.
Можно было бы экспортировать лист с нужной картинкой в HTML документ, а затем в папке документа html *.files поискать картинки. Сумбурный метод.
Оказывается, удобней из буфера переложить картинку в объект диаграммы Chart, при этом подогнав размеры диаграммы под картинку, а диаграмму можно аккурат сохранить как картинку в нужный файлик. Это уже порядок.
Всем этим занимается следующая функция. Даём ей объект Shape, ИмяФайла и ТипФайла:
// Сохранение картинки из объекта Shape в файл. // FilterName – строка, JPG, GIF, PNG, BMP и т.д. Функция СохранитьКартинкуВФайл ( Shape , FileName , FilterName = Неопределено) Экспорт
// Инициализируем константы VBA. msoFalse = 0 ; msoPicture = 13 ; xlLineStyleNone = – 4142 ; xlWBATWorksheet = – 4167 ;
// Проверяем тип объекта. Если Shape . Type msoPicture Тогда Возврат Ложь; КонецЕсли;
// Создаем новую книгу с единственным листом. Книга = Shape . Application . Workbooks . Add ( xlWBATWorksheet );
// Создаем диаграмму, в которую копируем картинку. Диаграмма = Книга . Worksheets . Item ( 1 ). Shapes . AddChart (). Chart ;
// Устанавливаем размер диаграммы как у картинки. Диаграмма . ChartArea . Height = Shape . Height ; Диаграмма . ChartArea . Width = Shape . Width ;
// Убираем границу диаграммы. Диаграмма . ChartArea . Border . LineStyle = xlLineStyleNone ;
// Убираем заполнение диаграммы. Диаграмма . ChartArea . Fill . Visible = msoFalse ;
// Копируем картинку в буфер. Shape . CopyPicture ();
// Вставляем данные в диаграмму из буфера. Диаграмма . Paste ();
// Экспортируем диаграмму в картинку (*.jpg, *.gif, *.bmp, *.png). Успех = Диаграмма . Export ( FileName , FilterName );
// Закрываем книгу без сохранения изменений. Книга . Close (False);
Во вложении конфигурация с примером использования функции.
Сохранение картинки, фото и т. д.
Итак, мы разобрались, как можно копировать рисунок и вставить его в документ, а кроме этого, выяснили, где и каким именно изменениям можно его подвергнуть. Однако иногда встаёт вопрос, как же «вытянуть» или сохранить изображения, которые размещены в скачанном с интернета документе формата Excel? Существует несколько вариантов.
- Сохраните документ в формате интернет-страницы, то есть html. Выберите пункт «Меню», а там «Сохранить как». В выпадающем списке пункта «Типа файла» выберите веб-страница. Там их несколько и вы можете выбрать любую. Перейдите в ту директорию, где был сохранен ваш документ и откройте его с помощью браузера. В нём вы увидите сам текст и все изображения, которые будет легко скачать просто кликнув на них правой кнопкой мыши и выбрав команду «Сохранить картинку как». Название самой команды может варьироваться, в зависимости от установленного браузера.
- Если изображение изначально имеет хорошее разрешение и качество, вы можете растянуть его, скопировать, используя комбинацию клавиш «Ctrl+C», а затем открыть стандартную программу Paint и вставить. Затем сохраняем и получаем файл в формате PNG.
- Кроме вышеуказанных простых операций, популярность программы Excel обеспечила её дополнительным софтом, который предназначен для решения разнообразных специфических и конкретных задач. Именно с этой целью была создана надстройка именуемая PastePictures. Благодаря ей, программа производит поиск картинок в указанной папке, основываясь на содержимом ячеек таблицы, а затем вставляет их в соседние ячейки или примечания к ним. Помимо этого, её функциональность позволяет скачивать изображения по ссылкам и сохранять их в конкретные папки, а затем вставлять в примечания к ячейкам. Скачав надстройку и открыв её, вам будет предоставлена возможность тестового прогона, во время которого вы увидите её основные возможности на примере специально созданного документа, куда затем будут добавлены картинки и изменён формат таблицы. Кроме этого, в ней есть множество других параметров, которые позволят вам с удобством работать над таблицами, вставлять и сохранять изображения. Выше был описан процесс вставки картинок в документ. Чтобы сохранить их, выберите установленную надстройку и в левом верхнем углу кликните на команду «Изображения». В ней вы увидите пункт «Сохранить картинки с листа в файлы», благодаря которому вы и перенесёте изображения в память вашего компьютера. Скачать надстройку можно, перейдя по этой ссылке – http://excelvba.ru/programmes/PastePictures.
Вышеуказанные действия помогут вам в решении проблемы сохранения и вставки разнообразных изображений в документах формата Excel, а некоторые из них применимы и в Word.
3 Best JPG to Excel Converter—Online Free
If you are new to convert JPG to Excel, you may be looking for an online free JPG to Excel ocr converters as many other users do, since they are free and super easy to use. Anything that costs nothing but does the job for you is attractive. So, we will start with the top list of 3 best online free JPG to Excel converters.
#1 Online2pdf
Whenever I was asked to recommend an online free tool to convert files, online2pdf is always on the top of my list. Online2pdf is a powerful file converter, allowing users to convert PDF and images, also helping on editing, compressing, unlocking, protecting, merging PDFs. The greatest part of using this tool is the high-quality conversion result. In my test, I captured a table and saved in JPG format, online2pdf helped to recognize the tables in original formatting.
Pros:
- Good quality;
- Free and easy to use;
- Support native PDF, scanned PDF and images;
- Allow customizing Excel output;
- Batch convert;
- Export as various formats;
Cons:
- Poor quality when working on complicate files;
- Recognize only 6 languages;
Steps to Convert JPG to Excel Online Free with Online2pdf
- Click “Select files” to add JPG files into the program;
- Choose output as Excel and select the file language in OCR options;
- (Optional) In the preferences option, customize the Excel output as needed;
- Click “Convert” to turn JPG to Excel format;
- Once the conversion finishes, the Excel will be downloaded automatically, save it to your device.
Best JPG to Excel OCR Converter for Mac
-
Enolsoft PDF Converter with OCR
Convert JPG, PNG and other images to Excel, Word, searchable PDF, etc.;
Recognize 200+ languages;
Convert native, scanned and protected PDF to 16 formats;
Convert images to images;
Batch convert files;
Preserve original file layout and formatting;
Allow to add password to the PDF output;
Free download
#2 OnlineOCR
OnlineOCR is another online free JPG to Excel converter with accurate OCR results and good formatting. It is super easy to use and can recognize more than 40 languages in the file. Even, you are allowed to preview the conversion results before downloading the Excel file.
Pros:
- Good quality;
- Free and easy to use;
- Recognize 40+ languages;
- Preview results before downloading Excel output;
Cons:
- Output needs manual adjustments when working on complicate files;
- Cannot batch convert;
- Support exporting to only 3 formats;
- Max file size 15mb;
Steps to Convert JPG to Excel Online Free with OnlineOCR
- Click “Select file” to add JPG files to the program;
- Choose file language;
- Choose output as Excel;
- Click “Convert” to change JPG to Excel;
- Once the conversion finishes, download the Excel file;
#3 Zamzar
In fact, Zamzar doesn’t allow to convert JPG to Excel directly, you will need to save the JPG file as PDF first, then convert PDF to Excel. And the reason why I still put this on the top 3 list is due to its capability to yield good conversion quality as other 2 online free converters. Even, Zamzar allows users to convert virtually all files, such as videos, audios, documents, ebooks, archives, etc.
Pros:
- Good quality;
- Easy to use;
- Support converting all kinds of files;
- Export as different formats;
- Batch convert;
Cons:
- Output needs manual adjustment when working on complicate files;
- Only 2 files can be converted for free;
Steps to Convert JPG to Excel Online Free with Zamzar
- Click “Add Files” to import JPG files;
- Choose output as PDF, then click “Convert Now” to save JPG as PDF first;
- Then upload the PDF to Zamzar again;
- Choose output as Excel;
- Click “Convert Now” to turn JPG file to Excel format;
What About Other Online Free JPG to Excel Converters?
There are other online JPG to Excel converters available and I did tested them to find out if there are more options to convert JPG to Excel online free. However, they all fall short on the conversion quality.
For example, many users are wondering if they can convert JPG to Excel with smallpdf. The answer is Yes, but similar to Zamzar, you will need to save JPG as PDF first, then convert PDF to Excel with smallpdf. According to my test, smallpdf cannot fully recognize the text and there is no formatting retained. So, if you want to recognize some simple text from an image file, smallpdf worth a try.
When talking about converting JPG to Excel with ilovepdf, it is a pity that ilovepdf won’t help on this. I tried to upload the same testing file to ilovepdf, other online programs could process the conversion, but ilovepdf couldn’t even recognize there were tables in the PDF file.
But this doesn’t mean there are no alternatives to those best 3 converters, you can still have a try on easypdf, online-convert and other online free OCR tools to turn a JPG file to Excel format.
Как извлечь картинки из Excel файла? Это элементарно!
Всем привет! В этой статье я расскажу, как просто и легко можно извлечь картинки из файла Excel.
Это может понадобиться в разных ситуациях, например тем, кому поставщик прислал прайс с картинками и ценами, а вам необходимо эти самые картинки разместить уже у себя на сайте. Но поскольку автоматических программ для перетаскивания самого файла “Иксель” вместе с картинками на сайт у вас – нет, приходится всё делать вручную.
Если это одна-две картинки, проблемы нет вообще. Их можно просто скопировать в буфер обмена (Ctrl + Insert), а затем спокойно вставить в Power Point и сохранить как рисунок. Подробнее об этой процедуре я рассказывал в статье: “Как просто и быстро сохранить картинку из Word 2007: пошаговая инструкция”.
Но что делать, если этих картинок миллион?! Сохранять их все по одной – это просто убийство!
И что же, ничего нельзя поделать?! Неужели нельзя вот так сразу же, раз, да и вытащить картинки из Excel одним нажатием на кнопку мыши?!
Одним нажатием – не обещаю. Но извлечь картинки скопом из “Экселя” – помогу! Делается это совершенно элементарно!
Как извлечь картинки из Excel файла: пошаговая инструкция
1. Открываете Excel-файл.
Видите кучу картинок.
2. Нажимаете “Сохранить как”
Но не просто сохраняете файл, а сохраняете его, как – Веб страница (*.htm,*.html).
Название придумайте любое. Я, к примеру, сохраняю файл, как “ПРАЙС”.
3. Открываете ваш сохранённый файл (а, вернее, уже папку)
И вуаля! Вот они – картинки.
Как видите, действительно – элементарно!
Больше полезных советов от меня вы найдёте в рубрике этого блога “СОВЕТЫ”.
Convert .xls to .jpg (.xlsx to .jpg) with Snipping Tool
It is another amazingly simple way to get an image of your Excel sheet that very few people know about. Snipping Tool is specially designed to take a snapshot of the screen and is included with all modern versions of Windows, from Windows 7 to Windows 10.
Unlike the Print Screen feature, Snipping Tool gives you the following choices as to what to capture:
- Free-form snip — you can draw any shape on the screen and only that part of your Excel sheet will be included in an image.
- Rectangular snip — the default option that captures rectangular snips.
- Window snip — allows capturing a dialog box or a resized Excel window.
- Full-screen snip — captures the entire screen, the same as Print Screen.
To locate Snipping Tool on your computer, click the Start button, type «snipping tool» in the search box, and then click on Snipping Tool in the list of results. If you don’t want to capture a snip immediately, click the Minimize button to send it to the task bar, switch to Excel and open the spreadsheet of interest.
To convert an Excel sheet to JPG (or another image format), perform the 3 quick steps outlined below:
- Choose what kind of snip you want to capture. For this, click the little arrow next to the Mode button (in older versions, click the arrow next to New), and select one of the options described above.
- Select the area of your sheet that you want to capture. This will immediately copy the selected area to the Snipping Tool window.
- Click the Save button, type the file name, choose your preferred image format (.jpg, .png and .gif are supported) and click OK. That’s all there is to it!
Tip. To make some edits to the captured image, use the Pen, Highlighter and Eraser tools shown in the screenshot below.
Save Excel data as image (.jpg, .png or .gif)
Whatever simple and straightforward the previous methods are, they have one significant limitation — they can only capture the part of a worksheet that is visible on the screen. In some situations, zooming out might help, but not when it comes to capturing a really big table that contains tens or thousands of rows. To get around this limitation, use the good old copy/paste technique, which allows copying any part of an Excel sheet including beyond the scroll areas, and then pasting the copied contents to wherever you want.
To save your Excel worksheet as a .jpg image, perform the following steps:
-
Select a table, chart, shape or any other Excel data that you want to save as an image.
Tip. To select a big table, select the first cell and press Ctrl + Shift + Enter to extend the selection of the last used cell.
- Press Ctrl + C to copy the selection to the clipboard.
Alternatively, on the Home tab, in the Clipboard group, click the little arrow next to Copy, and then click Copy as Picture…
This will give you the choice of whether to save the copied data As shown on screen or As shown when printed:
- Open Microsoft Paint or any other graphics editor.
- Press Ctrl + V to paste the copied data.
- Save the newly created file as GPEG, GIF or PNG image. Done!
Visually, an Excel table saved as an image is indistinguishable from the original one. If you copy the image back to Excel, it’s almost impossible to spot the difference unless you try selecting the data 🙂
Tip. If you’d rather not have gridlines in the image, switch to the View tab and clear the Show gridlines check box before copying the data.
Export Excel to JPG with Camera tool
One more way to quickly take a snapshot of your Excel data is using the Camera tool. A really cool feature of Excel Camera is that it creates a dynamic image that syncs with the original dataset and gets updated whenever the original data changes.
In order to use the Camera tool, you must add it to the ribbon or Quick Access Toolbar manually because it does not show up by default. To have it done, perform these steps:
- Click the small drop-down button in the upper-left corner of your Excel and select More Commands…. This will open the Options dialog box.
- On the right pane, under Choose commands from, select Commands Not in the Ribbon.
- Scroll down the list until you find the Camera command, select it and click the Add button to move it to the right-hand section.
- Click OK.
Now, you have the Camera button on the Quick Access Toolbar:
To save an Excel table as image using Camera, just do the following:
- Select a range of cells you want to capture. To make a photo of a chart, select the cells surrounding it.
- Click on the Camera
- Click anywhere in the worksheet where you want to place a snapshot. Bingo!
Now, you can make the image bigger or smaller by dragging the sizing handles. Or, you can apply different Picture Styles by using the Picture Tools tab that appears as soon as you select the image. For example:
Tip. By default, Microsoft Excel adds a border to the image, if you don’t want it, click Picture border > No outline on the Format tab, in the Picture styles group.
When you are happy with the image design, you can export the Excel camera output to anywhere. For this, simply select the picture and press Ctrl + C to copy it (or right-click and then click Copy). After that, open another application, say Paint, Word or PowerPoint, and press Ctrl + V to paste the copied image. Or, you can assemble bits from several worksheets onto one page, and then save it as image by using any of the methods described above. Just remember that only a linked picture on the sheet is «live». When copied outside of Excel, it becomes a regular image and it won’t update when the original data in the worksheet changes.
Best JPG to Excel OCR Converter for Windows PC
ABBYY FineReader 14 for Windows is a powerful program allowing users to edit, convert, scan even compare PDFs on Windows PC. It brings highly accurate conversion results and recognize hundreds of languages. For being so, couple with the extended features it offers, ABBYY FineReader comes with a high price tag.
Main Features:
- Edit PDFs within the program: search, review, comment, protect, fill forms;
- Convert PDF, scanned files and images into Excel, Word, and other editable formats;
- Compare PDF smartly;
- Customize settings;
- Automate conversion;
Steps to Convert JPG to Excel on Windows with ABBYY FineReader 15
- Free download ABBYY FineReader JPG to Excel software onto your Windows PC, install and launch the program;
- Click “Open”, choose “Convert to Microsoft Excel”, then upload JPG file;
- Then in the “Keep formatting” menu, choose “Editable copy”;
- Then the Excel file will be opened with your defaulted reader, save it.
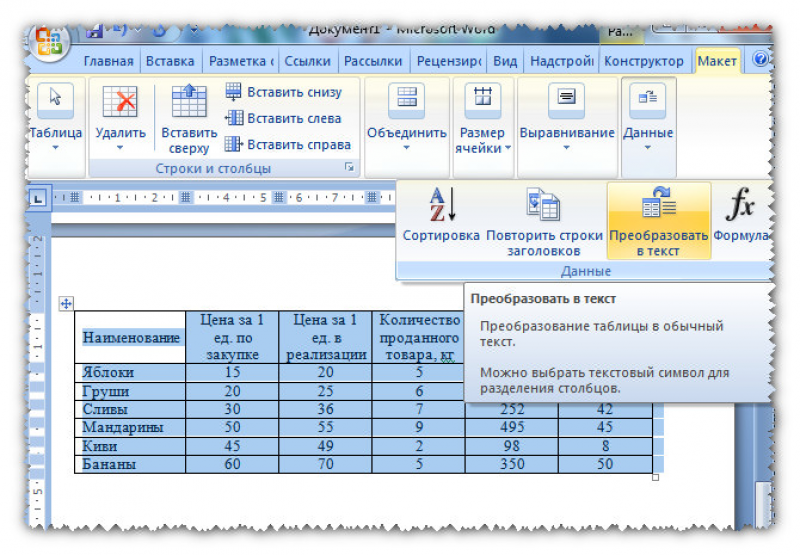
Извлечение картинок
Главным критерием выбора конкретного способа является тот факт, хотите ли вы вытащить одиночное изображение или произвести массовое извлечение. В первом случае можно удовлетвориться банальным копированием, а вот во втором придется применить процедуру конвертации, чтобы не терять время на извлечении каждого рисунка по отдельности.
Способ 1: копирование
Но, прежде всего, давайте все-таки рассмотрим, как произвести извлечение изображения из файла методом копирования.
-
Для того чтобы скопировать изображение, прежде всего его нужно выделить. Для этого кликаем по нему один раз левой кнопкой мыши. Затем выполняем щелчок правой кнопкой мыши по выделению, тем самым вызывая контекстное меню. В появившемся списке выбираем пункт «Копировать».
Можно также после выделения изображения перейти во вкладку «Главная». Там на ленте в блоке инструментов «Буфер обмена» щелкаем по пиктограмме «Копировать».
Существует и третий вариант, при котором после выделения нужно нажать на комбинацию клавиш Ctrl+C.
- После этого запускаем любой редактор изображений. Можно, например, воспользоваться стандартной программой Paint, которая встроена в Windows. Производим вставку в эту программу любым из тех способов, которые в ней доступен. В большинстве вариантов можно воспользоваться универсальным способом и набрать комбинацию клавиш Ctrl+V. В Paint, кроме этого, можно нажать на кнопку «Вставить», расположенную на ленте в блоке инструментов «Буфер обмена».
После этого картинка будет вставлена в редактор изображений и её можно сохранить в виде файла тем способом, который доступен в выбранной программе.
Преимущество данного способа заключается в том, что вы сами можете выбрать формат файла, в котором сохранить картинку, из поддерживаемых вариантов выбранного редактора изображений.
Способ 2: массовое извлечение изображений
Но, конечно, если изображений больше десятка, а то и несколько сотен, и их всех нужно извлечь, то вышеуказанный способ представляется непрактичным. Для этих целей существует возможность применить конвертацию документа Excel в формат HTML. При этом все изображения автоматически будут сохранены в отдельной папке на жестком диске компьютера.
- Открываем документ Excel, содержащий изображения. Переходим во вкладку «Файл».
В открывшемся окне щелкаем по пункту «Сохранить как», который находится в левой его части.
После этого действия запускается окно сохранения документа. Нам следует перейти в ту директорию на жестком диске, в которой желаем, чтобы разместилась папка с картинками. Поле «Имя файла» можно оставить без изменения, так как для наших целей это не важно. А вот в поле «Тип файла» следует выбрать значение «Веб-страница (*.htm; *.html)». После того, как вышеуказанные настройки произведены, щелкаем по кнопке «Сохранить».
Возможно, при этом появится диалоговое окно, в котором будет сообщаться, что файл может иметь возможности, несовместимые с форматом «Веб-страница», и при конвертации они будут утеряны. Нам следует согласиться, нажав на кнопку «OK», так как единственной целью является извлечение картинок.
После этого открываем Проводник Windows или любой другой файловый менеджер и переходим в директорию, в которой сохранили документ. В этой директории должна образоваться папка, которая содержит наименование документа. Именно в этой папке и содержатся изображения. Переходим в неё.
Как видим, картинки, которые были в документе Excel, представлены в этой папке в виде отдельных файлов. Теперь с ними можно выполнять те же манипуляции, что и с обычными изображениями.
Вытащить картинки из файла Excel не так уж сложно, как могло показаться на первый взгляд. Это можно сделать либо путем простого копирования изображения, либо путем сохранения документа, как веб-страницы, встроенными инструментами Эксель.
Опишите, что у вас не получилось.
Наши специалисты постараются ответить максимально быстро.
Как сохранить файлы Excel в формате JPEG
Вы можете сохранить файл Excel в формате JPEG при помощи программы Универсальный Конвертер Документов – виртуального принтера, который не “печатает” файлы на бумаге, но позволяет изменять их формат, таким образом она легко сохранит файлы Excel в формате JPEG.
Универсальный Конвертер Документов добавляет панель инструментов с “горячими клавишами” к интерфейсу Microsoft Excel. Для конвертации файлов Excel в формат JPEG достаточно лишь пары нажатий мыши: перейдите на панель инструментов Универсального Конвертера Документов и нажмите одну из трех кнопок: Convert to PDF (Конвертировать в PDF), Convert to JPG (Конвертировать в JPG) или Convert to TIFF (Конвертировать в TIFF).
LibreOffice Calc
LibreOffice Calc is an application of free and open source LibreOffice suite. Using it, you can easily convert Excel (CSV, XLS, TSV, etc.) to JPG image format. However, it only converts one page of the file or about first 50 rows of Excel to JPG image. The process of Excel to JPG conversion is pretty simple. First, load an Excel file and use its Export Option to save it in JPG file format. Apart from JPG, you can export an Excel file to XHTML, PDF, XML, PNG, etc. formats. This software also provides various tools sections through which you can edit an Excel document before the conversion.
Let’s take a brief look at various available editing sections:
- Edit: Using this section, you can enable Edit and Cell Edit modes to perform quick editing. Plus, common tools like Cut, Paste, and Find and Replace can also be found here.
- Insert: This section lets you insert various elements into the Excel file like Images, Tables, Charts, Objects, etc.
- Format: It helps you adjust the formatting of your Excel document like Spacing, Number Format, Spreadsheet Themes, Row & Column Height, etc.
- Sheet: Through this section, you can insert a new Cell, Row, Column, etc. Plus, a completely new sheet can also be entered in the existing sheet through it.
- Tools: Many handy tools like Spelling, Automatic Spell Checking, AutoCorrect, Password Protect Sheet, etc. are available in it.
In the LibreOffice Suite, you will also get many other LibreOffice products other than Calc such as Writer, Impress, Draw, Writer/Web, and more.
Windows
Write a Comment
Convert Excel to JPG by using Print Screen feature
It is the most popular technique to convert the currently visible on-screen part of your Excel sheet to JPG or any other image format. Here’s how:
- Zoom in or out the worksheet so that all data of interest is visible on the screen.
- Press the PrtSc key on your keyboard while holding the Alt key.
- Open a graphics editor of your choosing, Microsoft Paint works just fine for this purpose.
- Paste the copied screen by clicking the Paste button or pressing the Ctrl + V shortcut.
- Click the blue drop down arrow in the upper left corner of the Paint window, and then click Save As to save the pasted image. Or, simply press Ctrl + S (a shortcut to save a file that works in most programs).
- In the Save as window, type the desired file name, and choose one of the following image formats:
- JPEG (.jpg) — right choice for complex pictures and photos.
- GIF — great for creating low-resolution images, which is best suited for simple drawings.
- PNG — allows creating low-resolution files that load quickly but look crisp and beautiful, it’s suitable for almost anything.
- Click Save and you are done!
Here’s what my sample Excel table exported to Paint looks like:
Tip. The Print Screen feature captures everything on the screen, including the ribbon, top menu, scrollbar and sheet tabs. If you want to export only the data, use the Crop function to cut off extra parts before saving an image.
Excel to JPG converters online
If you have a lot of Excel files to be exported to images, you can save time by committing the job to some online Excel to jpg converter. Below you will find just a couple of many free converters available on the web.
Convertino — Convert XLS to JPG online & free
It is my favorite online converter that supports a great variety of document and image formats including Excel to JPEG conversion.
Here’s how you can convert Excel to JPG online:
- Select the source .xls or .xlsx file from your computer, Google Drive, Dropbox or drag it on the page using the mouse.
- Choose «to JPG» or select another image format (over 20 different formats are supported such as JPEG, PNG, TIFF, BMP, GIF, etc.)
- Download the converted JPG file or save it directly to your Dropbox or Google Drive (the best bit is that they do not ask for an email address to send the output to).
Note. When using a free version of Convertino, the maximum file size is 100 MB.
To give it a try, please follow this link: Convertino Excel to JPG.
Zamzar — free online Excel to JPG conversions
To see it in action, please follow this link: Zamar XLS to JPG.
If for some reason neither of the above tools suits you, you can find plenty more similar services by typing something like «convert xls to jpg online» or «xlsx to jpg online» in your preferred search engine.
This is how you can convert Excel to JPG online and desktop. I thank you for reading and hope to see you on our blog next week!
Сохранить изображения с листа Excel в файлы
Надстройка позволяет экспортировать все изображения с листа Excel в графические файлы.
Доступен выбор типа создаваемых файлов (поддерживаются форматы JPG, GIF и PNG)
Кроме того, можно указать имя папки, в которую будут помещены созданные файлы (эта папка будет создана автоматически в том же каталоге, где расположен обрабатываемая книга Excel)
Если нужно сохранять картинки под именами из заданного столбца, либо производить другие действия с картинками (вставку на лист, вставку по ссылкам, поиск картинок в интернете), то воспользуйтесь универсальной надстройкой PastePictures. Функция выгрузки изображений в файлы там присутствует в меню Изображения — Сохранить картинки с листа
В имени папки можно указать кодовое слово $filename – оно будет заменено на название текущего (обрабатываемого) файла Excel.
Для запуска экспорта картинок в файлы нажмите комбинацию клавиш Ctrl + Shift + P
На форме выберите формат сохраняемых изображений, и название папки для экспорта:
По завершении сохранения изображений макрос выдаст уведомление:
Результат экспорта изображений в созданной папке:
Ознакомьтесь также со способом сохранения в графические файлы всех диаграмм на листе Excel
| Вложение | Размер | Загрузки | Последняя загрузка |
|---|---|---|---|
| Надстройка ExportPictures.xla | 37 КБ | 64 | 3 года 1 неделя назад |
| Книга Excel с картинками для тестирования надстройки ExportPictures | 361.5 КБ | 246 | 1 год 48 недель назад |
63232 просмотра
Best JPG to Excel OCR Converter for Mac
Though there are good online free tools available to export JPG as Excel, many users still pay for an offline JPG to Excel converter in the end. One reason is that online free tools are borne with potential risk of information leakage and unstable conversion quality, while the other reason is that offline ones bring high-quality and professional conversion results.
Here for Mac users, you are recommneded with Enolsoft PDF Converter with OCR for mac, it is a professional OCR converter to export scanned files and images into multiple editable formats, including Excel, Word, PowerPoint, Pages, Keynote, Text, ePub, etc.
Main Features of Enolsoft PDF Converter with OCR
- Perform OCR on scanned files and images, export as editable formats (Searchable PDF, Excel, Word, Powerpoint, Keynote, Pages, Text, ePub, etc.);
- Recognize 200+ languages;
- Convert native PDF to 16 formats;
- Batch convert files;
- Preserve original file layout and formatting;
- Convert full file or specified page range;
- Support password-protected PDFs;
- Allow to add password to the PDF output;
- Free download Enolsoft JPG to Excel converter onto your mac, install and launch the program;Download
- Drag and drop JPG files into the program, it supports batch convert JPG to Excel on mac;
- Choose the JPG file language and select the output as Excel;
- Click “Convert” to change JPG to Excel on mac.
Universal Document Converter
Universal Document Converter is yet another free Excel to JPG Converter Software for Windows. Using it, you can easily convert Excel files to JPG image format. Along with JPG, you can also convert Excel files to PDF through this software.
This software works slightly different than other software as it does not come with any interface. So, to convert JPG to JPG, first, you need to open your Excel file using any Excel supported software. After that, use the print feature of that software and select Universal Document Converter option. The Universal Document converter option lets you select the JPG format and Output Folder Path, after which click on the print button to convert Excel file to JPG image format. You can customize color depth and quality of output JPG and also, enable progressive JPEG option.
This software is capable of converting Excel file of any size to JPG without any problem. However, it creates multiple JPG pages according to the size of the Excel file. Overall, it is another handy software to convert Excel document to JPG format.
Free Excel XLS to Image Jpg Bmp Converter
Free Excel XLS to Image Jpg Bmp Converter is a free Excel to JPG Converter software for Windows. Using this software, you can convert XLS and XLSX files to JPG images.
The process of XLS to JPG is pretty straightforward. In the first step, load one or more Excel files using its Choose Files or Choose Folder options. After that, select one file from its interface and go to its Output Format section. From the output format section, select JPG image format. Lastly, set the Output path and press the Convert button to start the conversion process. After the conversion, you can view the output JPG image containing all Excel data.
Apart from conversion, this software does not offer any editing or viewing feature. However, you can still convert Excel files to many formats other than the JPG like GIF, TIF, TGA, RLE, EMF, WMF, BMP, etc.
Note: In this free version of this software, you will face some limitations like batch conversion. To remove all the limitations, you need to purchase the paid version of this software.
Автоматическая конвертация файлов Excel в формат JPEG в офисе
Офисные работники обычно вынуждены тратить время, конвертируя полученные из различных источников файлы в тот формат, с которым они привыкли работать. Вы можете использовать устанавливаемое на сервер ПО Folder Mill для автоматизации этого процесса. Folder Mill отслеживает входящие файлы и конвертирует их в другие форматы согласно заданным сотрудниками предпочтениям.
Сотрудникам компании остается всего лишь использовать две папки: в одну они помещают входящие файлы, из другой забирают готовые файлы в удобных им форматах. Процесс конвертации происходит при этом автоматически.