Как пользоваться curl
Содержание:
- Формы
- Detailed Information
- Отправить и получить cookie
- Пару слов о других полезных опциях cURL
- Сложные случаи авторизации: AJAX, JQuery, JavaScript и т.п.
- Отправка данных методом POST
- URL
- URL
- User Agent
- Metalink
- Продоление/Вообновление предыдущей закачки
- POST запрос
- Using Passwords
- Команды Curl для HTTP
- HTTPS
- Получение информации о запросе cUrl
- Uploading
- TELNET
- Проверка http заголовков с помощью Curl
- Cookies
- Environment Variables
- Базовая аутентификация и аутентификация HTTP
Формы
Формы — основной способ представления web-сайта как HTML-страницы
с полями, в которые пользователь вводит данные, и затем нажимает на
кнопку ‘OK’ или ‘Отправить’, после чего данные отсылаются на сервер.
Затем сервер использует принятые данные и решает, как действовать
дальше: искать информацию в базе данных, показать введенный адрес на
карте, добавить сообщение об ошибке или использовать информацию для
аутентификации пользователя. Разумеется, на стороне сервера имеется
какая-то программа, которая принимает ваши данные.
4.1 GET
GET-форма использует метод GET, например следующим образом:
        <form method="GET" action="junk.cgi">
        <input type=text name="birthyear">
        <input type=submit name=press value="OK">
        </form>
Если вы откроете этот код в вашем браузере, вы увидите форму с
текстовым полем и кнопку с надписью «OK». Если вы введете
‘1905’ и нажмете OK, браузер создаст новый URL, по которому и
проследует. URL будет представляться строкой, состоящей из пути
предыдущего URL и строки, подобной
«junk.cgi?birthyear=1905&press=OK».
Например, если форма располагалась по адресу
«www.hotmail.com/when/birth.html», то при нажатии на кнопку
OK вы попадете на URL
«www.hotmail.com/when/junk.cgi?birthyear=1905&press=OK».
Большинство поисковых систем работают таким образом.
Чтобы curl сформировал GET-запрос, просто введите то, что
ожидалось от формы:
# curl "www.hotmail.com/when/junk.cgi?birthyear=1905&press=OK"
4.2 POST
Метод GET приводит к тому, что вся введенная информация
отображается в адресной строке вашего браузера. Может быть это
хорошо, когда вам нужно добавить страницу в закладки, но это
очевидный недостаток, когда вы вводите в поля формы секретную
информацию, либо когда объем информации, вводимый в поля, слишком
велик (что приводит к нечитаемому URL).
Протокол HTTP предоставляет метод POST. С помощью него клиент
отправляет данные отдельно от URL и поэтому вы не увидете их в
адресной строке.
Форма, генерирующая POST-запрос, похожа на предыдущую:
        <form method="POST" action="junk.cgi">
        <input type=text name="birthyear">
        <input type=submit name=press value=" OK ">
        </form>
Curl может сформировать POST-запрос с теми же данными следующим
образом:
# curl -d "birthyear=1905&press=%20OK%20" www.hotmail.com/when/junk.cgi
Этот POST-запрос использует ‘Content-Type
application/x-www-form-urlencoded’, это самый широко используемый
способ.
Данные, которые вы отправляете к серверу, должны быть правильно
закодированы, curl не будет делать это за вас. К примеру, если вы
хотите, чтобы данные содержали пробел, вам нужно заменить этот пробел
на %20 и т.п. Недостаток внимания к этому вопросу — частая ошибка,
из-за чего данные передаются не так, как надо.
4.3 Загрузка файлов с помощью POST (File Upload POST)
В далеком 1995 был определен дополнительный способ передавать
данные по HTTP. Он задокументирован в RFC 1867, поэтому этот способ
иногда называют RFC1867-posting.
Этот метод в основном разработан для лучшей поддержки загрузки
файлов. Форма, которая позволяет пользователю загрузить файл,
выглядит на HTML примерно следующим образом:
        <form method="POST" enctype='multipart/form-data' action="upload.cgi">
        <input type=file name=upload>
        <input type=submit name=press value="OK">
        </form>
Заметьте, что тип содержимого Content-Type установлен в
multipart/form-data.
Чтобы отослать данные в такую форму с помощью curl, введите
команду:
# curl -F upload=@localfilename -F press=OK
4.4 Скрытые поля
Обычный способ для передачи информации о состоянии в
HTML-приложениях — использование скрытых полей в формах. Скрытые поля
не заполняются, они невидимы для пользователя и передаются так же,
как и обычные поля.
Простой пример формы с одним видимым полем, одним скрытым и
кнопкой ОК:
        <form method="POST" action="foobar.cgi">
        <input type=text name="birthyear">
        <input type=hidden name="person" value="daniel">
        <input type=submit name="press" value="OK">
        </form>
Чтобы отправить POST-запрос с помощью curl, вам не нужно думать о
том, скрытое поле или нет. Для curl они все одинаковы:
# curl -d "birthyear=1905&press=OK&person=daniel"
4.5 Узнать, как выглядит POST-запрос
Когда вы хотите заполнить форму и отослать данные на сервер с
помощью curl, вы наверняка хотите, чтобы POST-запрос выглядел точно
также, как и выполненный с помощью браузера.
Простой способ увидеть свой POST-запрос, это сохранить
HTML-страницу с формой на диск, изменить метод на GET, и нажать
кнопку ‘Отправить’ (вы можете также изменить URL, которому будет
передаваться данные).
Вы увидите, что данные присоединились к URL, отделенные символами
‘?’, как и предполагается при использовании GET-форм.
Detailed Information
Different protocols provide different ways of getting detailed information about specific files/documents. To get curl to show detailed information about a single file, you should use / option. It displays all available info on a single file for HTTP and FTP. The HTTP information is a lot more extensive.
For HTTP, you can get the header information (the same as would show) shown before the data by using /. Curl understands the / option when getting files from both FTP and HTTP, and it will then store the headers in the specified file.
Store the HTTP headers in a separate file (headers.txt in the example):
Note that headers stored in a separate file can be very useful at a later time if you want curl to use cookies sent by the server. More about that in the cookies section.
Для сохранения куки в файле необходимо указать путь к этому файлу в соответствующих параметрах CURLOPT_COOKIEFILE и CURLOPT_COOKIEJAR.
$ch = curl_init('https://asgeto.ru');
curl_setopt($ch, CURLOPT_COOKIEFILE, __DIR__ . '/cookie.txt');
curl_setopt($ch, CURLOPT_COOKIEJAR, __DIR__ . '/cookie.txt');
curl_setopt($ch, CURLOPT_RETURNTRANSFER, true);
curl_setopt($ch, CURLOPT_SSL_VERIFYPEER, false);
curl_setopt($ch, CURLOPT_HEADER, false);

$html = curl_exec($ch);
curl_close($ch);
Параметр CURLOPT_COOKIE используется для принудительной передачи значения куки:
$ch = curl_init('https://asgeto.ru');
curl_setopt($ch, CURLOPT_COOKIE, 'PHPSESSID=61445603b6a0809b061080ed4bb93da3');
curl_setopt($ch, CURLOPT_RETURNTRANSFER, true);
curl_setopt($ch, CURLOPT_SSL_VERIFYPEER, false);
curl_setopt($ch, CURLOPT_HEADER, false);

$html = curl_exec($ch);
curl_close($ch);
Пару слов о других полезных опциях cURL
HTTP Аутентификация
Если на URL адресе есть HTTP аутентификация, то вы без труда можете воспользоваться следующим скриптом:
$url = "http://www.somesite.com/members/";

$ch = curl_init();

curl_setopt($ch, CURLOPT_URL, $url);
curl_setopt($ch, CURLOPT_RETURNTRANSFER, 1);

// указываем имя и пароль
curl_setopt($ch, CURLOPT_USERPWD, "myusername:mypassword");

// если перенаправление разрешено
curl_setopt($ch, CURLOPT_FOLLOWLOCATION, 1);
// то сохраним наши данные в cURL
curl_setopt($ch, CURLOPT_UNRESTRICTED_AUTH, 1);

$output = curl_exec($ch);

curl_close($ch);
FTP загрузка
В PHP также существует библиотека для работы с FTP, но вам ничего не мешает и тут воспользоваться средствами cURL:
// открываем файл
$file = fopen("/path/to/file", "r");

// в url должно быть следующее содержание
$url = "ftp://username:password@mydomain.com:21/path/to/new/file";

$ch = curl_init();

curl_setopt($ch, CURLOPT_URL, $url);
curl_setopt($ch, CURLOPT_RETURNTRANSFER, 1);

curl_setopt($ch, CURLOPT_UPLOAD, 1);
curl_setopt($ch, CURLOPT_INFILE, $fp);
curl_setopt($ch, CURLOPT_INFILESIZE, filesize("/path/to/file"));

// указывам ASCII мод
curl_setopt($ch, CURLOPT_FTPASCII, 1);

$output = curl_exec($ch);
curl_close($ch);
Используем Прокси
Вы можете выполнить свой URL запрос через прокси:
$ch = curl_init();

curl_setopt($ch, CURLOPT_URL,'http://www.example.com');

curl_setopt($ch, CURLOPT_RETURNTRANSFER, 1);

// указываем адрес
curl_setopt($ch, CURLOPT_PROXY, '11.11.11.11:8080');

// если необходимо предоставить имя пользователя и пароль
curl_setopt($ch, CURLOPT_PROXYUSERPWD,'user:pass');

$output = curl_exec($ch);

curl_close ($ch);
Функции обратного вызова
Также существует возможность указать функцию, которая будет срабатывать ещё до завершения работы cURL запроса. Например, пока содержание ответа загружается, вы можете начать использовать данные, не дожидаясь полной загрузки.
$ch = curl_init();

curl_setopt($ch, CURLOPT_URL,'http://net.tutsplus.com');

curl_setopt($ch, CURLOPT_WRITEFUNCTION,"progress_function");

curl_exec($ch);

curl_close ($ch);

function progress_function($ch,$str) {

    echo $str;
    return strlen($str);

}
Подобная функция ДОЛЖНА возвращать длину строки, что является обязательным требованием.
Сложные случаи авторизации: AJAX, JQuery, JavaScript и т.п.
Данные заголовок правильнее было бы написать так: «Сложные» случаи авторизации. Т.е. слово «сложные» взять в кавычки. Сложными они видятся только на первый взгляд, когда непонятно: куда происходит отправка, какие имена полей, что именно отправляется и т. д.
Но, на самом деле, все они сводятся к методам POST или GET. Чтобы понять, что именно отправляется, можно сохранить страницу с формой себе на диск и на кнопку отправки повесить функцию показа сформированных для отправки данных. Или ещё проще — как я, Wireshark’ом.
Если данные правильные, а аутентификация не происходит, то нужно копать в следующих направлениях:
- задать верную строку реферера
- задать «правильную» строку пользовательского агента.
Всё это можно сделать базовыми методами cURL, но я не буду на этом останавливаться. Урок получился и без того большим, а ведь я ещё хотел показать пару трюков с cURL.
Отправка данных методом POST
Команда ниже отправляет POST запрос на сервер аналогично тому, как пользователь, заполнив HTML форму, нажал бы кнопку «Отправить». Данные будут отправлены в формате .
> curl -d "key1=value1&key2=value2" http://www.example.com
> curl --data "key1=value1&key2=value2" http://www.example.com
Параметр аналогичен , для отправки двоичных данных необходимо использовать параметр . Для URL-кодирования полей формы нужно использовать .
> curl --data-urlencode "name=Василий" --data-urlencode "surname=Пупкин" http://www.example.com
Если значение опции начинается с , то после него должно быть имя файла с данными (или дефис — тогда будут использованы данные из стандартного ввода). Пример получения данных из файла для отправки POST-запроса:
> curl --data @data.txt http://www.example.com
Содержимое файла :
key1=value1&key2=value2
Массив , который будет содержать данные этого запроса:
Array
(
     => value1
     => value2
)
Пример URL-кодирования данных из файла перед отправкой POST-запроса:
> curl --data-urlencode name@username.txt http://www.example.com
Содержимое файла :
Иванов Иван Иванович
Массив , который будет содержать данные этого запроса:
Array
(
     = Иванов Иван Иванович
)
URL
The URL syntax
is protocol-dependent. You’ll find a detailed
description in RFC 3986.
You can specify
multiple URLs or parts of URLs by writing part sets within
braces and quoting the URL as in:
«http://site.{one,two,three}.com»
or you can get
sequences of alphanumeric series by using [] as in:
«ftp://ftp.example.com/file.txt»
«ftp://ftp.example.com/file.txt»
(with leading zeros)
«ftp://ftp.example.com/file.txt»
Nested
sequences are not supported, but you can use several ones
next to each other:
«http://example.com/archive/vol/part{a,b,c}.html»
You can specify
any amount of URLs on the command line. They will be fetched
in a sequential manner in the specified order. You can
specify command line options and URLs mixed and in any order
on the command line.
You can specify
a step counter for the ranges to get every Nth number or
letter:
«http://example.com/file.txt»
«http://example.com/file.txt»
When using []
or {} sequences when invoked from a command line prompt, you
probably have to put the full URL within double quotes to
avoid the shell from interfering with it. This also goes for
other characters treated special, like for example
’&’, ’?’ and
’*’.
Provide the
IPv6 zone index in the URL with an escaped percentage sign
and the interface name. Like in
«http:///»
If you specify
URL without protocol:// prefix, curl will attempt to guess
what protocol you might want. It will then default to HTTP
but try other protocols based on often-used host name
prefixes. For example, for host names starting with
«ftp.» curl will assume you want to speak FTP.
curl will do
its best to use what you pass to it as a URL. It is not
trying to validate it as a syntactically correct URL by any
means but is instead very liberal with what it
accepts.
curl will
attempt to re-use connections for multiple file transfers,
so that getting many files from the same server will not do
multiple connects / handshakes. This improves speed. Of
course this is only done on files specified on a single
command line and cannot be used between separate curl
invokes.
URL
The URL syntax is protocol-dependent. You’ll find a detailed description in RFC 3986.
You can specify multiple URLs or parts of URLs by writing part sets within braces and quoting the URL as in:
«http://site.{one,two,three}.com»
or you can get sequences of alphanumeric series by using [] as in:
«ftp://ftp.example.com/file.txt»
«ftp://ftp.example.com/file.txt» (with leading zeros)
«ftp://ftp.example.com/file.txt»
Nested sequences are not supported, but you can use several ones next to each other:
«http://example.com/archive/vol/part{a,b,c}.html»
You can specify any amount of URLs on the command line. They will be fetched in a sequential manner in the specified order. You can specify command line options and URLs mixed and in any order on the command line.
You can specify a step counter for the ranges to get every Nth number or letter:
«http://example.com/file.txt»
«http://example.com/file.txt»
When using [] or {} sequences when invoked from a command line prompt, you probably have to put the full URL within double quotes to avoid the shell from interfering with it. This also goes for other characters treated special, like for example ‘&’, ‘?’ and ‘*’.
Provide the IPv6 zone index in the URL with an escaped percentage sign and the interface name. Like in
«http:///»
If you specify URL without protocol:// prefix, curl will attempt to guess what protocol you might want. It will then default to HTTP but try other protocols based on often-used host name prefixes. For example, for host names starting with «ftp.» curl will assume you want to speak FTP.
curl will do its best to use what you pass to it as a URL. It is not trying to validate it as a syntactically correct URL by any means but is instead very liberal with what it accepts.
curl will attempt to re-use connections for multiple file transfers, so that getting many files from the same server will not do multiple connects / handshakes. This improves speed. Of course this is only done on files specified on a single command line and cannot be used between separate curl invokes.
User Agent
An HTTP request has the option to include information about the browser that generated the request. Curl allows it to be specified on the command line. It is especially useful to fool or trick stupid servers or CGI scripts that only accept certain browsers.
Example:
Other common strings:
- — Netscape Version 3 for Windows 95
- — Netscape Version 3 for Windows 95
- — Netscape Version 2 for OS/2
- — Netscape for AIX
- — Netscape for Linux
Note that Internet Explorer tries hard to be compatible in every way:
Mozilla/4.0 (compatible; MSIE 4.01; Windows 95) — MSIE for W95
Mozilla is not the only possible User-Agent name:
- — KDE File Manager desktop client
- — Lynx command line browser
Metalink
Curl supports Metalink (both version 3 and 4 (RFC 5854) are supported), a way to list multiple URIs and hashes for a file. Curl will make use of the mirrors listed within for failover if there are errors (such as the file or server not being available). It will also verify the hash of the file after the download completes. The Metalink file itself is downloaded and processed in memory and not stored in the local file system.
Example to use a remote Metalink file:
To use a Metalink file in the local file system, use FILE protocol ():
Please note that if FILE protocol is disabled, there is no way to use a local Metalink file at the time of this writing. Also note that if and are used together, will be ignored. This is because including headers in the response will break Metalink parser and if the headers are included in the file described in Metalink file, hash check will fail.
Продоление/Вообновление предыдущей закачки
Используя опцию -C вы можете продолжить закачку, которая была остановлена по каким-либо причинам. Это будет полезным при обрыве загрузки больших файлов.
Если мы говорим ‘-C -’, то curl будет искать, с какого места возобновить загрузку. Мы также можем задать ‘-C <смещение>’. Заданное смещение байт будет пропущено от начала исходного файла.
Начните большую загрузку с curl и нажмите Ctrl-C для остановки посреди закачки.
$ curl -O http://www.gnu.org/software/gettext/manual/gettext.html
##############             20.1%
Закачка была остановлена на 20.1%. Используя “curl -C -” мы можем продолжить загрузку с того места, где мы остановились. Теперь загрузка продолжиться с 20.1%.
curl -C - -O http://www.gnu.org/software/gettext/manual/gettext.html
###############            21.1%
POST запрос
Примечание
httpbin — сервис для отладки HTTP запросов и
ответов
Пример POST запроса к сервису httpbin.
POST запрос на сайт https://httpbin.org/post
#include <stdio.h>
#include <curl/curl.h>

int main(void)
{
  CURL *curl;
  CURLcode res;

  /* In windows, this will init the winsock stuff */
  curl_global_init(CURL_GLOBAL_ALL);

  /* get a curl handle */
  curl = curl_easy_init();
  if(curl) {
    /* First set the URL that is about to receive our POST. This URL can
       just as well be a https:// URL if that is what should receive the
       data. */
    curl_easy_setopt(curl, CURLOPT_URL, "https://httpbin.org/post");
    /* Now specify the POST data */
    curl_easy_setopt(curl, CURLOPT_POSTFIELDS, "name=UrFU&project=lectures.www");

    /* Perform the request, res will get the return code */
    res = curl_easy_perform(curl);
    /* Check for errors */
    if(res != CURLE_OK)
      fprintf(stderr, "curl_easy_perform() failed: %s\n",
              curl_easy_strerror(res));

    /* always cleanup */
    curl_easy_cleanup(curl);
  }
  curl_global_cleanup();
  return ;
}
Ответ в формате JSON
{
  "args" {},
  "data" "",
  "files" {},
  "form" {
    "name" "UrFU",
    "project" "lectures.www"
  },
  "headers" {
    "Accept" "*/*",
    "Content-Length" "30",
    "Content-Type" "application/x-www-form-urlencoded",
    "Host" "httpbin.org"
  },
  "json" null,
  "url" "https://httpbin.org/post"
}
Using Passwords
To ftp files using name+passwd, include them in the URL like:
or specify them with the -u flag like
It is just like for FTP, but you may also want to specify and use SSL-specific options for certificates etc.
Note that using as prefix is the «implicit» way as described in the standards while the recommended «explicit» way is done by using FTP:// and the option.
This is similar to FTP, but you can use the option to specify a private key to use instead of a password. Note that the private key may itself be protected by a password that is unrelated to the login password of the remote system; this password is specified using the option. Typically, curl will automatically extract the public key from the private key file, but in cases where curl does not have the proper library support, a matching public key file must be specified using the option.
HTTP
Curl also supports user and password in HTTP URLs, thus you can pick a file like:
or specify user and password separately like in
HTTP offers many different methods of authentication and curl supports several: Basic, Digest, NTLM and Negotiate (SPNEGO). Without telling which method to use, curl defaults to Basic. You can also ask curl to pick the most secure ones out of the ones that the server accepts for the given URL, by using .
Note! According to the URL specification, HTTP URLs can not contain a user and password, so that style will not work when using curl via a proxy, even though curl allows it at other times. When using a proxy, you must use the style for user and password.
Команды Curl для HTTP
Curl также можно использовать c прокси-сервером. Если вы находитесь за прокси-сервером, прослушивающим порт 8090 на sampleproxy.com, загрузите файлы, как показано ниже:
curl -x sampleproxy.com:8090 -U username:password -O http:// testdomain.com/testfile.tar.gz
В приведённом выше примере вы можете выбросить -U username:password, если прокси-сервер не требует метода аутентификации.
Типичный HTTP-запрос всегда содержит заголовок. Заголовок HTTP отправляет дополнительную информацию об удалённом веб-сервере вместе с фактическим запросом. С помощью инструментов разработчика в браузере вы можете посмотреть сведения о заголовке, а проверить их можно с помощью команды curl.
Пример ниже демонстрирует, как получить информацию о заголовке с веб-сайта.
curl -I www.testdomain.com
Используя curl, вы можете сделать запрос GET и POST. Запрос GET будет выглядеть следующим образом:
curl http://mydomain.com
А вот пример запроса POST
curl –data “text=Hello” https://myDomain.com/firstPage.jsp
Здесь text=Hello — это параметр запроса POST. Такое поведение похоже на HTML-формы.
Вы также можете указать несколько методов HTTP в одной команде curl. Сделайте это, используя опцию –next, например:
curl –data “text=Hello” https://myDomain.com/firstPage.jsp --next https://myDomain.com/displayResult.jsp
Команда содержит запрос POST, за которым следует запрос GET.
Каждый HTTP-запрос содержит агент пользователя, который отправляется как часть запроса. Он указывает информацию о браузере клиента. По умолчанию запрос содержит curl и номер версии в качестве информации об агенте пользователя. Пример вывода показан ниже:
“GET / HTTP/1.1” 200 “_” ”curl/7/29/0”
Вы можете изменить дефолтную информацию об агенте пользователя, используя следующую команду:
curl -I http://mydomain.com –-user-agent “My new Browser”
Теперь вывод будет выглядеть так:
“GET / HTTP/1.1” 200 “_” ”My new Browser”
HTTPS
Secure HTTP requires a TLS library to be installed and used when curl is built. If that is done, curl is capable of retrieving and posting documents using the HTTPS protocol.
Example:
curl is also capable of using client certificates to get/post files from sites that require valid certificates. The only drawback is that the certificate needs to be in PEM-format. PEM is a standard and open format to store certificates with, but it is not used by the most commonly used browsers. If you want curl to use the certificates you use with your (favourite) browser, you may need to download/compile a converter that can convert your browser’s formatted certificates to PEM formatted ones.
Example on how to automatically retrieve a document using a certificate with a personal password:
If you neglect to specify the password on the command line, you will be prompted for the correct password before any data can be received.
Many older HTTPS servers have problems with specific SSL or TLS versions, which newer versions of OpenSSL etc use, therefore it is sometimes useful to specify what SSL-version curl should use. Use -3, -2 or -1 to specify that exact SSL version to use (for SSLv3, SSLv2 or TLSv1 respectively):
Otherwise, curl will attempt to use a sensible TLS default version.
Получение информации о запросе cUrl
Чтобы получить исчерпывающую информацию о самом запросе используется функция curl_getinfo(). Главным образом эта информация полезна для отладки работы скрипта, в котором выполняются cURL запросы.
curl_exec($ch);
$info = curl_getinfo($ch);
echo 'Запрос для url ' . $info . ' занял ' . $info . ' секунд ';
Функция возвращает данные в виде массива со следующими ключами:
- url
- content_type
- http_code
- header_size
- request_size
- filetime
- ssl_verify_result
- redirect_count
- total_time
- namelookup_time
- connect_time
- pretransfer_time
- size_upload
- size_download
- speed_download
- speed_upload
- download_content_length
- upload_content_length
- starttransfer_time
- redirect_time
Uploading
FTP / FTPS / SFTP / SCP
Upload all data on stdin to a specified server:
Upload data from a specified file, login with user and password:
Upload a local file to the remote site, and use the local file name at the remote site too:
Upload a local file to get appended to the remote file:
Curl also supports ftp upload through a proxy, but only if the proxy is configured to allow that kind of tunneling. If it does, you can run curl in a fashion similar to:
HTTP
Upload all data on stdin to a specified HTTP site:
Note that the HTTP server must have been configured to accept PUT before this can be done successfully.
For other ways to do HTTP data upload, see the POST section below.
TELNET
The curl telnet support is basic and very easy to use. Curl passes all data passed to it on stdin to the remote server. Connect to a remote telnet server using a command line similar to:
And enter the data to pass to the server on stdin. The result will be sent to stdout or to the file you specify with .
You might want the / option to switch off the buffered output for slow connections or similar.
Pass options to the telnet protocol negotiation, by using the option. To tell the server we use a vt100 terminal, try something like:
Other interesting options for it include:
- Sets the X display location.
- Sets an environment variable.
NOTE: The telnet protocol does not specify any way to login with a specified user and password so curl can’t do that automatically. To do that, you need to track when the login prompt is received and send the username and password accordingly.
Проверка http заголовков с помощью Curl
Для проверки заголовков мы тоже можем использовать утилиту curl. Чтобы вывести заголовки страницы запустите ее с опцией -I:
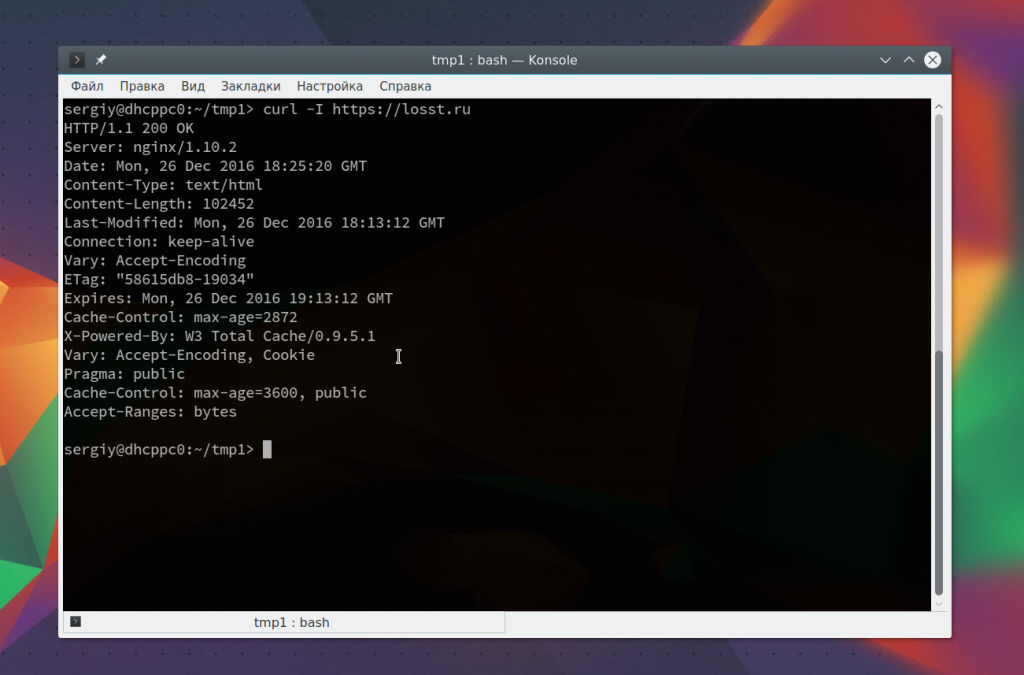
Здесь отображается код ответа сервера, а также принятые http заголовки. Из них мы можем сделать такие выводы:
- Страница сгенерирована в nginx 1.10.2;
- Это обычная html страница (text/html);
- Размер страницы 102452 байт или 100 кб;
- Страница последний раз изменялась 18:13:12 (last_modified) это очень важный параметр для поисковых систем;
- Сервер будет выдавать разные версии страниц при изменении поля Accept-Encoding (Vary);
- Страница может храниться в любом кэше (public) на протяжении часа (expires);
Таким способом может быть выполнена проверка http заголовков для любой страницы или ресурса чтобы сразу определить все ли отправляется правильно. Например, посмотрим заголовки для изображения:

Мы можем видеть, что картинка будет храниться в кэше намного дольше (max-age) чем html страница.
Осталось проверить работают ли такие заголовки, как If-Modified-Since и If-None-Match. Первый позволяет выполнять проверку актуальности кэша по дате модификации, второй — по контрольной сумме поля ETag. Кэш очень важен, чтобы снизить нагрузку на ваш сервер. Если страница не изменилась, то сервер лишь сообщает что она не изменилась, отправляя код ответа 304, вместо передачи полного файла.
Конечно, вы можете использовать для этого онлайн сервисы, но работают они плохо и не всегда показывают верное значение. Поэтому пользуемся опять curl.
Проверка If-Modified-Since
Сначала запрашиваем нашу страницу для просмотра заголовков http, а затем копируем поле Last-Modified:

Теперь запрашиваем ее еще раз, но уже с заголовком If-Modified-Since: и ваша дата:

В ответ вы должны получить не саму страницу, а только заголовок HTTP/1.1 304 Not Modified. Если так, значит проверка кода ответа сервера пройдена и все работает верно.
Проверка If-None-Match
Заголовок If-None-Match работает похожим образом, только здесь используется значение контрольной суммы кэша из поля ETag. Опять запросим нашу страницу и скопируем сумму:

Затем отправим полученную сумму с заголовком:

И снова мы должны получить ответ 304, страница не изменена.
Проверка сжатия
Сжатие позволяет уменьшить размер передаваемых данных, но в то же время создает дополнительную нагрузку на сервер. Чтобы проверить поддерживает ли сервер сжатие gzip нужно отправить в запросе заголовок Accept-Encoding с параметром gzip:

В ответе мы увидим поле Content-Encoding: gzip. Это будет означать, что сжатие используется.
Cookies
С помощью cookies веб-браузеры контролируют состояние на стороне
клиента. Cookie — это имя с присоединенным содержимым. Сервер при
помощи отправки cookies сообщает клиенту путь и имя хоста, по
которому в следующий раз должны быть отправлены cookies, сообщает
время жизни cookies и некоторые другие параметры.
Когда клиент соединяется с сервером по адресу, указанному в
принятом cookie, клиент посылает этот cookie к серверу (если время
жизни не истекло).
Многие приложения и сервера используют этот метод, чтобы
объединить нескольких запросов в одну логическую сессию. Чтобы curl
также мог выполнять такую функцию, мы должны уметь сохранять и
отправлять cookies, как и делают браузеры.
Простейший способ отправить cookie к серверу при получении
страницы с помощью curl, это добавить соответствующий ключ в
командной строке:
# curl -b "name=Daniel" www.cookiesite.com
Cookies отправляются как обычные HTTP-заголовки. Это позволяет curl
сохранять cookies, сохраняя заголовки. Сохранение cookies с помощью
curl выполняется командой:
# curl -D headers_and_cookies www.cookiesite.com
(кстати, для сохранения cookies лучше использовать ключ -c, об этом
ниже).
У curl имеется полнофункциональный обработчик cookies, который
полезен, когда вы хотите соединиться в очередной раз к серверу и
использовать cookies, сохраненные в прошлый раз (либо подработанные
вручную). Для использования cookies, сохраненных в файле, вызовите
curl так:
# curl -b stored_cookies_in_file www.cookiesite.com
«Cookie-движок» curl включается, когда вы указываете ключ
-b. Если вы хотите, чтобы curl лишь воспринимал cookies, используйте
-b с указанием файла, которого не существует. Например, если вы
хотите, чтобы curl принял cookies со страницы, а затем пошел по
перенаправлению (возможно, отдав принятый только что cookie), то
можно вызывать curl так:
# curl -b nada -L www.cookiesite.com
Curl умеет читать и писать cookie-файлы, имеющие формат Netscape и
Mozilla. Это удобный способ обмениваться cookies между браузерами и
автоматическими скриптами. Ключ -b автоматически определяет, является
ли данный файл cookie-файлом указанных браузеров и обрабатывает его
соответствующим образом, а используя ключ -c/—cookie-jar, вы можете
заставить curl записать новый cookie-файл по завершении операции:
# curl -b cookies.txt -c newcookies.txt www.cookiesite.com
Environment Variables
Curl reads and understands the following environment variables:
They should be set for protocol-specific proxies. General proxy should be set with
A comma-separated list of host names that shouldn’t go through any proxy is set in (only an asterisk, matches all hosts)
If the host name matches one of these strings, or the host is within the domain of one of these strings, transactions with that node will not be proxied. When a domain is used, it needs to start with a period. A user can specify that both www.example.com and foo.example.com should not use a proxy by setting to . By including the full name you can exclude specific host names, so to make not use a proxy but still have do it, set to .
The usage of the / flag overrides the environment variables.
Базовая аутентификация и аутентификация HTTP
Аутентификация, проще говоря, это введение имени пользователя и пароля.
Базовая аутентификация — это аутентификация средствами сервера. Для этого создаются два файла: .htaccess и .htpasswd
Содержимое файла .htaccess примерно такое
AuthName "Только для зарегистрированных пользователей!"
AuthType Basic
require valid-user
AuthUserFile /home/freeforum.biz/htdocs/.htpassw
Содержимое файла .htpasswd примерно такое:
mial:CRdiI.ZrZQRRc
Т.е. логин и хэш пароля.
При попытке получить доступ к запароленной папке, в браузере отобразиться примерно такое окно:
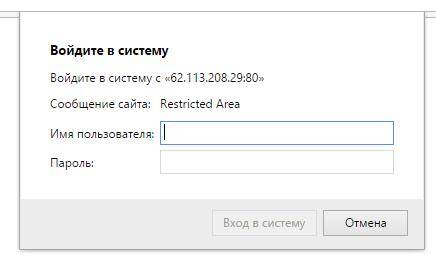
HTTP аутентификация — это тот случай, когда мы вводим логин и пароль в форму на сайте. Именно такая аутентификация используется при входе в почту, на форумы и т. д.
Базовая аутентификация cURL (PHP)
Есть сайт http://62.113.208.29/Update_FED_DAYS/, который требует от нас авторизоваться:
Пробуем наш первоначальный скрипт:
<?php
$target_url = "http://62.113.208.29/Update_FED_DAYS/";
$ch = curl_init($target_url);
$response_data = curl_exec($ch);
if (curl_errno($ch) > 0) {
     echo 'Ошибка curl: ' . curl_error($ch);
} else {
     echo $response_data;
}
curl_close($ch);
?>
Хотя скрипт и считает, что ошибки нет, но выводимый результат нам совсем не нравится:
Добавляем две строки:
curl_setopt($ch, CURLOPT_HTTPAUTH, CURLAUTH_BASIC);
curl_setopt($ch, CURLOPT_USERPWD, "ru-board:ru-board");
Первой строкой мы задаём тип аутентификации — базовая. Вторая строка содержит имя и пароль через двоеточие (в нашем случае имя и пароль одинаковые — ru-board). Получилось так:
<?php
$target_url = "http://62.113.208.29/Update_FED_DAYS/";
$ch = curl_init($target_url);
curl_setopt($ch, CURLOPT_RETURNTRANSFER, 1);
curl_setopt($ch, CURLOPT_HTTPAUTH, CURLAUTH_BASIC);
curl_setopt($ch, CURLOPT_USERPWD, "ru-board:ru-board");
$response_data = curl_exec($ch);
if (curl_errno($ch) > 0) {
      echo 'Ошибка curl: ' . curl_error($ch);
} else {
      echo $response_data;
}
curl_close($ch);
?>
Пробуем:
Отлично!
Базовая аутентификация cURL (в командной строке)
Этого же самого в командной строке можно добиться одной строчкой:
curl -u ru-board:ru-board http://62.113.208.29/Update_FED_DAYS/
Я не забыл указать тип аутентификации, просто в cURL базовый тип аутентификации является дефолтным.
В командной строке всё получилось так быстро, что от расстройства я написал вот такую программу. Она подключается к сайту и скачивает самое последнее обновление:
temp=`curl -s -u ru-board:ru-board http://62.113.208.29/Update_FED_DAYS/ | grep -E -o 'Update_FED_201{1}.{2}.{2}.7z' | uniq | tail -n 1`; curl -o $temp -u ru-board:ru-board http://62.113.208.29/Update_FED_DAYS/$temp
Буквально ещё несколькими командами можно добавить:
- распаковку архива в указанный каталог;
- запуск обновлений КонсультантПлюс (это обновления для него);
- можно реализовать проверку — было ли уже скачено последнее доступное обновление или появилось новое;
- добавить это всё в Cron для ежедневных обновлений.