Туториал. простая анимация на чистом css
Содержание:
- Defining Keyframes
- transition
- Property Values
- @keyframes
- Delay an Animation
- CSS Properties
- Animation Shorthand Property
- CSS Animation Properties
- Property Values
- Поддержка браузера
- The CSS animation properties
- 8 Best Animated Websites with CSS & HTML Animation
- Tumbling lettering
- Используйте “липкие” фильтры
- Добавляйте псевдо-хвостики
- CSS Tutorial
- Event transitionend
- Introduction
- Specify the Speed Curve of the Animation
- Используйте комбинации из animation-timing-function
- Animation properties
- The @keyframes rule
Defining Keyframes
Keyframes are used to specify the values for the animating properties at various stages of the animation. Keyframes are specified using a specialized CSS at-rule — . The keyframe selector for a keyframe style rule starts with a percentage () or the keywords (same as 0%) or (same as 100%). The selector is used to specify where a keyframe is constructed along the duration of the animation.
Percentages represent a percentage of the animation duration, 0% represents the starting point of the animation, 100% represents the end point, 50% represents the midpoint and so on. That means, a 50% keyframe in a 2s animation would be 1s into an animation.
transition
transition-property
Устанавливает имя стилевого свойства, значение которого будет отслеживаться для создания эффекта перехода. Вам нужно прописать в качестве значения название стиля, для которого будет применяться плавное изменение.
transition-duration
Задает время за которое должна пройти анимация.
Задаёт промежуток времени, в течение которого должен осуществляться переход. Если разные свойства имеют разные значения для перехода, они указываются через запятую. Если продолжительность перехода не указана, то переход будет резкий. Свойство не наследуется.
transition-timing-function
Свойство задаёт временную функцию, которая описывает скорость перехода объекта от одного значения к другому. Если вы определяете более одного перехода для элемент, например, цвет фона элемента и его положение, вы можете использовать разные функции для каждого свойства. Свойство не наследуется.
В таблице ниже представлены значения которые вы можете использовать в качестве значения для свойства .
| easeInSine | cubic-bezier(0.47, 0, 0.745, 0.715) |
| easeOutSine | cubic-bezier(0.39, 0.575, 0.565, 1) |
| easeInOutSine | cubic-bezier(0.445, 0.05, 0.55, 0.95) |
| easeInQuad | cubic-bezier(0.55, 0.085, 0.68, 0.53) |
| easeOutQuad | cubic-bezier(0.25, 0.46, 0.45, 0.94) |
| easeInOutQuad | cubic-bezier(0.455, 0.03, 0.515, 0.955) |
| easeInCubic | cubic-bezier(0.55, 0.055, 0.675, 0.19) |
| easeOutCubic | cubic-bezier(0.215, 0.61, 0.355, 1) |
| easeInOutCubic | cubic-bezier(0.645, 0.045, 0.355, 1) |
| easeInQuart | cubic-bezier(0.895, 0.03, 0.685, 0.22) |
| easeOutQuart | cubic-bezier(0.165, 0.84, 0.44, 1) |
| easeInOutQuart | cubic-bezier(0.77, 0, 0.175, 1) |
| easeInQuint | cubic-bezier(0.755, 0.05, 0.855, 0.06) |
| easeOutQuint | cubic-bezier(0.23, 1, 0.32, 1) |
| easeInOutQuint | cubic-bezier(0.86, 0, 0.07, 1) |
| easeInExpo | cubic-bezier(0.95, 0.05, 0.795, 0.035) |
| easeOutExpo | cubic-bezier(0.19, 1, 0.22, 1) |
| easeInOutExpo | cubic-bezier(1, 0, 0, 1) |
| easeInCirc | cubic-bezier(0.6, 0.04, 0.98, 0.335) |
| easeOutCirc | cubic-bezier(0.075, 0.82, 0.165, 1) |
| easeInOutCirc | cubic-bezier(0.785, 0.135, 0.15, 0.86) |
| easeInBack | cubic-bezier(0.6, -0.28, 0.735, 0.045) |
| easeOutBack | cubic-bezier(0.175, 0.885, 0.32, 1.275) |
| easeInOutBack | cubic-bezier(0.68, -0.55, 0.265, 1.55) |
Property Values
| Value | Description |
|---|---|
| none | Default value. Animation will not apply any styles to the element before or after it is executing |
| forwards | The element will retain the style values that is set by the last keyframe (depends on animation-direction and animation-iteration-count) |
| backwards | The element will get the style values that is set by the first keyframe (depends on animation-direction), and retain this during the animation-delay period |
| both | The animation will follow the rules for both forwards and backwards, extending the animation properties in both directions |
| initial | Sets this property to its default value. Read about initial |
| inherit | Inherits this property from its parent element. Read about inherit |
@keyframes
Сама анимация на веб-странице делается с помощью двух вещей. Продолжительность анимации, задержка перед её выполнением, число повторений и другие параметры указываются через универсальное свойство animation. А ключевые кадры и значения свойств элемента определяются правилом @keyframes. Затем они связываются между собой с помощью переменной, имя для которой мы придумываем сами. Схематично это выглядит так.
Таким образом, создав несколько заготовок ключевых кадров мы можем их применять к разным элементам указывая нужную переменную. Вот, например, как сделать плавное появление текста на экране (пример 1).
Пример 1. Появление текста
<!DOCTYPE html>
<html>
<head>
<meta charset=»utf-8″>
<title>Анимация</title>
<style>
.fadeIn {
animation: fadeIn 3s;
background: #fc0;
padding: 10px;
}
@keyframes fadeIn {
from { opacity: 0; }
to { opacity: 1; }
}
</style>
</head>
<body>
<div class=»fadeIn»>Основные области применения заклёпочных соединений —
авиационная техника и судостроение.</div>
</body>
</html>
В данном примере мы создаём элемент с классом fadeIn, к которому применяется свойство animation со значением fadeIn 3s. Это означает, что анимация будет длиться три секунды, но что именно будет происходить за это время animation не знает, в его задачу лишь входит перенаправление к @keyframes с именем fadeIn. Внутри @keyframes есть два ключевых слова — from и to, они определяют начальное и конечное значение свойств элемента. Исходя из этого браузер за три секунды плавно меняет значение opacity с 0 до 1.
Обратите внимание на префикс -webkit. Браузер Chrome не поддерживает оригинальные свойства, поэтому приходится дублировать записи, добавляя этот префикс
Анимация может быть сложной и содержать более двух ключевых кадров, чем это показано в примере выше. Тогда ключевые кадры указываются в процентах от времени всей анимации. 0% — начало анимации, 100% — время её окончания, 50% — середина и т. д. Если какие-то ключевые кадры имеют одинаковое состояние, то их можно группировать, как показано в примере 2.
Пример 2. Ключевые кадры
<!DOCTYPE html>
<html>
<head>
<meta charset=»utf-8″>
<title>Анимация</title>
<style>
.tinLeftOut {
animation: tinLeftOut 3s;
}
@keyframes tinLeftOut {
0%, 20%, 40%, 50% {
opacity: 1; transform: scale(1, 1) translateX(0);
}
10%, 30% {
opacity: 1; transform: scale(1.1, 1.1) translateX(0);
}
100% {
opacity: 0; transform: scale(1, 1) translateX(-900%);
}
}
</style>
</head>
<body>
<img src=»image/cat.jpg» alt=»» class=»tinLeftOut»>
</body>
</html>
Ключевые слова from и to соответствуют 0% и 100%, поэтому можно указывать как проценты, так и эти ключевые слова, они взаимозаменяемы.
Delay an Animation
The property specifies a delay for the start of an animation.
The following example has a 2 seconds delay before starting the animation:
Example
div {
width: 100px; height: 100px;
position: relative; background-color: red; animation-name: example;
animation-duration: 4s; animation-delay: 2s;}
Negative values are also allowed. If using negative values, the animation
will start as if it had already been playing for N seconds.
In the following example, the animation will start as if it had already been
playing for 2 seconds:
Example
div {
width: 100px; height: 100px;
position: relative; background-color: red;
animation-name: example;
animation-duration: 4s; animation-delay: -2s;}
CSS Properties
align-contentalign-itemsalign-selfallanimationanimation-delayanimation-directionanimation-durationanimation-fill-modeanimation-iteration-countanimation-nameanimation-play-stateanimation-timing-functionbackface-visibilitybackgroundbackground-attachmentbackground-blend-modebackground-clipbackground-colorbackground-imagebackground-originbackground-positionbackground-repeatbackground-sizeborderborder-bottomborder-bottom-colorborder-bottom-left-radiusborder-bottom-right-radiusborder-bottom-styleborder-bottom-widthborder-collapseborder-colorborder-imageborder-image-outsetborder-image-repeatborder-image-sliceborder-image-sourceborder-image-widthborder-leftborder-left-colorborder-left-styleborder-left-widthborder-radiusborder-rightborder-right-colorborder-right-styleborder-right-widthborder-spacingborder-styleborder-topborder-top-colorborder-top-left-radiusborder-top-right-radiusborder-top-styleborder-top-widthborder-widthbottombox-decoration-breakbox-shadowbox-sizingbreak-afterbreak-beforebreak-insidecaption-sidecaret-color@charsetclearclipclip-pathcolorcolumn-countcolumn-fillcolumn-gapcolumn-rulecolumn-rule-colorcolumn-rule-stylecolumn-rule-widthcolumn-spancolumn-widthcolumnscontentcounter-incrementcounter-resetcursordirectiondisplayempty-cellsfilterflexflex-basisflex-directionflex-flowflex-growflex-shrinkflex-wrapfloatfont@font-facefont-familyfont-feature-settingsfont-kerningfont-sizefont-size-adjustfont-stretchfont-stylefont-variantfont-variant-capsfont-weightgapgridgrid-areagrid-auto-columnsgrid-auto-flowgrid-auto-rowsgrid-columngrid-column-endgrid-column-gapgrid-column-startgrid-gapgrid-rowgrid-row-endgrid-row-gapgrid-row-startgrid-templategrid-template-areasgrid-template-columnsgrid-template-rowshanging-punctuationheighthyphens@importisolationjustify-content@keyframesleftletter-spacingline-heightlist-stylelist-style-imagelist-style-positionlist-style-typemarginmargin-bottommargin-leftmargin-rightmargin-topmax-heightmax-width@mediamin-heightmin-widthmix-blend-modeobject-fitobject-positionopacityorderoutlineoutline-coloroutline-offsetoutline-styleoutline-widthoverflowoverflow-xoverflow-ypaddingpadding-bottompadding-leftpadding-rightpadding-toppage-break-afterpage-break-beforepage-break-insideperspectiveperspective-originpointer-eventspositionquotesresizerightrow-gapscroll-behaviortab-sizetable-layouttext-aligntext-align-lasttext-decorationtext-decoration-colortext-decoration-linetext-decoration-styletext-indenttext-justifytext-overflowtext-shadowtext-transformtoptransformtransform-origintransform-styletransitiontransition-delaytransition-durationtransition-propertytransition-timing-functionunicode-bidiuser-selectvertical-alignvisibilitywhite-spacewidthword-breakword-spacingword-wrapwriting-modez-index
Animation Shorthand Property
The example below uses six of the animation properties:
Example
div
{
animation-name: example;
animation-duration: 5s;
animation-timing-function: linear;
animation-delay: 2s;
animation-iteration-count: infinite;
animation-direction: alternate;
}
The same animation effect as above can be achieved by using the shorthand
property:
Example
div
{
animation: example 5s linear 2s infinite alternate;
}
CSS Animation Properties
The following table lists the @keyframes rule and all the CSS animation properties:
| Property | Description |
|---|---|
| @keyframes | Specifies the animation code |
| animation | A shorthand property for setting all the animation properties |
| animation-delay | Specifies a delay for the start of an animation |
| animation-direction | Specifies whether an animation should be played forwards, backwards or in alternate cycles |
| animation-duration | Specifies how long time an animation should take to complete one cycle |
| animation-fill-mode | Specifies a style for the element when the animation is not playing (before it starts, after it ends, or both) |
| animation-iteration-count | Specifies the number of times an animation should be played |
| animation-name | Specifies the name of the @keyframes animation |
| animation-play-state | Specifies whether the animation is running or paused |
| animation-timing-function | Specifies the speed curve of the animation |
❮ Previous
Next ❯
Property Values
| Value | Description |
|---|---|
| animation-name | Specifies the name of the keyframe you want to bind to the selector |
| animation-duration | Specifies how many seconds or milliseconds an animation takes to complete |
animation-timing-function |
Specifies the speed curve of the animation |
| animation-delay | Specifies a delay before the animation will start |
animation-iteration-count |
Specifies how many times an animation should be played |
| animation-direction | Specifies whether or not the animation should play in reverse on alternate cycles |
| animation-fill-mode | Specifies what values are applied by the animation outside the time it is executing |
| animation-play-state | Specifies whether the animation is running or paused |
| initial | Sets this property to its default value. Read about initial |
| inherit | Inherits this property from its parent element. Read about inherit |
Поддержка браузера
Числа в таблице указывают первую версию браузера, которая полностью поддерживает анимации CSS.
Числа, за которыми следуют -webkit -,- moz -, или -o — указывают первую версию, которая работает с префиксом.
| 43.04.0 -webkit- | 10.0 | 16.05.0 -moz- | 9.04.0 -webkit- | 30.015.0 -webkit-12.0 -o- |
Пример
Анимация background-color для красного до синего:
/* Код для старых Chrome, Safari и Opera */
@-webkit-keyframes mymove
{
from {background-color: red;}
to {background-color: blue;}
}/* Стандартный синтаксис */@keyframes mymove
{
from {background-color: red;}
to {background-color: blue;}
}
The CSS animation properties
CSS animations offers a lot of different parameters you can tweak:
| Property | Description |
|---|---|
| the name of the animation, it references an animation created using | |
| how long the animation should last, in seconds | |
| the timing function used by the animation (common values: , ). Default: | |
| optional number of seconds to wait before starting the animation | |
| how many times the animation should be performed. Expects a number, or . Default: 1 | |
| the direction of the animation. Can be , , or . In the last 2, it alternates going forward and then backwards | |
| defines how to style the element when the animation ends, after it finishes its iteration count number. or go back to the first keyframe styles. and use the style that’s set in the last keyframe | |
| if set to , it pauses the animation. Default is |
The property is a shorthand for all these properties, in this order:
This is the example we used above:
8 Best Animated Websites with CSS & HTML Animation
We’ve pulled together a well-selected list of the best animated websites available today. These web animation examples use cool animations and illustrations to demonstrate products and services, display brand style, create mood, and even lead the user through a story.
1. Your Plan, Your Planet
by MediaMonks
Animations:
- Hover
- CSS3 animation
- Storytelling animations
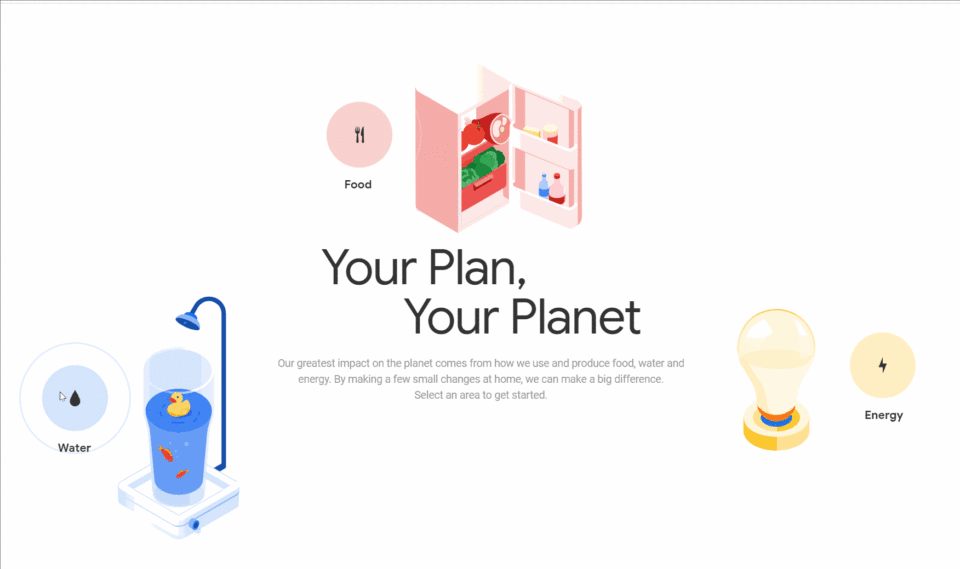
Your Plan, Your Planet is a CSS animation website example designed by MediaMonks. The concept of this site is to help people plan for a more sustainable future in a playful way through simple tips and isometric illustrations that take Material Design to another dimension.
Tumbling lettering
- Author: Leon brown
Google’s Game of the Year features a playful CSS animation on the homepage, with the title words tumbling and bumping into one another. Here’s how it was done.
The first step is to define the webpage document with HTML. It consists of the HTML document container, which stores a head and body section. While the head section is used to load the external CSS and JavaScript resources, the body is used to store the page content.
The page content consists of three h1 title tags that will show the different variations of the animation effect. While any text can be inserted into these tags, their animation is defined by the names in the class attribute. The presentation and animation settings for these class names will be defined in the CSS later on.
Next, create a new file called ‘code.js’. We want to find all page elements with the animate class and create an array list representing each word of the inner text. The initial animation delay is also defined in this step. Page content is not available until the page has fully loaded, so this code is being placed inside the window’s load event listener.
The word content of the animation items needs to be contained inside a span element. To do this, the existing HTML content is reset to blank, then a loop is used to make the word in the identified ‘words’ list a span element. Additionally, an animationDelay style is applied – calculated in relation to the initial delay (specified below) and the word’s index position.
Create a new file called styles.css. Now we’ll set the presentation rules that will be part of every word element in the animation, controlled by their span tag. Display as block, combined with centred text alignment, will result in each word appearing on a separate line horizontally aligned to the middle of its container. Relative positioning will be used to animate in relation to its text-flow position.
Animation elements that have the backwards and forwards class have a specific animation applied to them. This step defines the animation to apply to span elements whose parent container has both the animate and backwards or forwards class.
Note how there is no space between the animate and backwards class reference, meaning the parent element must have both.
The mixed animation is defined using the same settings used for the forwards and backwards animations. Instead of applying the animations to every child of the parent, the nth-child selector is used to apply alternating animation settings. The backwards animation is applied to every even-number child, while the forwards animation is applied to every odd-number child.
The animations we’ve just created are made with an initial ‘from’ starting position, with no vertical position or rotation adjustment. The ‘to’ position is the final state of the animation, which sets the elements with an adjusted vertical position and rotation state. Slightly different ending settings are used for both animations to avoid the text becoming unreadable due to overlap in mixed animations.
Используйте “липкие” фильтры
Были времена, когда SVG-фильтры для обычных HTML-элементов были решением так себе – IE/Edge их совсем не поддерживали, а у остальных браузеров поведение могло сильно отличаться, да и производительность, особенно в Firefox, оставляла желать лучшего. Но постепенно дела налаживаются, Edge переходит на новый движок, да и другие браузеры вроде бы начинают вести себя схожим образом. Так что может для продакшена технология еще не готова, но попробовать и поиграться с ней, для того, чтобы расшевелить мозги, очень даже можно.
Применить фильтр несложно:
Главное не забыть про саму SVG картинку с ним:
Вообще SVG-фильтры – это очень широкая тема, достойная отдельной статьи, так что сейчас мы просто воспользуемся одним из них, не вдаваясь в подробности его работы.
Довольно неплохо эффект с этим фильтром смотрится на разных выезжающих кнопках:
Для создания «вау-эффектов» такие фильтры подходят как нельзя лучше. Осталось дождаться нормальной поддержки всеми основными браузерами.
Добавляйте псевдо-хвостики
Возможно вы еще помните детские мультики. Там персонажи во время быстрых движений растягиваются в направлении движения или даже оставляют за собой фантомный след. Персонаж как бы раздваивается или размазывается и это выглядит довольно мило. Подчеркивает движения. Очень советую загуглить “12 принципов анимации” и посмотреть разные примеры, но мы сейчас остановимся на технической реализации такого следа. Как его можно сделать?
На первый взгляд может показаться, что сделать подобное в рамках CSS практически невозможно, особенно если элемент наполнен контентом, имеет фиксированную форму и его нельзя просто так растянуть. Но это лишь отчасти правда. Мы можем использовать псевдоэлементы размером с основной элемент (или немного меньше него) и перемещать их с задержкой относительно основной анимации.
Это может выглядеть как-то так:
Как видите, никакой магии здесь нет. Просто небольшая задержка. Она даст такой эффект, что часть элемента как бы не успевает за основным его объемом и постоянно его догоняет. Это может разбавить и оживить даже простое движение.
Пример с несколькими движущимися кружками:
CSS Tutorial
CSS HOMECSS IntroductionCSS SyntaxCSS SelectorsCSS How ToCSS CommentsCSS Colors
Colors
RGB
HEX
HSL
CSS Backgrounds
Background Color
Background Image
Background Repeat
Background Attachment
Background Shorthand
CSS Borders
Borders
Border Width
Border Color
Border Sides
Border Shorthand
Rounded Borders
CSS Margins
Margins
Margin Collapse
CSS PaddingCSS Height/WidthCSS Box ModelCSS Outline
Outline
Outline Width
Outline Color
Outline Shorthand
Outline Offset
CSS Text
Text Color
Text Alignment
Text Decoration
Text Transformation
Text Spacing
Text Shadow
CSS Fonts
Font Family
Font Web Safe
Font Fallbacks
Font Style
Font Size
Font Google
Font Pairings
Font Shorthand
CSS IconsCSS LinksCSS ListsCSS Tables
Table Borders
Table Size
Table Alignment
Table Style
Table Responsive
CSS DisplayCSS Max-widthCSS PositionCSS OverflowCSS Float
Float
Clear
Float Examples
CSS Inline-blockCSS AlignCSS CombinatorsCSS Pseudo-classCSS Pseudo-elementCSS OpacityCSS Navigation Bar
Navbar
Vertical Navbar
Horizontal Navbar
CSS DropdownsCSS Image GalleryCSS Image SpritesCSS Attr SelectorsCSS FormsCSS CountersCSS Website LayoutCSS UnitsCSS SpecificityCSS !important
Event transitionend
When the CSS animation finishes the event triggers.
It is widely used to do an action after the animation is done. Also we can join animations.
For instance, the ship in the example below starts to sail there and back when clicked, each time farther and farther to the right:
The animation is initiated by the function that re-runs each time the transition finishes, and flips the direction:
The event object for has a few specific properties:
- The property that has finished animating. Can be good if we animate multiple properties simultaneously.
- The time (in seconds) that the animation took, without .
Introduction
An animation is applied to an element using the property.
is the name of the animation, which we need to define separately. We also tell CSS to make the animation last 10 seconds, perform it in a linear way (no acceleration or any difference in its speed) and to repeat it infinitely.
You must define how your animation works using keyframes. Example of an animation that rotates an item:
Inside the definition you can have as many intermediate waypoints as you want.
In this case we instruct CSS to make the transform property to rotate the Z axis from 0 to 360 grades, completing the full loop.
You can use any CSS transform here.
Notice how this does not dictate anything about the temporal interval the animation should take. This is defined when you use it via .
Specify the Speed Curve of the Animation
The property specifies the speed curve of the
animation.
The animation-timing-function property can have the following values:
- — Specifies an animation with a slow start, then fast, then end slowly (this is default)
- — Specifies an animation with the same speed from start to end
- — Specifies an animation with a slow start
- — Specifies an animation with a slow end
- — Specifies an animation with a slow start and end
- — Lets you define your own values in a cubic-bezier function
The following example shows some of the different speed curves that can be used:
Example
#div1 {animation-timing-function: linear;}#div2
{animation-timing-function: ease;}#div3 {animation-timing-function:
ease-in;}#div4 {animation-timing-function: ease-out;}#div5
{animation-timing-function: ease-in-out;}
Используйте комбинации из animation-timing-function
Одна из очень частых стенок в головах у начинающих верстальщиков – это мысль о том, что animation-timing-function существует в единственном экземпляре на всю анимацию. Так вот, это не так.
Мы можем задавать в каждом фрейме в keyframes свою функцию и она будет работать до следующего фрейма, а в следующем – никто не мешает задать еще одну и.т.д. В последнем фрейме, разумеется, уже ничего не указываем – анимация там заканчивается.
Пример:
Зачем это может быть нужно? В первую очередь для создания всевозможных подпрыгиваний, отпрыгиваний, смены скорости движения в соответствии с физикой, но без прибегания к скриптам. На самом деле пользователь и не заметит, если где-то движения будут не совсем соответствовать физическим законам, особенно если они будут намеренно преувеличенными, мультяшными. Это определенно стоит взять на вооружение.
Чтобы лучше понять, о чем идет речь, посмотрим красивый пример от David Lewis (концепт не адаптивный, лучше открыть на большом экране в новой вкладке):
Animation properties
To understand how animations work, start with an example of a pulsing icon, which may be used in a mobile interface to indicate what part of an application is selected. The animation continuously shrinks and grows one of the icons as it dims and brightens it. This simple example will illustrate several other features below:
(View live sample)
The animation CSS property specifies the name of an animation you will supply, pulse in this case, and its overall duration of 1 second. Both are required:
The infinite keyword indicates that the animation repeats indefinitely. If not specified, the animation executes only once.
The animation property is a shorthand that combines the values of others:
Animation properties are standard in many browsers, but as of this writing require prefixes for all WebKit browsers and older versions of Gecko and Opera. For widest support, you should define animation properties redundantly:
From here on, examples feature only the un-prefixed property names.
The @keyframes rule
The animation-name property specifies an animation named pulse. Use a @keyframes rule within the CSS to define each named animation sequence:
The entire sequence between from and to executes over the span of time defined by the animation-duration property. Each keyframe within the sequence behaves like a CSS selector, manipulating the values of individual properties. Shifts from one keyframe to another work the same as transitions, and the same set of properties that can be transitioned can also be manipulated in keyframes. In this case, opacity dims the icon and transform shrinks it. (See the tutorial on transforms for details on the transform property’s scale() function.)
As with animation properties, each @keyframes rule also needs to be prefixed redundantly to run on WebKit-based browsers such as Chrome and Safari. The transform properties below are also prefixed:
This example also substitutes 0% and 100% for their synonymous keywords from and to. (If you don’t specify either, values transition from the next available keyframe in the series.)