Gpt диск преобразовать в mbr
Содержание:
- How to Convert MBR Disk to GPT Disk
- The differences between MBR and GPT disks
- Как конвертировать диск MBR в GPT с помощью AOMEI Partition Assistant
- Изменение стиля раздела при помощи сторонних программ
- Method 2. How to Change MBR to GPT via Disk Management
- Способ #1: Преобразование GPT диска в MBR через управление дисками в Windows
- Method 1: Convert MBR to GPT During Windows Installation with DiskPart Commands
- Как не потерять данные при преобразовании
- Через сторонние программы Acronis Disk Director и Minitool Partition Wizard
- Как в работающей Windows преобразовать диск из GPT в MBR и, наоборот, из MBR в GPT программой Paragon Hard Disk Manager
- Are You Sure to Convert MBR to GPT During Windows Installation?
- Программы для преобразования между GPT и MBR, в том числе и без потери данных
- Method 1. How to Convert MBR to GPT Using EaseUS Partition Master
- Overview of MBR and GPT Disk
- Способ №1. Используем командную строку
- How to change SSD from MBR to GPT without data loss?
- Method 2: Convert MBR to GPT During Windows Installation Using Partition Manager – No Data Loss
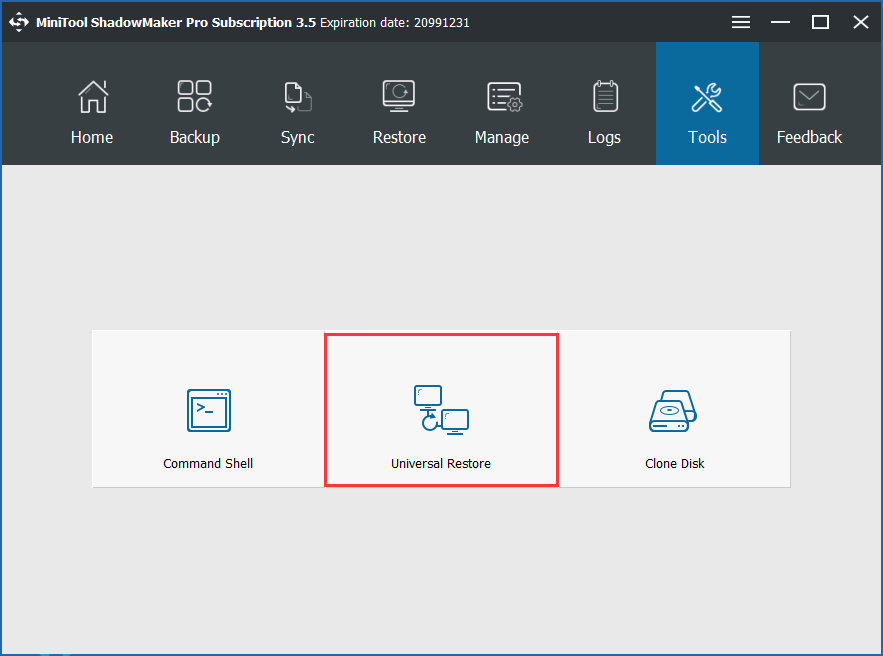
How to Convert MBR Disk to GPT Disk
Importance:
If users are dealing with the system disk, do the followings in advance in case of any accidents after the conversion.
- Create a bootable media of MiniTool Partition Wizard.
- Create a system image or back up the whole system disk.
If there are multiple operating systems, please confirm which operating system needs booting from GPT disk, and then boot from it to do the conversion. MiniTool Partition Wizard is not responsible for the rest operating systems not booting after the conversion. Do it at your own risk.
The downloading and installation process of MiniTool Partition Wizard is easy to finish, even for inexperienced users. Now, let’s see how to do:
Note: MiniTool Partition Wizard can help users convert an MBR disk containing Windows to GPT, provided that the System & Boot & Active partitions are located on the same disk. But if users want to boot from the GPT disk successfully, UEFI mode should be supported and enabled.
Step 1. Choose the MBR disk that users want to convert.
Step 2. Select Convert MBR Disk to GPT Disk function through following three ways.
- Click it under the Convert Disk list.
- Choose it from the drop-down list of Disk menu at the top.
- Right-click the target disk and choose it from the pop-up list.
Step 3. Click on Apply button in order to carry out pending operations.
Step 4. Choose Yes in the pop-up prompt window to start converting a disk from MBR to GPT.
Step 5. Click OK button at the end of conversion to end the process.
The differences between MBR and GPT disks
There are two different ways of storing the partitioning information on a hard drive, called MBR (Master Boot Record) and GPT (GUID Partition Table). So what’s the difference between MBR and GPT disks and why do you need to convert MBR to GPT?
MBR, the master boot record disk, uses the standard BIOS partition table and supports up to 2 TB per single partition in Windows operating systems. It only supports up to 4 primary partitions, so If you want to create more partitions on an MBR disk, you have to change one of the primary partitions into an extended partition. With an extended partition you can create up to 128 logical drives, therefore, extending your limit beyond 4 partitions. GPT, the GUID partition table disk, uses EFI instead of BIOS, and its volume limit is bigger than MBR disks so you can use it on drives with more than 2TB disk space and create a theoretically unlimited number of partitions. Unfortunately, it can only support Windows 64bit systems from Windows Vista onwards. You can still use GPT disks in 32-bit versions of Windows XP, 2003, 2000, etc.
Note: Removable flash drives are the exception as they are recognized as MBR by default and can’t be converted to GPT.
Generally speaking, GPT disks have better performance than MBR, so, many users currently want to convert their master boot record (MBR) disk into GUID partition table (GPT) disk. If you want to know more about difference between MBR and GPT please read the linked article.
Как конвертировать диск MBR в GPT с помощью AOMEI Partition Assistant
Чтобы произвести конвертирование в GPT-диск, рекомендуется AOMEI Partition Assistant – программа, работающая с дисками и обладающая рядом преимуществ:
— при использовании в домашних целях она бесплатна;
— есть поддержка русского языка;
— работает на всех популярных версиях Windows, как 32- 64-битными (Win7, 8 или 10);
— присутствуют удобные и полезные «мастера работы», автоматизирующие долгий и рутинный процесс по настройке всех параметров. Так, встроен мастер копирования как целого диска, так и его отдельного раздела, восстановления разделов и переноса ОС на SSD с более старых HDD, а также работы с загрузочными носителями;
— программа позволяет форматрировать жесткий диск, изменять структуру с GPT в MBR и в обратном порядке.
Скачать AOMEI Partition Assistant можно здесь — http://www.disk-partition.com/download.html
Изменение стиля раздела при помощи сторонних программ
И напоследок еще несколько слов о том, как изменить GPT на MBR. В качестве более удобных инструментов, нежели имеющиеся в Windows, можно применять специальные дисковые программы от Acronis, AOMEI, Paragon и других разработчиков. Выполняемые операции, в общем-то, от только что описанных для средств Windows особо не отличаются и сводятся к конвертированию в выбранный стиль неразмеченного пространства. Однако преобразование выполняется гораздо быстрее и эффективнее. Интерфейс таких программ очень похож на раздел управления дисками Windows, но некоторые операции (например, перераспределение дискового пространства) выполняются гораздо проще за счет использования самого обычного фейдера (ползунка), путем перемещения которого и можно выбрать требуемые размеры каждого раздела.
Method 2. How to Change MBR to GPT via Disk Management
Applies to: Change a data disk from MBR to GPT, deleting partition and data is required.
To change a data disk to GPT, you must delete all the partitions on the MBR disk in Disk Management. Otherwise, the «Convert to GPT Disk» option will be greyed out in Disk Management. You will see it choosable after removing the existing partitions.
Steps to Change an MBR disk to GPT in Disk Management:
Step 1. Righ-click on «This PC» or «My Computer», choose «Manage», and select «Disk Management».
Step 2. Right-click each partition on the target MBR disk and choose «Delete Volume».
Step 3. Click «OK» to confirm the deletion, and repeat Step 2 to delete all partitions on the disk.
Step 4.When the whole disk displays as unallocated, right-click on the MBR disk and choose «Convert to GPT Disk».
Close Disk Management when the disk conversion process finishes. You may use your new disk to create as many partitions as you want or install a new OS on the disk now.
Способ #1: Преобразование GPT диска в MBR через управление дисками в Windows
Пожалуй, самый простой вариант, позволяющий выполнить переформатирование из-под запущенной операционки, в привычной программной среде. Вам не понадобится даже перезапускать ПК — вплоть до окончания работы.
Единственный минус, способный охладить пыл юзера, решившего, что конвертация GPT в MBR необходима, — работать с системным диском в таких условиях не получится. Вы не сможете применить изменения к винчестеру, с которого в данный момент запущена ОС. Никаких сбоев, правда, и не произойдёт: система просто откажет в доступе.
Таким образом, описываемым далее способом можно подготовить к использованию запасной носитель или изменить разметку на несистемном; зачем может понадобиться второе, решать самому пользователю.
Чтобы получить доступ к исходной утилите, выполните несколько простых шагов — не сбиться с пути помогут иллюстрации ниже:
- Отыщите в нижнем ряду клавиатуры, скорее всего — в левом сегменте, клавишу Windows и воспользуйтесь ею. Не торопитесь отпускать кнопку: удерживая её, нажмите вторую, R. В результате на экране должно появиться небольшое окошко «Выполнить». Если вы видите другой заголовок или размещение полей не совпадает с иллюстрацией — просто закройте окно и повторите попытку: скорее всего, вы спутали вторую клавишу.
В редактируемой строке — она в окошке будет ровно одна, — впишите запрос msc
Обратите внимание на последовательность символов и на точку, отделяющую последние три литеры: она обязательно должна присутствовать и в вашей команде. Готовы узнать, как переделать диск из GPT в MBR? Нажимайте «ОК»!
В результате, возможно, через пять-десять секунд после предыдущего шага, вы увидите на мониторе новое окно, теперь уже чуть побольше
Найдите в общем перечне тот винчестер, с которым желаете поработать. Выделите заголовок и, воспользовавшись клавишей «Меню» (можно заменить её правой кнопкой мыши, если отсутствует на клавиатуре), и щёлкните по пункту «Свойства» — пока что это самый простой способ узнать текущую разметку.
Нужная вам информация, а также много другой, не менее интересной и полезной, находится на вкладке «Тома». Здесь, взглянув на строки, расположенные в средней части окошка, вы увидите соответствующую надпись: MBR, и в таком случае ничего переформатировать не придётся, или GUID — тогда будьте готовы к дальнейшим преобразованиям, позволяющим сделать перевод GPT в MBR.
Собственно, теперь вы уже знаете, с каким диском будете работать. Не покидая окошка недавно открытой утилиты, последовательно, двигаясь от первого к заключительному, выделите все находящиеся на нём разделы (в новых версиях ОС — «тома») и удалите их, используя то же меню, из которого получали доступ к «Свойствам». Если логический раздел всего один, вам будет даже проще: операцию понадобится провести только раз
Обратите внимание, что информация с диска будет удалена.
- Почти готово. Снова выделите заголовок вашего накопителя и, при помощи всё того же меню, преобразуйте его в MBR. Просто выберите нужную опцию и дайте согласие на переразметку — в остальном процесс будет протекать автоматически.
Во время конвертации крайне не рекомендуется запускать на ПК, пусть даже достаточно мощном, какие-либо программы или игры, просматривать документы, фильмы или даже слушать музыку. Чем меньше будет нагрузка на процессор, тем, во-первых, быстрее будет завершён процесс, а во-вторых — проще будет избежать критических ошибок.
Когда работа будет завершена, перезагрузите машину и заново создайте на винчестере разделы — старые будут удалены безвозвратно. Кроме того, не пренебрегайте возможностью сделать резервную копию. Важные файлы, размещаемые в каталогах на носителе, уничтожаются вместе с разделами — конвертировать GPT в MBR без потери данных описанным выше способом не выйдет.
Method 1: Convert MBR to GPT During Windows Installation with DiskPart Commands
As we know, DiskPart commands can help us manage our PC’s drive. But do you know it can also help us convert MBR to GPT during Windows installation?
Using this utility to finish this conversion, you should note that you must select an object to give it focus before making any changes with those commands.
Furthermore, this utility is available in the following operating systems: Windows 10/8/7 and Windows Server 2019/2016/2012/2008.
If you are using one of the above Windows operating systems, please keep reading to finish the conversion by using Command Prompt. If not, you can try Method 2.
Here is the tutorial on MBR to GPT during Windows installation via DiskPart commands.
Step 1: During Windows installation, please press F8 key on the keyboard to access Command Prompt.
Step 2: After getting a cmd.exe window, please input diskpart and hit Enter key on the keyboard.
Step 3: After getting a newly popping-up window, please input the following commands in order, and then hit Enter key on the keyboard after inputting each command.
Note: Please make sure your selected disk is an MBR disk. Since Disk 1 is an MBR disk, here I take Disk 1 as an example to complete this conversion.
- list disk
- select disk 1
- clean
- convert gpt
When you see “DiskPart successfully converted the selected disk to GPT format”, the conversion completes.
As you see, this method can help you convert MBR to GPT during Windows installation with few steps. But it can also clean your data stored in the selected disk. If you don’t want to lose any data and complete this conversion, you can move to the following method.
Tip: Maybe you have the experience that you cleaned a wrong disk with DiskPart, and you can click Clean on Wrong Disk? Undo Diskpart Clean Command Now to make up for your loss.
Как не потерять данные при преобразовании
Используйте стороннюю утилиту Minitool Partition Wizard Bootable. Скачайте ISO-образ и запишите его на флешку, отформатированную в FAT32. Необходимые условия:
- Используется загрузка EFI.
- В BIOS выключена функция «Secure Boot».
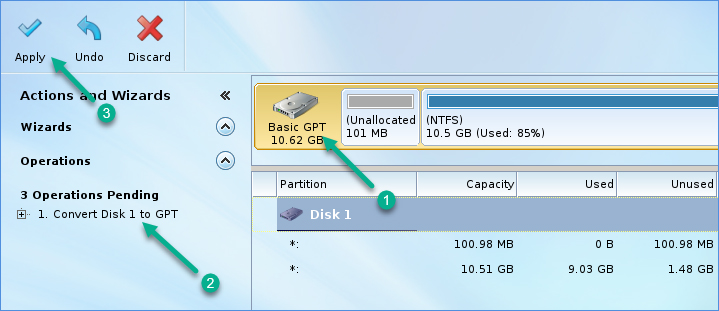
Загрузите ПК с созданного вами накопителя. В окне программного инструмента:
- Выберите HDD или SSD таблицу разделов которого нужно преобразовать.
- В левой части окна программы выберите пункт «Convert MBR Disk to GPT Disk».
- Примените изменения нажатием кнопки «Apply».
- Дайте положительный ответ на предупреждение утилиты.
- Ждите завершения преобразования. Время, которое потребуется, зависит от объема накопителя и занятого пространства на нем.
Если диск системный, может появиться сообщение о том, что его преобразование невозможно. Чтобы все же преобразовать его:
- Выберите раздел загрузчика ОС, который располагается в самом начале.
- Удалите его, нажав «Delete» и подтвердив действие кнопкой «Apply». Вместо него вы можете тут же создать новый раздел загрузчика, но уже в файловой системе FAT32.
- Повторите действия для преобразования таблицы разделов.
Через сторонние программы Acronis Disk Director и Minitool Partition Wizard
При помощи сторонних утилит можно преобразовывать диски, сохраняя на них данные. Самыми популярными и удобными программами являются описанные далее.
Acronis Disk Director
Для конвертации системы через «Аскроникс» нужно:
- на первом экране загрузки выбрать нужную версию приложения;
- открыть меню «Базовые диски»;
- удалить системный и резервный разделы диска;
- кликом правой кнопкой мыши развернуть контекстное меню и выбрать пункт «Преобразовать в MBR»;
- после нажатия кнопки «Продолжить» система автоматически преобразует таблицы.
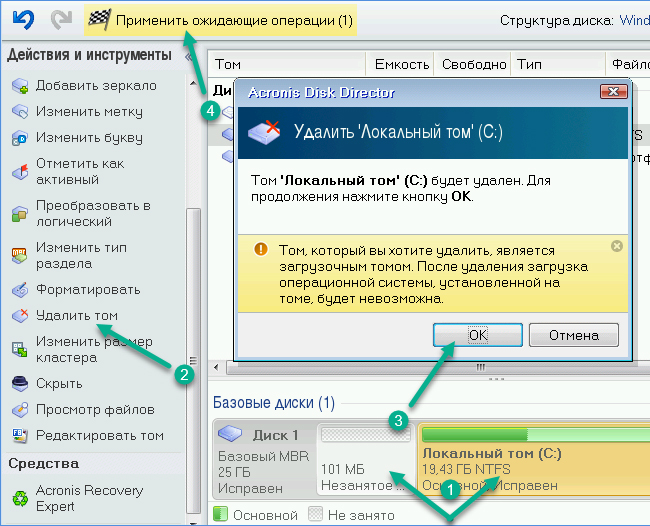
Удаление загрузочного и пустого томов через Acronis Disk Director
Важно! Даже при использовании сторонних утилит, перед началом конвертации лучше продублировать важные данные на другом носителе
Minitool Partition Wizard
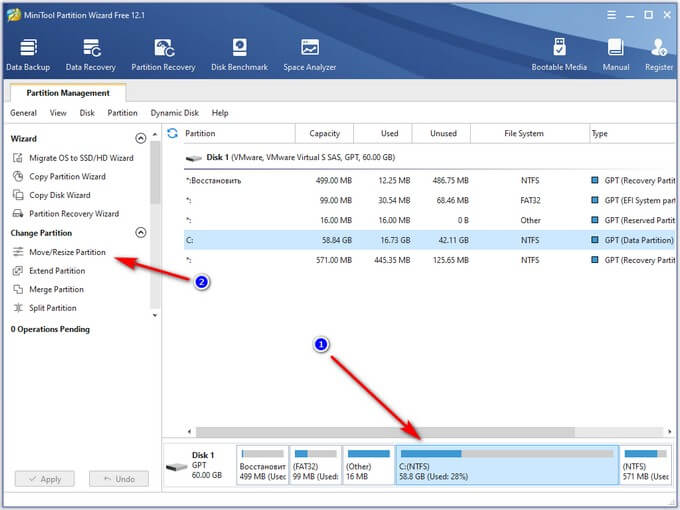
Minitool Partition Wizard – полностью бесплатная программа с широким функционалом по управлению дисками. Утилита может работать как из-под интерфейса Виндовс, так и прямо с загрузочной флешки. Для изменения типа структурирования информации накопителя, следует:
- в правом окне программы выбрать нужный диск (именно целый диск, а не раздел);
- левом меню найти пункт «Convert GPT Disk to MBR Disk» и нажать его;
- после подтверждения действия начнется преобразование системы.
Конвертация в приложении Minitool Partition Wizard
Обратите внимание! Если система выдает ошибку, что диск имеет системные разделы, нужно удалить часть накопителя, подписанную «Зарезервировано системой».
Если при установке операционной системы выбранный диск имеет стиль разделов gpt, как установить Windows 7 или 10 вопрос решается легко: если выбранный дистрибутив Виндовс имеет 64-битную архитектуру, то в большинстве случаев программа установки сама сделает все за пользователя. В целом же достаточно следовать описанию, приведенному выше.
Как в работающей Windows преобразовать диск из GPT в MBR и, наоборот, из MBR в GPT программой Paragon Hard Disk Manager
Привет друзья! Если вы хотите преобразовать жёсткий диск из GPT в MBR или, наоборот, из MBR в GPT и всё это без удаления ваших файлов на вашем HDD, то сделать это смогут только две программы, первая, это платная версия программы Paragon Hard Disk Manager 15 Professional, а вторая — бесплатная AOMEI Partition Assistant. Вообще, это очень хорошая программа совместимая с Windows 7, 8.1, 10, можно сказать настоящий комбайн объединяющий в себе две программы, первая для резервного копирования данных и восстановления, а вторая для управления дисковым пространством вашего компьютера. Невозможно в одной статье показать всё, что умеет эта программа, поэтому мы планируем написать о ней ещё несколько подробных статей и даже создать специальный раздел. А сегодня Paragon Hard Disk Manager 15 Professional поможет нам преобразовать жёсткий диск из стиля GPT в MBR и наоборот!
http://www.paragon.ru/home/hdm-professional /, но хочу сказать, что многое в ней не работает и только после покупки программы весь функционал будет разблокирован, в том числе и конвертер GPT в MBR .
Как в работающей Windows преобразовать диск из GPT в MBR программой Paragon Hard Disk Manager
Итак, если вы приобрели программу, то для примера давайте преобразуем в MBR мой жёсткий диск GPT. Работать будем в Windows 10
«Управление дисками» моего компьютера. Видим два жёстких диска, на первый установлена Windows 10, а на втором 700 Гб (буква (H:)) находятся мои личные файлы: фото, видео, ISO-образы операционных систем, VHD-файлы, документы и так далее, в процессе преобразования диска в MBR с ними ничего не случится.
В свойствах диска видно, что он имеет таблицу разделов GU >
На диске много файлов.
Запускаем Paragon Hard Disk Manager 15 Professional. В главном окне программы (напоминающем оснастку «Управление дисками») нажмите на стрелочку для отображения дисков и разделов.
Выбираем наш GPT жёсткий диск (H:) и щёлкаем на нём правой мышью, выбираем в появившемся меню «Конвертировать базовый GPT в базовый MBR диск».
Нажимаем « Применить » и программа начинает свою работу.
Преобразование в MBR успешно завершено! « Закрыть »
Заходим в свойства диска (H:) и видим, что он преобразован из GPT в MBR.
И все файлы в целости и сохранности.
Как в работающей Windows преобразовать диск из MBR в GPT программой Paragon Hard Disk Manager
Друзья, если вам понадобится провернуть обратную операцию, то есть преобразовать MBR в GPT, то делаем всё в обратном порядке. Щёлкаем правой мышью на MBR жёстком диске правой мышью и выбираем « Конвертировать в GPT диск »
« Да » и программа начнёт процесс конвертации диска MBR в GPT.
Преобразование в GPT успешно завершено! «Закрыть».
Мои файлы опять не пострадали.
Примечание : Paragon Hard Disk Manager 15 Professional может создать загрузочную флешку или диск, для этого нужно нажать кнопку RECOVERY MEDIA BUILDER (Создание аварийного носителя). Пользоваться такой флешкой очень удобно, так как можно преобразовывать при необходимости из GPT в MBR (и наоборот) жёсткий диск с установленной операционной системой. Также загрузочная флешка пригодится при операциях резервного копирования, восстановления, распределения дискового пространства и т.д.
Преобразование GPT в MBR может потребоваться в разных случаях. Часто встречающийся вариант — ошибка Установка Windows на данный диск невозможна. Выбранный диск имеет стиль разделов GPT, которая возникает при попытке установить x86 версию Windows 7 на диск с системой разделов GPT или на компьютере без UEFI BIOS. Хотя возможны и иные варианты, когда это может понадобиться.
Для того, чтобы конвертировать GPT в MBR вы можете использовать стандартные средства Windows (в том числе и во время установки) или же специальные программы, предназначенные для этих целей. В этой инструкции покажу различные способы преобразования. Также в конце инструкции есть видео, в котором показаны способы конвертировать диск в MBR, в том числе без потери данных. Дополнительно: способы обратной конвертации из MBR в GPT, в том числе без потери данных, описаны в инструкции: На выбранном диске находится таблица MBR-разделов
Внимание: если вы хотите преобразовать диск в из MBR в GPT с установленной системой, используйте метод: Конвертация MBR в GPT с помощью mbr2gpt.exe
Are You Sure to Convert MBR to GPT During Windows Installation?
Before showing the 2 methods about how to convert MBR to GPT during Windows installation, I would like to make a simple introduction to the two partition styles at first. Please spend your minutes reading this part as it may help you figure out you really need to make this conversion or not.
What is MBR? What advantages or disadvantages does it have?
A master boot record (MBR) is a special type of boot sector at the very beginning of partitioned computer mass storage devices intended for use with IBM PC-compatible system and beyond. It records the information that how the logical partitions, containing file systems, are organized on that medium.
Keep using MBR disk, you have the following reasons:
- MBR produces a high quality;
- Your computer only supports Legacy BIOS mode.
However, this partition style only supports at most four primary partitions or three primary partitions and one extended partition containing many logical partitions (If you have some questions about how to create more partitions on an MBR disk, you can read the post: How to Create More Than 4 Partitions on MBR Disk in Windows 10).
Furthermore, this partition style only supports a single partition no more than 2TB. It means that you should set the disk more than 2TB as a GPT disk or you will run into a problem like 3TB hard Drive only using 2TB.
What is GPT? What advantages does it have?
Standing for GUID Partition Table, GPT is a new standard with many advantages. Why is it called GUID Partition Table? The reason is that every partition on your drive has a “globally unique identifier”.
Converting to GPT disk, you have the following reasons:
- The hard disk is larger than 2TB;
- To create more than 4 primary partitions on the disk (In theory, this type of hard disk drive can support 128 primary partitions);
- Your computer supports UEFI mode and this mode is enabled.
The above content just shows a short comparison of these two partition styles. If you want to learn about more information about MBR vs GPT, please click MBR vs. GPT Guide: What’s The Difference and Which One Is Better.
After seeing the comparison, you may draw a conclusion that GPT disk is much better than MBR disk in terms of some aspects, and you may want to convert MBR disk to GPT disk when you have got a new disk for Windows installation. How to achieve this conversion?
To do that, you should make sure that your computer does support UEFI by entering BIOS.
If it doesn’t, you may get this information “Windows Cannot Be Installed to This Disk. The Selected Disk Is of the GPT Partition Style.” when you install Windows on GPT disk. Once you get this information, you can read the MiniTool’s post: Windows Cannot Be Installed to a Disk? Here Are Solutions.
If your computer does support UEFI mode and this mode is enabled, let’s see how to convert MBR to GPT during Windows installation.
Программы для преобразования между GPT и MBR, в том числе и без потери данных
специальные приложения
бесплатное приложениеполезные функции
И пришла на смену старого формата MBR. Новые материнские платы, как правило, поставляются с поддержкой UEFI. Это и логично, ведь система загружается быстрей, а таблица разделов GPT обеспечивает поддержку накопителей с большим объемом. MBR же позволяет адресовать не более 2.2 Тб адресного пространства.
Несмотря на очевидные преимущества GPT, иногда необходимо установить операционную систему на MBR диск. При наличии диска с GPT разметкой, его можно легко переделать под MBR.
Внимание! Вся информация на накопителе будет уничтожена после выполнения преобразования диска из формата GPT в MBR.
При установке системы на жесткий
диск с таблицей разделов GPT может появиться ошибка: Невозможно установить Windows на диск 0 раздел 1
.
Подробнее: Установка Windows на данный диск невозможна. Выбранный диск имеют стиль разделов GPT
.
Method 1. How to Convert MBR to GPT Using EaseUS Partition Master
Applies to: Converting both data and OS drive from MBR to GPT without data loss nor Windows reinstallation.
Reliable disk conversion tool — EaseUS Partition Master enables you to convert your disk from MBR to GPT directly in only a few clicks. It exceeds both Disk Management and DiskPart in the following two aspects:
- Keep All Partitions: EaseUS Partition Master doesn’t delete any partitions for disk conversion.
- No Data Loss: EaseUS Partition Master keeps all data safely stored on the disk while converting it from MBR to GPT, or vice versa.
- Notice:
- To convert a boot disk to GPT (the disk contains your system), make sure the motherboard supports the UEFI boot mode.
- Otherwise, you will encounter boot failure on your computer after MBR to GPT conversion.
Steps to Convert MBR to GPT Without Data Loss:
Step 1. Download and launch EaseUS Partition Master on your Windows computer.
Step 2. Right-click the MBR disk that you want to convert and choose «Convert to GPT».
Step 3. After that, find and click the «Execute 1 Operation» button on the toolbar and choose «Apply» to start the conversion.
Optional Steps: Enable UEFI Mode After Convert System Boot Disk to GPT
If you converted a Windows system disk to GPT, remember to enable the UEFI boot mode on your computer to make the OS bootable. Here are the steps:
Step 1. Restart PC and press F2, F8, F12, Del to enter the BIOS boot menu.
Step 2. Locate the boot options menu and enable the UEFI mode.
- Set Launch CSM to Enabled. If CSM is set to Disabled, you can skip to Step 4 below
- Set Boot Device Control to UEFI Only
- Set Boot from Storage Devices to UEFI driver first
Step 3. Set the USB UEFI OS Boot option is at the top of the Boot Priority List.
Step 4. Save the changes and exit BIOS, reboot PC from the GPT disk.
After this, wait patiently. Your computer will automatically reboot from the GPT disk by then.
- Important
- Note that both Method 2 and Method 3 only work to change a data disk to GPT. If it’s a boot disk, you may encounter OS boot failure error.
- Also, the below two methods require you to delete all partitions on your disk. If you have useful files on the disk, back them up in advance.
- For quick and free backup software, EaseUS Todo Backup is fast and effective to help.
Overview of MBR and GPT Disk
Before learning how to convert GPT to MBR, it is necessary to get a deeper understanding of MBR and GPT hard disk. On the whole, they are two different partition styles.
MBR, short for Master Boot Record, is a guide sector at the very front of the drive. MBR describes the information on logical partitions and contains file systems and the organization type. It contains the boot routine – this is the executable code produced when the computer loads the OS in the second stage of the start-up or the boot record which connects every partition (VBR).
GPT, short for – GUID (Globally Unique Identifiers) Partition Table, has become the new standard of disk partition table originating from the EFI (Extensive Firmware Interface). It is gradually replacing MBR with something more modern. On GPT disk, every partition has its own “globally unique identifier”.
What are the limitations of an MBR disk?▸MBR disks only support disk up to 2TB in size. If the hard disk surpasses 2TB, the additional space will show as unallocated space.▸MBR disk only supports 4 primary partitions at most. To create more, you have to make one primary partition ”extended drive”, within which you can create many logical drives.▸MBR partitioning rules are complex and poorly designed. On an MBR disk, the partitioning and boot data is stored in one place. If this data is overwritten or corrupted, it’s difficult to recover it.▸MBR cannot be created on media which cannot be partitioned – such as CDs/DVDs.
What are the advantages of a GPT disk?▸GPT can take full advantage of a large hard drives over 2TB .The partition size is limited to 256TB as each partition in GPT can be up to 2^64 logical blocks in length.▸GPT also allows for a nearly unlimited number of partitions. Generally, Windows allows up to 128 partitions on a GPT drive.▸A Partition on a GPT disk has self-contained backup at the end of the disk, with the original being stored at the front of the disk. When one of the two is destroyed, you can restore it with the other.
Способ №1. Используем командную строку
Данный способ подразумевает, что все действия, направленные на то, чтобы изменить тип дисков, выполняются прямо во время установки.
Внимание! Перед началом обязательно скопируйте все данные на флешку или другой носитель информации, к примеру, в облако. При инсталляции и преобразовании вся информация с дисков будет удалена.. Когда все приготовления закончены, начинается конвертация во время установки системы Windows:
Когда все приготовления закончены, начинается конвертация во время установки системы Windows:
1В любом месте нажмите на клавиатуре Shift + F10 одновременно. После этого запустится командная строка. Это нам и нужно.
2Сначала введите «diskpart» и нажмите «Enter» (эта кнопка будет использоваться для выполнения всех дальнейших команд).
3После того, как будет введен в командной строке «diskpart», введите другую команду — «list disk» (список дисков) и снова используйте «Enter» для выполнения действия.
4Появится перечень всех доступных дисков. Вам нужно понять, какой из них тот, с которым возникает проблема. Сделать это очень просто. Как видите на рисунке 1, ошибка возникает только после выбора диска для установки, а он подписан в формате «Диск ».
В таком же формате он отображается в командной строке. То есть, если Вы пытаетесь установить ОС на «Диск 6», то в командной строке тоже нужно в дальнейшем выбрать именно его. Делается это командой «select disk ». В случае с шестым вводим «select disk 6».
5После этого можно ввести команду «clean», чтобы убрать все содержимое диска. Также можно удалить содержимое конкретного раздела, на который будет инсталлирована система.
Для этого сначала введите «detail disk», после чего отобразятся доступные разделы. Используйте «select volume», чтобы выбрать нужный и «delete volume», чтобы стереть его.
6Наконец, чтобы справиться с ошибкой GPT при установке, введите «convert mbr».
Подсказка: Чтобы выполнить обратную конвертацию, соответственно, нужно вводить «convert gpt».
7Немного подождите, пока выполнится конвертация GPT в MBR при установке Windows 7 и введите «Exit», чтобы выйти.
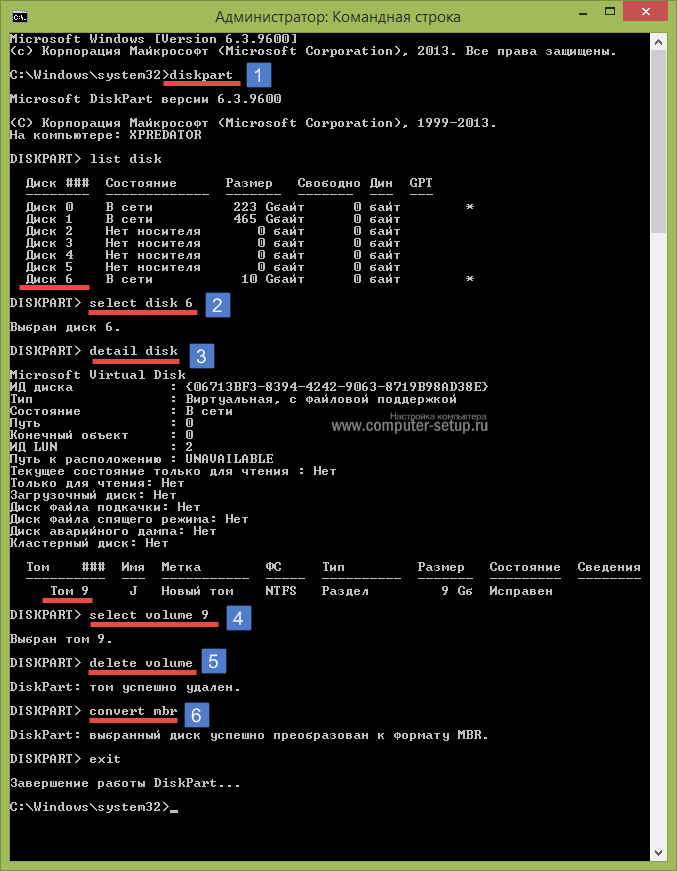
Рис. 2. Конвертация в командной строке
Дальше совершенно спокойно можно установить Windows безо всяких ошибок.
How to change SSD from MBR to GPT without data loss?
As shown above, converting SSD to GPT via Command Prompt requires you to clear selected SSD drive before conversion. So you might wonder is it possible to convert SSD to GPT without deleting partitions/losing data? Yes, it is possible when you use a third-party software called AOMEI Partition Assistant Professional.
This software allows you to convert data and system disks with partitions into GPT or MBR styles without data loss in Windows 10/8/7. That is to say, there is no need to delete all partitions first! Next we will show you how to use this software to convert SSD to GPT. You can download the free Demo Version to have a try.
Download Pro Demo Win 10/8.1/8/7/XP
Secure Download
Step 1. Install and run the software. Right click the SSD drive you need to convert from MBR to GPT, and select “Convert to GPT Disk”.
Step 2. Click “OK” to confirm your operation.
Step 3. In the main interface, click “Apply” to start converting disk to GPT style.
Method 2: Convert MBR to GPT During Windows Installation Using Partition Manager – No Data Loss
To avoid data loss when converting MBR to GPT during Windows installation, it is highly recommended that you use the third-party software – MiniTool Partition Wizard.
It is a really useful partition manager that can help you upgrade to a larger hard disk without reinstalling OS, back up data to secure your data security, check your disk health, and so on. It can also help you convert MBR to GPT during Windows installation without losing data.
How to convert MBR to GPT during Windows installation via MiniTool Partition Wizard? To do that, you should complete two steps, namely making a USB boot disk and converting MBR to GPT.
Make a USB Boot Disk with MiniTool Partition Wizard
Since no running OS is installed on your computer, you need to create a USB boot disk on another normally running computer at first. To do that, you should pay some money for the bootable edition of MiniTool Partition Wizard.
How to create a USB boot disk? Please refer to the following tutorial.
Step 1: Prepare a normally running computer and a USB (CD/DVD is also allowed) in advance.
Note: If there is anything important stored in the USB, please back up them at first. You can apply Copy Partition features of this software since the following operations will cause data loss.
Step 2: Connect the prepared USB flash drive with the normally running computer and then power on it.
Step 3: Buy MiniTool Partition Wizard Pro by clicking the following button and then launch it to get its main interface showing like the following image.
Step 4: Click Bootable Media feature in the toolbar. This feature can help you create a bootable disk easily.
Step 5: When you get a new pop-up window like the following image shows, please click WinPE based media with MiniTool plug-in.
Step 6: Click the USB Flash Disk option to make a bootable USB flash drive. (You can also click CD/DVD Writer if you want to make a bootable CD/DVD).
Step 7: When you get the message “The data on the USB disk will be destroyed. Are you sure you want to build a USB boot disk?”, click Yes if all the important data has been backed up and all data stored in the USB flash drive will be cleaned.
Step 8: After you confirm the change, the feature works to build a USB bootable disk for you. Please wait patiently.
Step 9: Click Finish after the building process comes to an end.
Now, you get a USB bootable disk. All preparations have been accomplished. Therefore, let’s keep reading on how to convert MBR to GPT with MiniTool Partition Pro during Windows installation without losing data.
Convert MBR to GPT via MiniTool Partition Wizard
In this part, you will get detailed instructions about converting MBR to GPT with MiniTool Partition Wizard.
Step 1: Connect the USB boot disk with the computer where Windows is installing.
Step 2: Enter BIOS by pressing F8 key on the keyboard.
Step 3: Set USB as the First Boot Device and save configuration changes and exit from BIOS.
Step 4: Enter the interface of the bootable edition of MiniTool Partition Wizard Pro.
Step 5: Make sure which MBR disk showing in the Disk Map needs to be converted to GPT disk, right-click the disk, and Choose Convert MBR Disk to GPT Disk among the options. Or you can also activate the Convert MBR to GPT Disk feature from the left panel after choosing the disk. (Here take Disk 1 for an example)
Step 6: Click the Apply button in order to carry out pending operations.
Step 7: Click Yes in the pop-up prompt windows to start converting MBR disk to GPT disk.
Step 8: Click the OK button when the converting process comes to an end.