Устранение ошибки доступа к интернету err_network_access_denied
Содержание:
- 7 Ways To Fix ERR_NETWORK_CHANGED Error
- Отключение или удаление виртуальных адаптеров
- Причина ошибки «Похоже, вы подключились к другой сети»
- Как устранить ошибки при скачивании
- Method #1: Clear Google Chrome History
- Top 5 Ways to Fix ERR_NETWORK_CHANGED Chrome Error on Windows 10
- Изменение списка автозагрузки
- What Causes ‘ERR_NETWORK_CHANGED’ Error?
- Introduction
- Почему не работает мобильный интернет на Huawei/Honor и как исправить?
- Способ 9: Настройка питания адаптера беспроводной сети (ноутбуки и планшеты)
- err_network_changed chrome
- Method #7: Reinstall Network Adapter Driver
- Method #8: Update Google Chrome
- Method #9: Reinstall Google Chrome
- Убираем лишнее из автозагрузки и чистим комп от лишнего
- Заключение
7 Ways To Fix ERR_NETWORK_CHANGED Error
Let’s take a look at 7 simple solutions to fix ERR_NETWORK_CHANGED error in Google Chrome browser.
Solution #1: Restart the Modem
Occasionally a simple modem restart can solve the issue.
It could be that there are some technical problems on your network which are interfering with your connection, so restarting the modem might be a quick and easy fix.
Solution #2: Flush Your DNS then Reset TCP/IP
If a modem reset didn’t help with the ERR_NETWORK_CHANGED issue, you can flush the DNS and then reset TCP/IP, using the following steps:
- Right click on the Windows key
- Click on Command Prompt (Admin)
- Type in the following pressing Enter after each one:
ipconfig /releaseipconfig /flushdnsipconfig /renew
- Right click on the Windows key then choose Command Prompt (Admin)
- Type in the following pressing Enter after each one:
ipconfig /flushdnsnbtstat –rnetsh int ip resetnetsh winsock reset
Reboot your PC and try to access Chrome again
Solution #3: Clear Chrome Browsing Data
- Open Chrome
- Press Ctrl and H to open the history
- Click on Clear Browsing Data, choosing ‘Beginning of Time’ so it deletes everything
- Make sure these are selected too:
- Advertisement
- Cached images and files
- Auto-fill form data
- Passwords
- Cookies and other site and plugin data
- Browsing history
- Download history
- Click on Clear Browsing Data
- Close Chrome when it is finished, then reboot the computer
- Open Chrome to see if the ERR_NETWORK_CHANGED error is gone
Solution #4: Change the Google DNS
- Open Control Panel
- Pick Network and Internet
- Choose Network and Sharing Center
- Click Change Adaptor Settings
- Now double click your WiFi
- Choose Properties
- Click on Internet Protocol Version 4 (TCP/IPv4)
- Click Properties
- Check Use the Following DNS Server Addresses – Type this:
Preferred DNS server: 8.8.8.8Alternate DNS server: 8.8.4.4
Close everything and reopen Chrome to see whether the error is fixed
Solution #5: Uncheck Proxy
- Press the Windows key and R
- Type the following then press Enter: inetcpl.cpl
- Select LAN Settings on the Connections tab
- Now uncheck Use a Proxy Server for the LAN
- Ensure Automatically Detect Settings is checked
- Click OK then click Apply
- Reboot your computer
Solution #6: Reinstall the Network Adapter Drivers
- Press the Windows key and R
- Type this then press Enter: devmgmt.msc
- Expand the Network Adaptors section to find your network adaptor
- Jot down the name of it (in case something goes wrong)
- Right click on the network adaptor then uninstall it
- Press OK or Yes to confirm if asked
- Restart the computer
- Try to connect to the network
- If you can’t the driver software hasn’t been installed automatically
- Navigate to the manufacturer’s website (using another PC to get online and a USB drive if necessary) to download the driver
- Install the driver then reboot the computer
Solution #7: Delete the WLAN Profiles
If nothing has worked so far, hopefully this final fix will.
- Press the Windows key and X
- Click on Command Prompt (Admin)
- Type this in then press Enter:
netsh wlan show profiles
Type this in next:
netsh wlan delete profile name=””netsh wlan delete profile name
- Repeat for every WiFi profile
- Attempt to reconnect to the WiFi
Отключение или удаление виртуальных адаптеров
Если на компьютере использовались виртуальные машины, то могли создаваться такие же соединения, использующие технологию Hyper-V. Они способны влиять на активные Интернет-соединения и могут заставить систему переключиться на виртуальный адаптер. Лучший вариант – отключить или вовсе удалить такие вещи, а после проверить работоспособность интернета.
- Зайдите в сетевые подключения через «WIN+R» – ncpa.cpl.
- Найдите в списке виртуальный адаптер и удалите его. Если он активен, то сначала отключите устройство.
- Если адаптеров несколько, то повторите процедуру с каждым из них.
После удаления перезагрузите ОС и проверьте работоспособность интернета. Если в течение часа или двух ничего не случилось, то задача успешно решена.
Причина ошибки «Похоже, вы подключились к другой сети»
Если кратко, то ошибка ERR_NETWORK_CHANGED появляется в те моменты, когда какие-либо параметры сети изменяются по сравнению с тем, которые только что использовались в браузере.
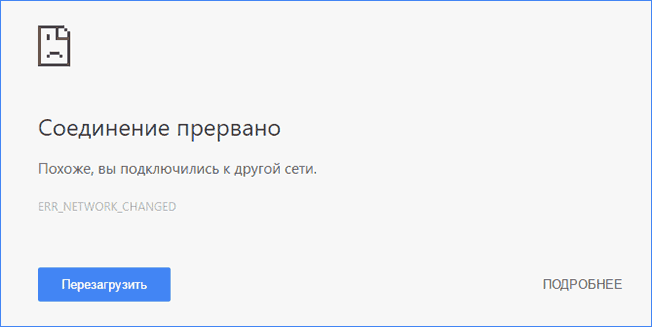
Например, столкнуться с рассматриваемым сообщением о том, что вы подключились к другой сети можно после смены каких-то параметров Интернет-подключения, после перезагрузки роутера и повторного подключения к Wi-Fi, однако в этих ситуациях она появляется однократно и затем не проявляет себя.
Добавить в заметки чтобы посмотреть позже?
Если же ошибка сохраняется или возникает регулярно, по всей видимости, смену параметров сети вызывает какой-то дополнительный нюанс, который подчас бывает трудно обнаружить начинающему пользователю.
Как устранить ошибки при скачивании
Если при попытке скачать приложение, тему, расширение или файл появляется сообщение об ошибке, ознакомьтесь с приведенными ниже инструкциями.
Как устранить большинство ошибок
Если вам не удается скачать файл, выполните следующие действия:
- Проверьте подключение к Интернету. Если оно прерывается, попробуйте исправить эту проблему.
- Скачивание будет продолжено автоматически. Чтобы возобновить скачивание вручную, нажмите на стрелку вниз Возобновитьили «Ещё» Возобновить.
- Попробуйте скачать файл позже.
- Обратитесь к владельцу сайта.
Подробнее о том, как найти скачанный файл…
Как устранить определенные виды ошибок
Не удалось подключиться к сети
Чтобы исправить ошибку:
Скачивание запрещено
Скачивание файла заблокировано настройками безопасности вашего компьютера.
Подробнее…
Пользователям Windows: файл, который вы скачали, мог быть удален Диспетчером вложений. Чтобы узнать, почему это произошло и какие файлы можно сохранять, перейдите к настройкам интернет-безопасности Windows.
Файлы отсутствуют
Эта ошибка возникает, если вы пытаетесь скачать файл, которого нет на сайте или который был перемещен в другой раздел.
Method #1: Clear Google Chrome History
When you surf hundreds of web pages, the history is gradually filled, and this can finally hurt the overall behavior of Google Chrome since some of these websites can affect the natural access to your network.
So, to fix this Chrome error, you can try to delete the Chrome history.
Note: This method will reset all your passwords, so make sure to back up that information before trying these steps.
- Open Google Chrome
- Open the Chrome History using the keyboard shortcut: Ctrl + H
-
On the left menu, click on the option Clear browsing data
- On the pop-up navigate to the Advanced tab
- Now, on Time range choose the option All Time
-
Check all the boxes below and finally click Clear data
- After this, you can restart your computer and try to surf the web on Google Chrome.
Top 5 Ways to Fix ERR_NETWORK_CHANGED Chrome Error on Windows 10
Here we’ve had top 5 solutions for you to troubleshoot the Google Chrome error «ERR_NETWORK_CHANGED» on Windows 10 and make your browser access to the Internet again.
Note: Before the fixing, make sure your network is fine and related hardware is working.
1. Change the DNS Server Addresses in Windows Network Settings
You could change the default DNS server addresses and use the Google public DNS to help release the pain caused by «A network change was detected. ERR_NETWORK_CHANGED».
Step 1. Right-click the network icon on the Windows 10 taskbar.
Step 2. Select the Open Network and Sharing Center.
Step 3. On the right side, click the Change adapter settings.
Step 4. Right-click your current network adapter for Properties.
Step 5. Highlight the Internet Protocol Version 4 (TCP/IPv4) item.
Step 6. Click the Properties button below.
Step 7. Choose the option Use the following DNS server addresses.
Step 8. Type 8.8.8.8 into the box of Preferred DNS server.
Step 9. Type 8.8.4.4 into the box of Alternate DNS server.
Step 10. Click the OK.
After that, you could restart your notebook or desktop and try the network connection in chrome again to check if the error is fixed.
2. Reset TCP/IP and DNS to Troubleshoot Chrome ERR_NETWORK_CHANGED
Faulty TCP/IP or DNS settings can result in many network issues, like «a network change was detected» error, unidentified network problem, Microsoft Edge not working, «WiFi doesn’t have a valid IP configuration» issue, etc. You could reset the TCP/IP and DNS via Command Prompt and resolve the «ERR_NETWORK_CHANGED» error in Google Chrome.
Step 1. Use Windows shortcut keys Win + X.
Step 2. Select the Command Prompt (Admin). (Note: If you’ve updated to Windows 10 Creators Update, you can go to the Start menu and find Command Prompt under the category W. Right-click it for More and select Run as administrator.)
Step 3. Type into command line ipconfig /flushdns.
Step 4. Hit the Enter.
Step 5. Type into ipconfig /renew.
Step 6. Hit the Enter key.
Step 7. Type into command netsh int ip set dns.
Step 8. Press the Enter.
Step 9. Type into netsh winsock reset.
Step 10. Hit the key Enter.
Then reboot the computer and launch the browser to see if the problem still persists.
3. Update Network Drivers to Fix ERR_NETWORK_CHANGED in Windows 10 Chrome
Outdated, incompatible, or missing network driver is one of the culprits that trigger the «Err Network Changed» error on Windows 10, as well as network issues like WiFi “No Internet, Secured” problem, Ethernet not working issue, no LAN access problem, no WiFi available, etc. In this case, you need to download and install proper network drivers for your Windows 10 desktop or laptop.
You could download the network driver updates via the button directly.
Here’s how to quickly update drivers:
Step 1. Click the Scan button and Driver Talent will automatically detect the driver that causes «ERR_NETWORK_CHANGED».
Step 2. Click the Update button after to download and install the best-matched network drivers.
Step 3. Perform a restart to make the driver changes take effect on Windows 10.
Note: It’s better to backup all the drivers before any system changes in case other PC problems happen.
4. Solve ERR_NETWORK_CHANGED Problem via Internet Options
You could also fix the network problem in the Internet Options:
Step 2. Change the View to Small icons.
Step 3. Select the Internet Options.
Step 4. Select the Connections tab.
Step 5. Click the Lan Settings button.
Step 6. Uncheck the Automatically Detect Settings.
Step 7. Click the OK.
5. Turn off/on the Router or Modem
Router not working problem can also result in «a network change was detected» error in Chrome. You could turn off the router and turn it on again after several minutes to fix the problem. Then launch the Chrome browser again to see if the error «ERR_NETWORK_CHANGED» has been fixed.
That’s it. Hope this post could help you make your Google Chrome work on Windows 10 again. If you still fail to fix the «ERR_NETWORK_CHANGED» in Chrome, you can comment below for more help. If you have any other Windows 10-related issues, you can check for the solutions in Windows 10 section on this site.
Recommended Download
| ExplorerMax | Driver Talent for Network Card | |||
| Smart and advanced file explorer tool for Windows platforms | Download & Install Network Drivers without Internet Connection | |||
| 30-day Free Trial | Free Download |
Please enable JavaScript to view the comments powered by Disqus.
Изменение списка автозагрузки
Просмотрите список автоматической загрузки программ и убедитесь, что нет ничего лишнего.
- В Windows 10 нужно нажать по клавишам «CTRL + SHIFT + ESC», перейти в «Автозагрузку» и правым щелчком мыши отключить все лишнее.
- В Windows 7 список редактируется через «WIN + R» — «msconfig» — «Автозагрузка». После снятия галочке с приложений нажмите «Ок» и перезагрузитесь.
Таким образом отключится автозапуск самих программ, но у них могут быть и запущенные службы, которые также нужно отключить. Поэтому, программы лучше всего удалять и делать это с использованием деинсталляторов «Your / Revo uninstaller» или той же «Ccleaner».
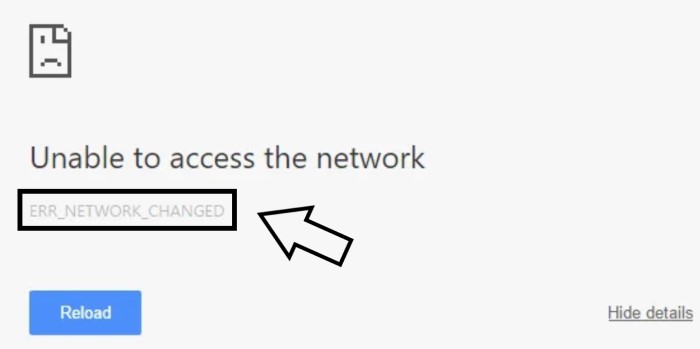
What Causes ‘ERR_NETWORK_CHANGED’ Error?
There are various reasons for this error to happen, which is why you might need to try several possible solutions to find the one that works.
In the event of this error, you will see one of the following error messages on your screen:
Your connection was interruptedA network changed was detectedCheck your internet connection
or
Unable to access the networkERR_NETWORK_CHANGED
Just about any website can be affected by this annoying error, even the big ones like Google, YouTube or Facebook.
Until you fix whatever is causing this issue, you won’t be able to view any webpages. This error is similar to ERR_CACHE_MISS and ERR_EMPTY_RESPONSE chrome errors.
There are various solutions to try, but before trying any of them uninstall any VPNs you are using, and also create a restore point in case anything does go wrong.
Introduction
Accurately measuring performance characteristics of web applications is an important aspect in helping site developers understand how to improve their web applications. The worst case scenario is the failure to load the application, or a particular resource, due to a network error, and to address such failures the developer requires assistance from the user agent to identify when, where, and why such failures are occurring.
Today, application developers do not have real-time web application availability data from their end users. For example, if the user fails to load the page due to a network error, such as a failed DNS lookup, a connection timeout, a reset connection, or other reasons, the site developer is unable to detect and address this issue. Note that these kinds of network errors cannot be detected purely server-side, since by definition the client might not have been able to successfully establish a connection with the server.
Existing methods (such as synthetic monitoring) provide a partial solution by placing monitoring nodes in predetermined geographic locations, but require additional infrastructure investments, and cannot provide truly global and near real-time availability data for real end users.
Network Error Logging (NEL) addresses this need by defining a mechanism enabling web applications to declare a reporting policy that can be used by the user agent to report network errors for a given origin. A web application opts into using NEL by supplying a HTTP response header field that describes the desired . This policy instructs the user agent to log information about requests to that origin, and to attempt to deliver that information to a group of endpoints previously configured using the Reporting API []. As the name implies, NEL reports are primarily used to describe errors. However, in order to determine rates of errors across different client populations, we must also know how many successful requests are occurring; these successful requests can also be reported via the NEL mechanism.
For example, if the user agent fails to fetch a resource from due to an aborted TCP connection, the user agent would queue the following report via the Reporting API:
- type
- endpoint group
- the endpoint group configured by the field
- settings
- TODO
- data
-
{
  "referrer": "https://referrer.com/",
  "sampling_fraction": 1.0,
  "server_ip": "123.122.121.120",
  "protocol": "http/1.1",
  "elapsed_time": 321,
  "type": "tcp.aborted"
}
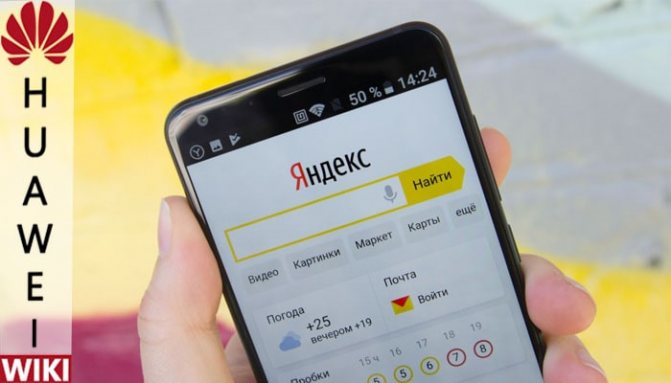
Почему не работает мобильный интернет на Huawei/Honor и как исправить?
Не представляете жизнь без доступа к Интернету? Чтобы найти решение, нужно разобраться в причинах сбоя и понять почему не работает интернет на телефоне Хуавей?
Основных причин поломок насчитывают 6:
- плохо ловит саму сеть. Возможно находитесь вне зоны покрытия 3G или 4G. Решить эту проблему можно простым способом. Проверьте значок сети в верхнем левом углу экрана. Там находятся 4 палочки сети. Для хорошей работы должно быть минимум 3 полоски;
- сбой подключения к интернету Возможен сбой в работе самого смартфона. Перезагрузите мобильник. Отключите и включите устройство заново. Пробуйте зайти в сеть;
- минусовой баланс на номере. При недостаточном количестве средств подключения не будет осуществлено. Проверьте деньги на счету. Пока деньги не поступят на счёт, воспользоваться Internet не выйдет;
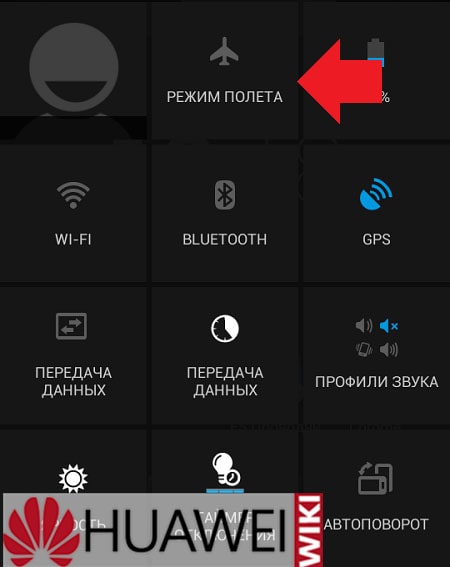
- включен режим полета. Это состояние телефона, в котором звонки не поступают. Его включают при полетах на самолете. Проверьте, возможно после рейса забыли выключить его и возникли проблемы;
- наиболее банальная. Возможно, забыли включить передачу данных. Без нажатия этой клавиши онлайн работу выполнять не получится;
- некорректные настройки точки доступа. Заново подключите модем и роутер. Свяжитесь с провайдером и объясните причину сбоя.
Плохо ловит
К сожалению, покрытия мобильной сети на разных участках отличается. Особенно плохое подключение загородом или в небольших сёлах и пригородах. Если плохо ловит сеть пользоваться мировой паутиной в полной мере не выйдет. Попробуйте перезагрузить устройство. Пройдитесь по территории и найдите более удачное покрытие. В верхнем левом углу следите за количеством «полосок».
Сбой подключения к интернету
Сбой в работе интернета возникает из-за сбоя параметров. Чтобы заново осуществить подключение, зайдите в «Настройки» и выберете пункт «Беспроводные сети». Далее нажимаете «Мобильная сеть». Заходим в браузер и проверяем включение.
Недостаток средств на счету
Если стабильно используйте интернет — приобретите тариф с безлимитным количеством мегабайт. Платите по факту раз в месяц, используйте в неограниченном количестве. В таком случае, недостаток средств на свету перестанет быть проблемой.
Включен режим полета
При полетах на самолете запрещается получать и осуществлять звонки. Для того, чтобы избежать подобной ситуации, рекомендуют включать специальный режим. При включении любые звонки будут блокироваться. Звонящий абонент получит уведомлении о выключенном телефоне. Однако, в таком состоянии 3G или 4G недоступен. После полета рекомендуется сразу выключать.
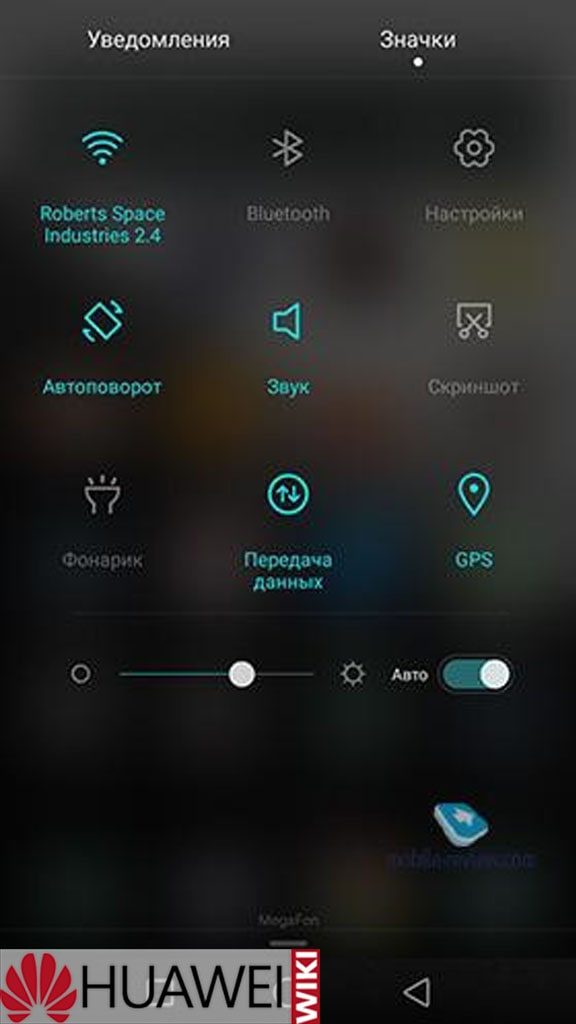
Отключена передача данных
Кнопка «Передача данных» находится в быстром меню. Привести ее в действие легко. Проведите по экрану сверху вниз и найдите значок. Если иконка не выделена значит доступа к сети нет.
Некорректные настройки точки доступа
Точку доступа возможно включить с помощью сотового оператора. Если проблема в этом позвоните по номеру оператора или посетите сервисный центр. Подробно объясните сбой, и попросите помощи. Независимо от Honor или Huawei порядок действий одинаковый. Менеджер предоставит данные для настройки.
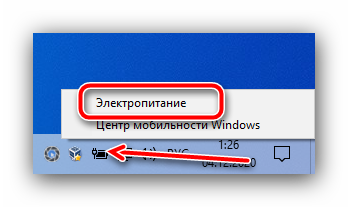
Способ 9: Настройка питания адаптера беспроводной сети (ноутбуки и планшеты)
Последняя причина, по которой может возникать обрыв соединения в процессе загрузки страницы – проблемы с питанием адаптера беспроводных сетей. Устранить их можно следующим образом:
- Откройте настройки электропитания — найдите в системном трее значок батареи, кликните по нему ПКМ и выберите пункт «Электропитание».
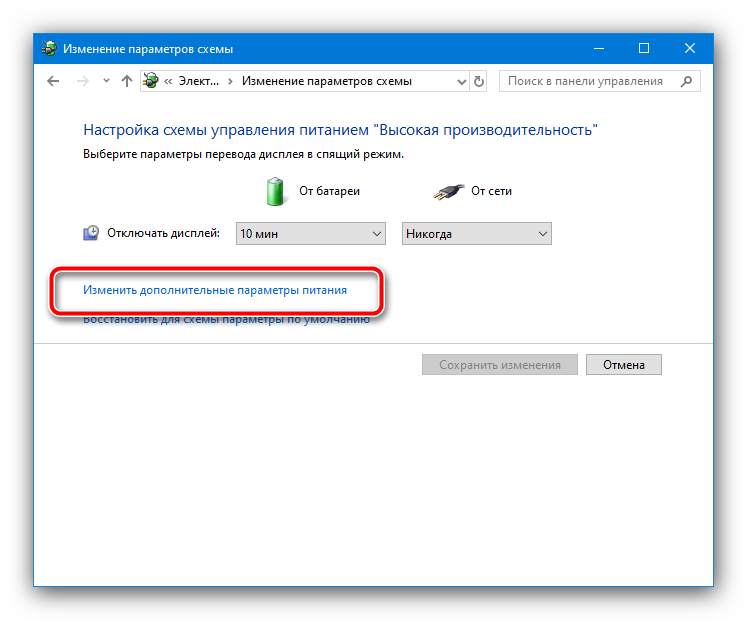
Нажмите на ссылку «Настройка схемы электропитания»,
далее кликните «Изменить дополнительные параметры электропитания».
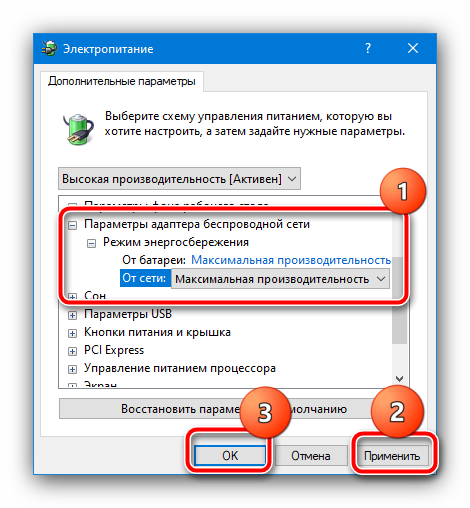
В перечне комплектующих найдите пункт «Параметры адаптера беспроводной сети», раскройте его и подпункт «Режим энергосбережения», где установите значение «Максимальная производительность» для обоих вариантов. Нажмите на кнопки «Применить» и «ОК» для подтверждения.
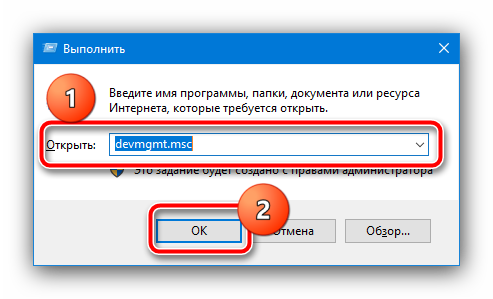
Также стоит отключить аналогичный параметр в «Диспетчере устройств». Вызовите средство «Выполнить» введите в нем и нажмите Enter.
Раскройте категорию «Сетевые адаптеры», найдите внутри используемое устройство, кликните по нему ПКМ и выберите пункт «Свойства».
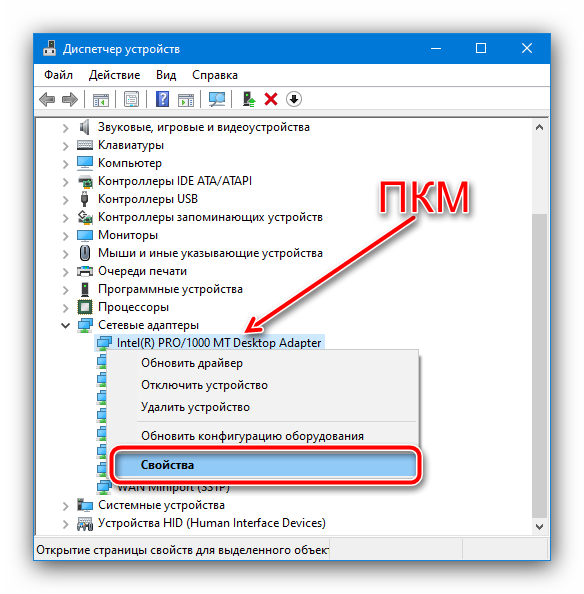
В открывшемся окне перейдите на вкладку «Управление электропитанием», уберите отметку с пункта «Разрешить отключение этого устройства…» и нажмите «ОК».
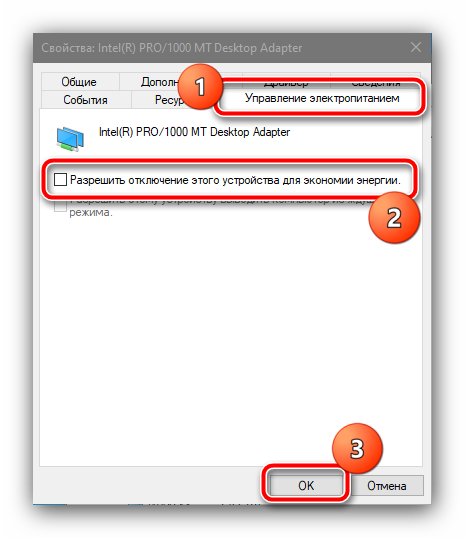
После применения этих параметров проблема должна быть устранена.
Опишите, что у вас не получилось.
Наши специалисты постараются ответить максимально быстро.
err_network_changed chrome
- First of all, we recommend temporarily disable security software (antivirus) if installed
- Also, remove VPN if configured on your system.
- Restart your router, modem include your PC, this would fix the problem if any temporary glitch causing the issue.
- Again check on different PC or connect your Phone through wifi network to make sure you have a working internet connection. err_network_changed chrome error effected on your PC only.
Clear browsing data in Chrome
- Open Google Chrome browser
- At the top right, click More.
- Click More tools then Clear browsing data.
- At the top, choose a time range. To delete everything, select All time.
- Next to “Cookies and other site data” and “Cached images and files,” check the boxes.
- Click Clear data.
- Now reload the web page check this helps.
Flush DNS cache
This is another solution that most probably fixes temporary internet glitches.
Simple press windows + R, type ipconfig /flush dns and click ok
Restart windows after executing the command can check there is no more err_network_changed chrome error.
Uncheck Proxy
- Press Windows Key + R type “inetcpl.cpl” and hit enter to open Internet Properties.
- Go to Connections tab and select LAN settings.
- Uncheck Use a Proxy Server for your LAN and make sure “Automatically detect settings” is checked.
- Click Ok then Apply and reboot your PC.
Reset TCP/IP protocol
This is another workaround to solve Internet accessing issue on Chrome browser. Here is the procedure-
Type cmd on start menu search, Right click on command prompt select run as administrator. Now perform command below one by one and press enter key each.
netsh winsock resetnetsh int ip reset c:\resetlog.txtipconfig /releaseipconfig /flushdnsipconfig /renew
Restart windows after executing these commands and check there is no more ERR_NETWORK_CHANGED error.
Use Google’s Public DNS
Problem with DNS (Domain Name Server) might also create such trouble. Therefore, reset Google’s Public DNS by following below steps-
- Right click on Start icon then choose Network Connections from the list of options.
- Henceforth on right pane, click Change adapter option.
- Thereafter locate current connection, once found, make a right click and select Properties on the context menu.
- locate Internet Protocol Version 4 (TCP/IPv4) then hit Properties.
- On succeeding page, mark Use the following DNS server addresses radio button subsequently fill the following data at its respective address (See Snapshot).
Preferred DNS server: 8.8.8.8 Alternate DNS server: 8.8.4.4
- Checkmark on validate settings upon exit,
- Once you have performed above steps, Reboot your system and check if the issue ERR_NETWORK_CHANGED has solved or not on chrome browser.
Update Network adapter
An outdated device driver can also cause several problems. Keeping them updated ensures that you have the latest fix for any bugs and errors.
- Press Windows + x, select Device Manager.
- Expand Network Adapter drivers,
- Right, click the installed network driver and Select Update driver software
- Click on Search automatically for updated driver software to let windows check and install updated driver software for you.
- After installing the updated driver, select the Start button > Power > Restart.
- Again open web browser and check the problem resolved.
Reinstall Google Chrome
In case, certain files don’t install while installing the Chrome browser, this may cause ERR_NETWORK_CHANGED issue. It is therefore recommended to uninstall then fresh install the application software. Here are the steps to follow-
- press Window key & I to launch Settings.
- Once the page opens up, tap Apps followed by Apps & Features on the left pane.
- Switch to the right hand side and select Google Chrome.
- Now hit Uninstall button to remove this app from your system.
- Once this task is finished, Reboot your system to remove its remaining files.
- Now visit chrome official site, and download and install the software from there.
Did these solutions help to fix net::err_network_changed chrome error windows 10? Let us know on comments below, also read:
- How to fix mouse clicks not recognized on Windows 10
- Solved: Ethernet Doesn’t Have A Valid IP Configuration Windows 10
- Solved: print jobs stay in queue after printing windows 10
- Laptop won’t boot after update? Here how to fix windows 10 startup problems
- How To fix WiFi disconnects automatically windows 10
Method #7: Reinstall Network Adapter Driver
Some network driver failures are associated with configuration failures or not applied updates, so maybe reinstall your network adapter driver can solve the error.
To reinstall your network adapter drivers on Windows follow these steps:
- Open the Run window using the keyboard shortcut: Win + R
- There copy and paste the following command: and press Enter
- Once in the Device Manager, open the section Network Adapter
-
There right-click on your default adapter and in the menu select the option Uninstall device
- The following message will be displayed. Click on Uninstall again to complete the action.
- Now restart Windows and your network adapter will be uninstalled.
If Windows fails to install the driver, download the latest driver from the manufacturer’s website of your network adapter.
If you aren’t sure what’s your manufacturer website, you can update the driver efficiently using Driver Easy
Driver Easy will automatically recognize your system and find the drivers for it. So you don’t need to risk downloading and installing the wrong driver, and you don’t have to worry about making an error when installing.
You can update the drivers automatically, either with the Free or Pro version of the Driver Easy.
- and install the Driver Easy
- Run Driver Easy and click on the Scan Now button. Easy Driver will scan your computer and detect any outdated drivers.
- Click on the Update button located next to your adapter network driver to download and install the correct version of this driver automatically.
- You can also click on Update all to download and automatically install the correct version of all the missing or outdated drivers in your computer.
Note: Driver Easy requires an internet connection to update the drivers. If you can’t access the Internet on all of your Windows, let the Offline Scan feature help you.
Method #8: Update Google Chrome
Some updates of Google Chrome are designed to optimize the use and experience of the browser and therefore integrate general improvements, so it is ideal always to be checking if you have updates available.
To check the updates on Google Chrome, follow these steps:
- Open Google Chrome
-
Click on the three dots menu and click on the option Help and then on About Google Chrome
- There you only need to wait, and if there is any update, it will be automatically applied to Google Chrome.
Method #9: Reinstall Google Chrome
This is the last method that you can try, and although it is a hard one, this can be your ultimate resource to fix the error.
- To Uninstall Google Chrome, follow these steps:
- Press the keys Win + R to open the Run window
- Type the command:
-
Click on OK to open Programs and Features
- There, search for Google Chrome and click on Uninstall
- Run the installer and automatically will install Google Chrome
Wrapping Up: ERR_NETWORK_CHANGED
Must read: How to fix ERR_NAME_RESOLUTION_FAILED on Google Chrome
I hope this tutorial helps you to solve the problem, if you have any question or problem, leave me a comment below and will try to answer you the soonest I can. Thanks for reading.
Убираем лишнее из автозагрузки и чистим комп от лишнего
Вспомните, не устанавливали ли вы ранее какие-то программы, которые в теории могут мешать работе адаптеру. В первую очередь давайте зайдем в автозагрузку:
Windows 7: нажимаем «Win+R» и вводим «msconfig».
Windows 10: нажимаем правой кнопкой по «Пуску» и выбираем «Диспетчер задач».
Далее на вкладке «Автозагрузка» отключите все программы кроме антивирусника и звуковой карты (по умолчанию это Realtek). Далее нажимаем «Применить» и перезагружаем комп.
Также я советую вам зайти в раздел «Программы и компоненты» и удалить все лишние и ненужные программы с компа. Также проверьте систему антивирусником со свежими базами. В качестве последнего варианта, можно попробовать обновить драйвер на сетевое устройство:
- Сетевой адаптер
- Wi-Fi модуль
Заключение
С данной проблемой могут столкнуться вледельцы не только ПК и лаптопов, но и владельцы Андроид девайсов. В большинстве случаев проблема решается перезагрузкой сети, браузера или устройства, но бывают и более сложные случаи, связанные с Wi-Fi роутером. Если описанные действия вам не помогли, то остается только обратиться в сервисный центр, дабы установить причину происходящего. Это бывает лишь в единичных случаях.
Теперь вы знаете, что делать в случае возникновения сбоя «Соединение прервано. Похоже вы подключились к другой сети». Надеемся, что советы будут полезными и помогут решить проблему. Любые вопросы — смело в комментарии.